How to setup IPTV in 15 minutes. This guide walks you through every step on Fire Stick, Android TV, iPhone, Smart TV, Windows, and Mac, with screenshots so you don’t get stuck anywhere.
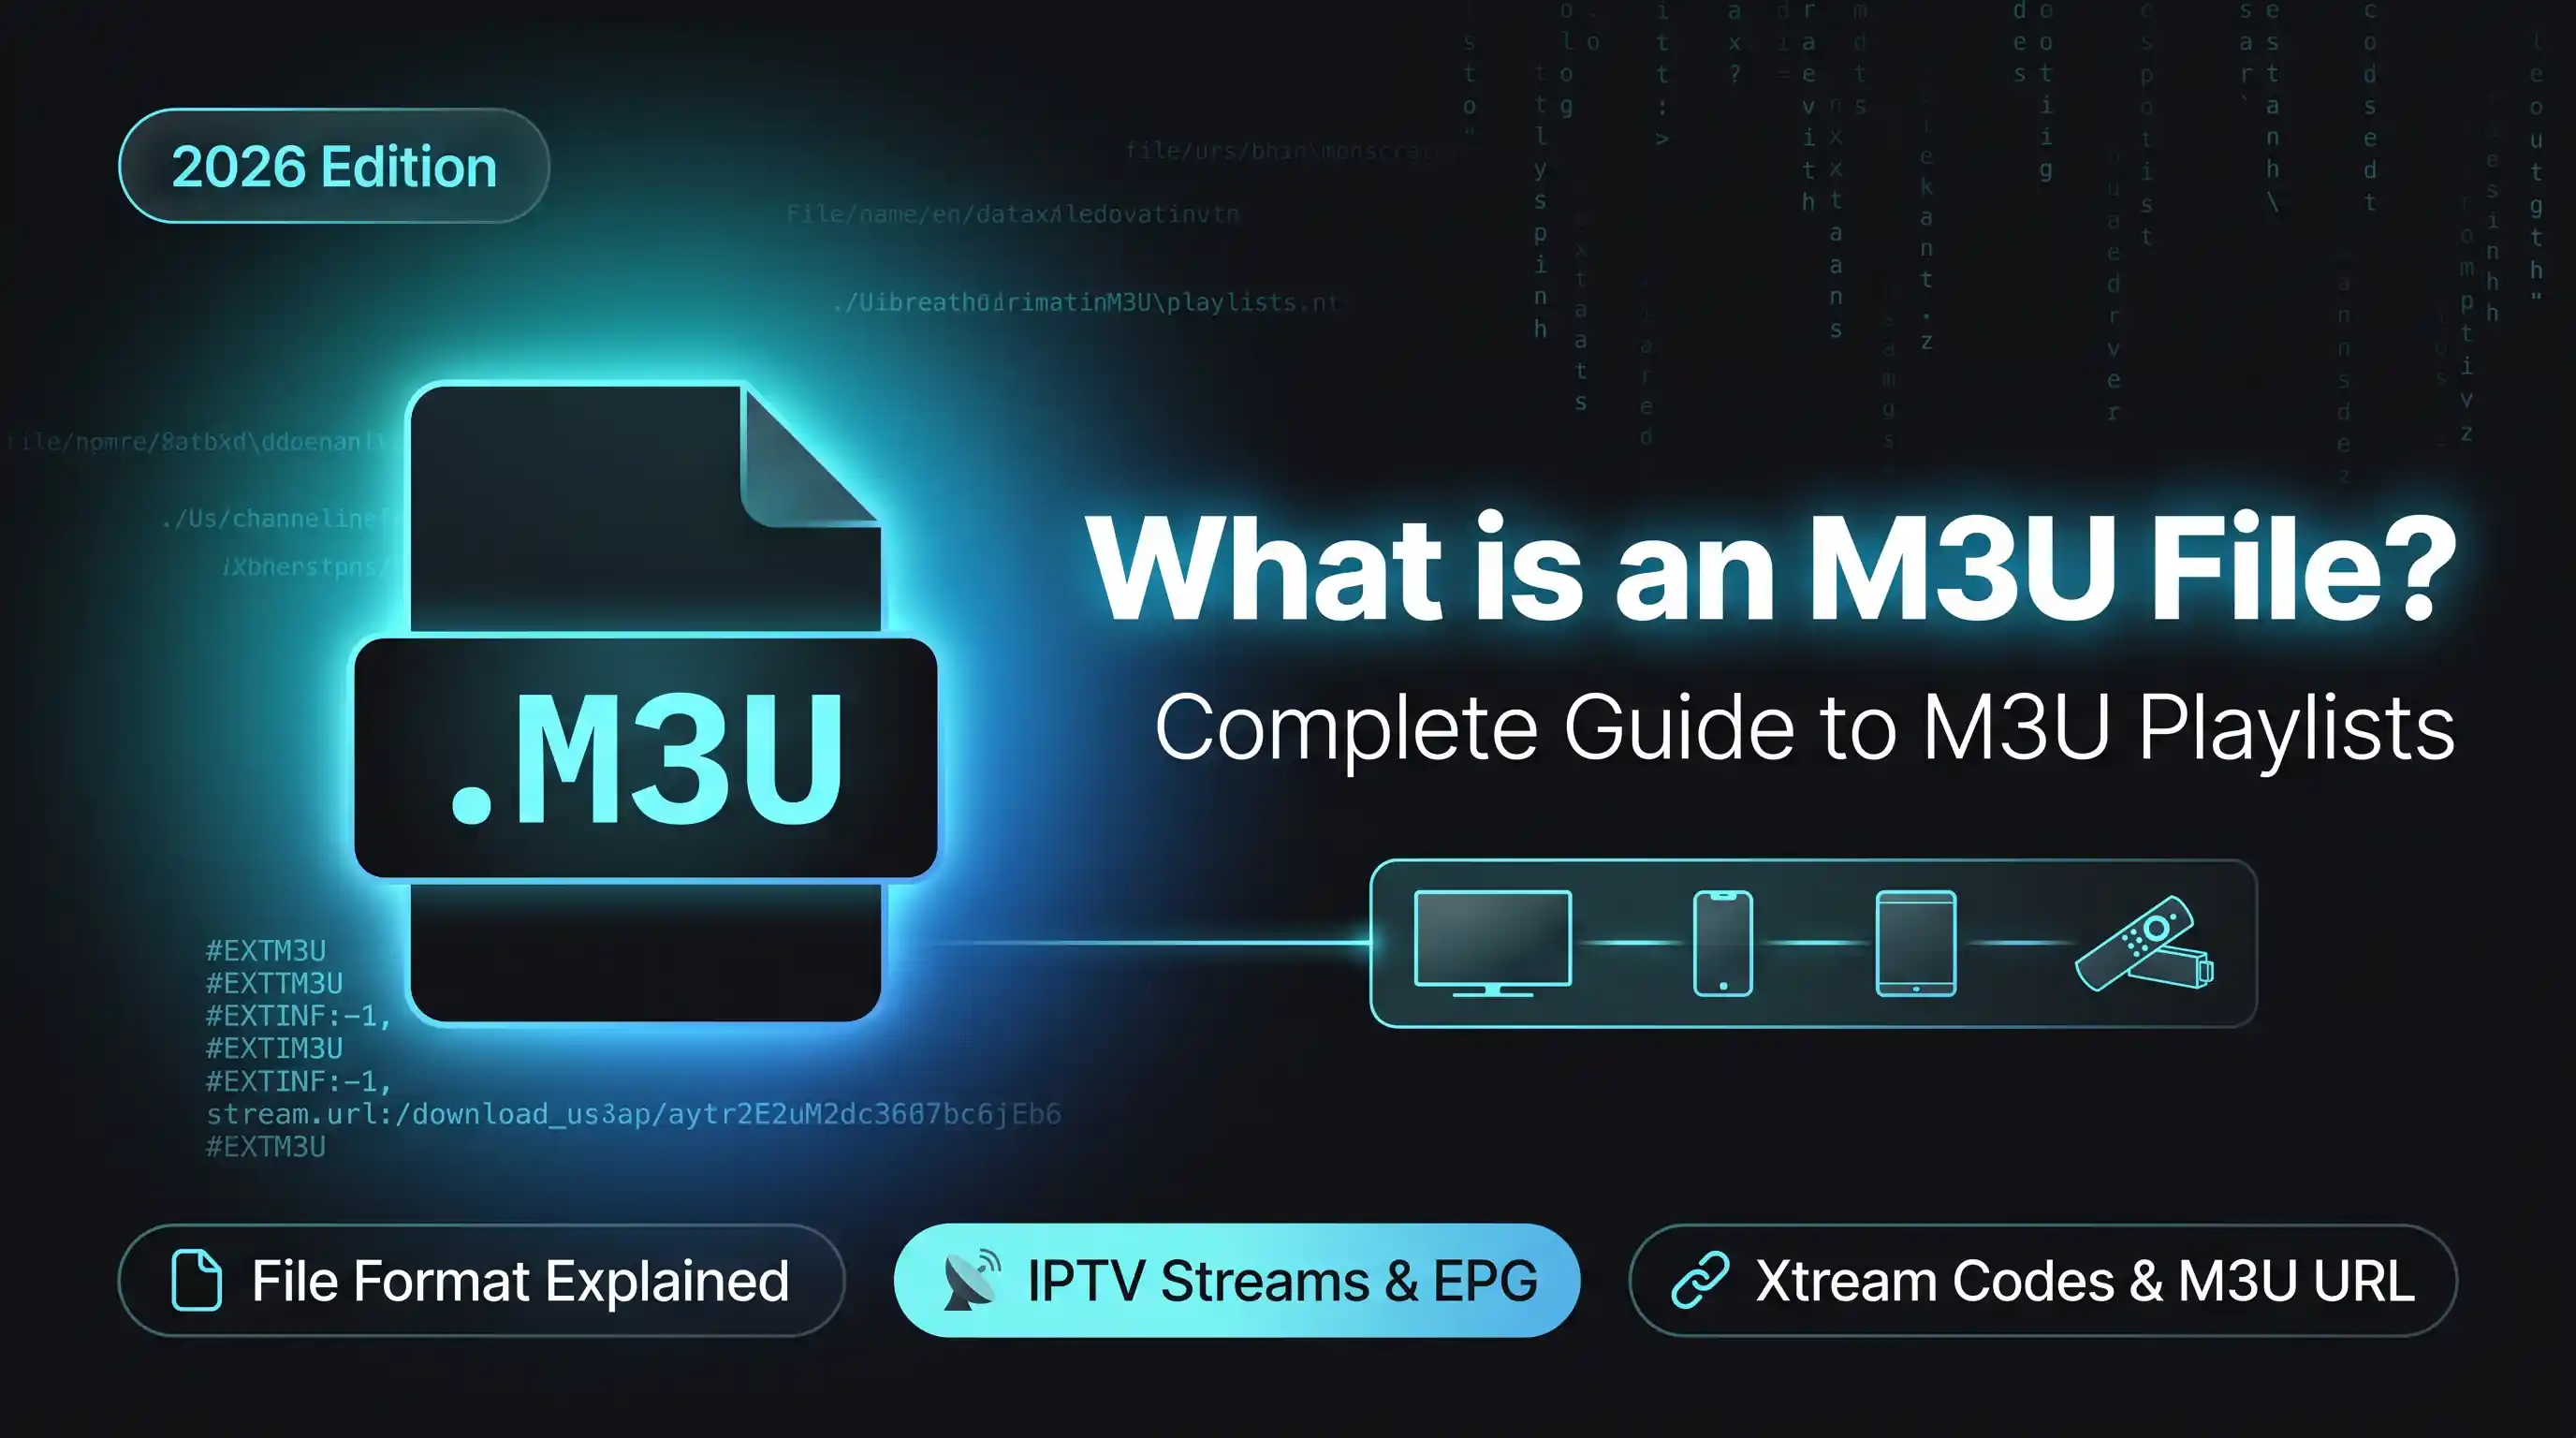
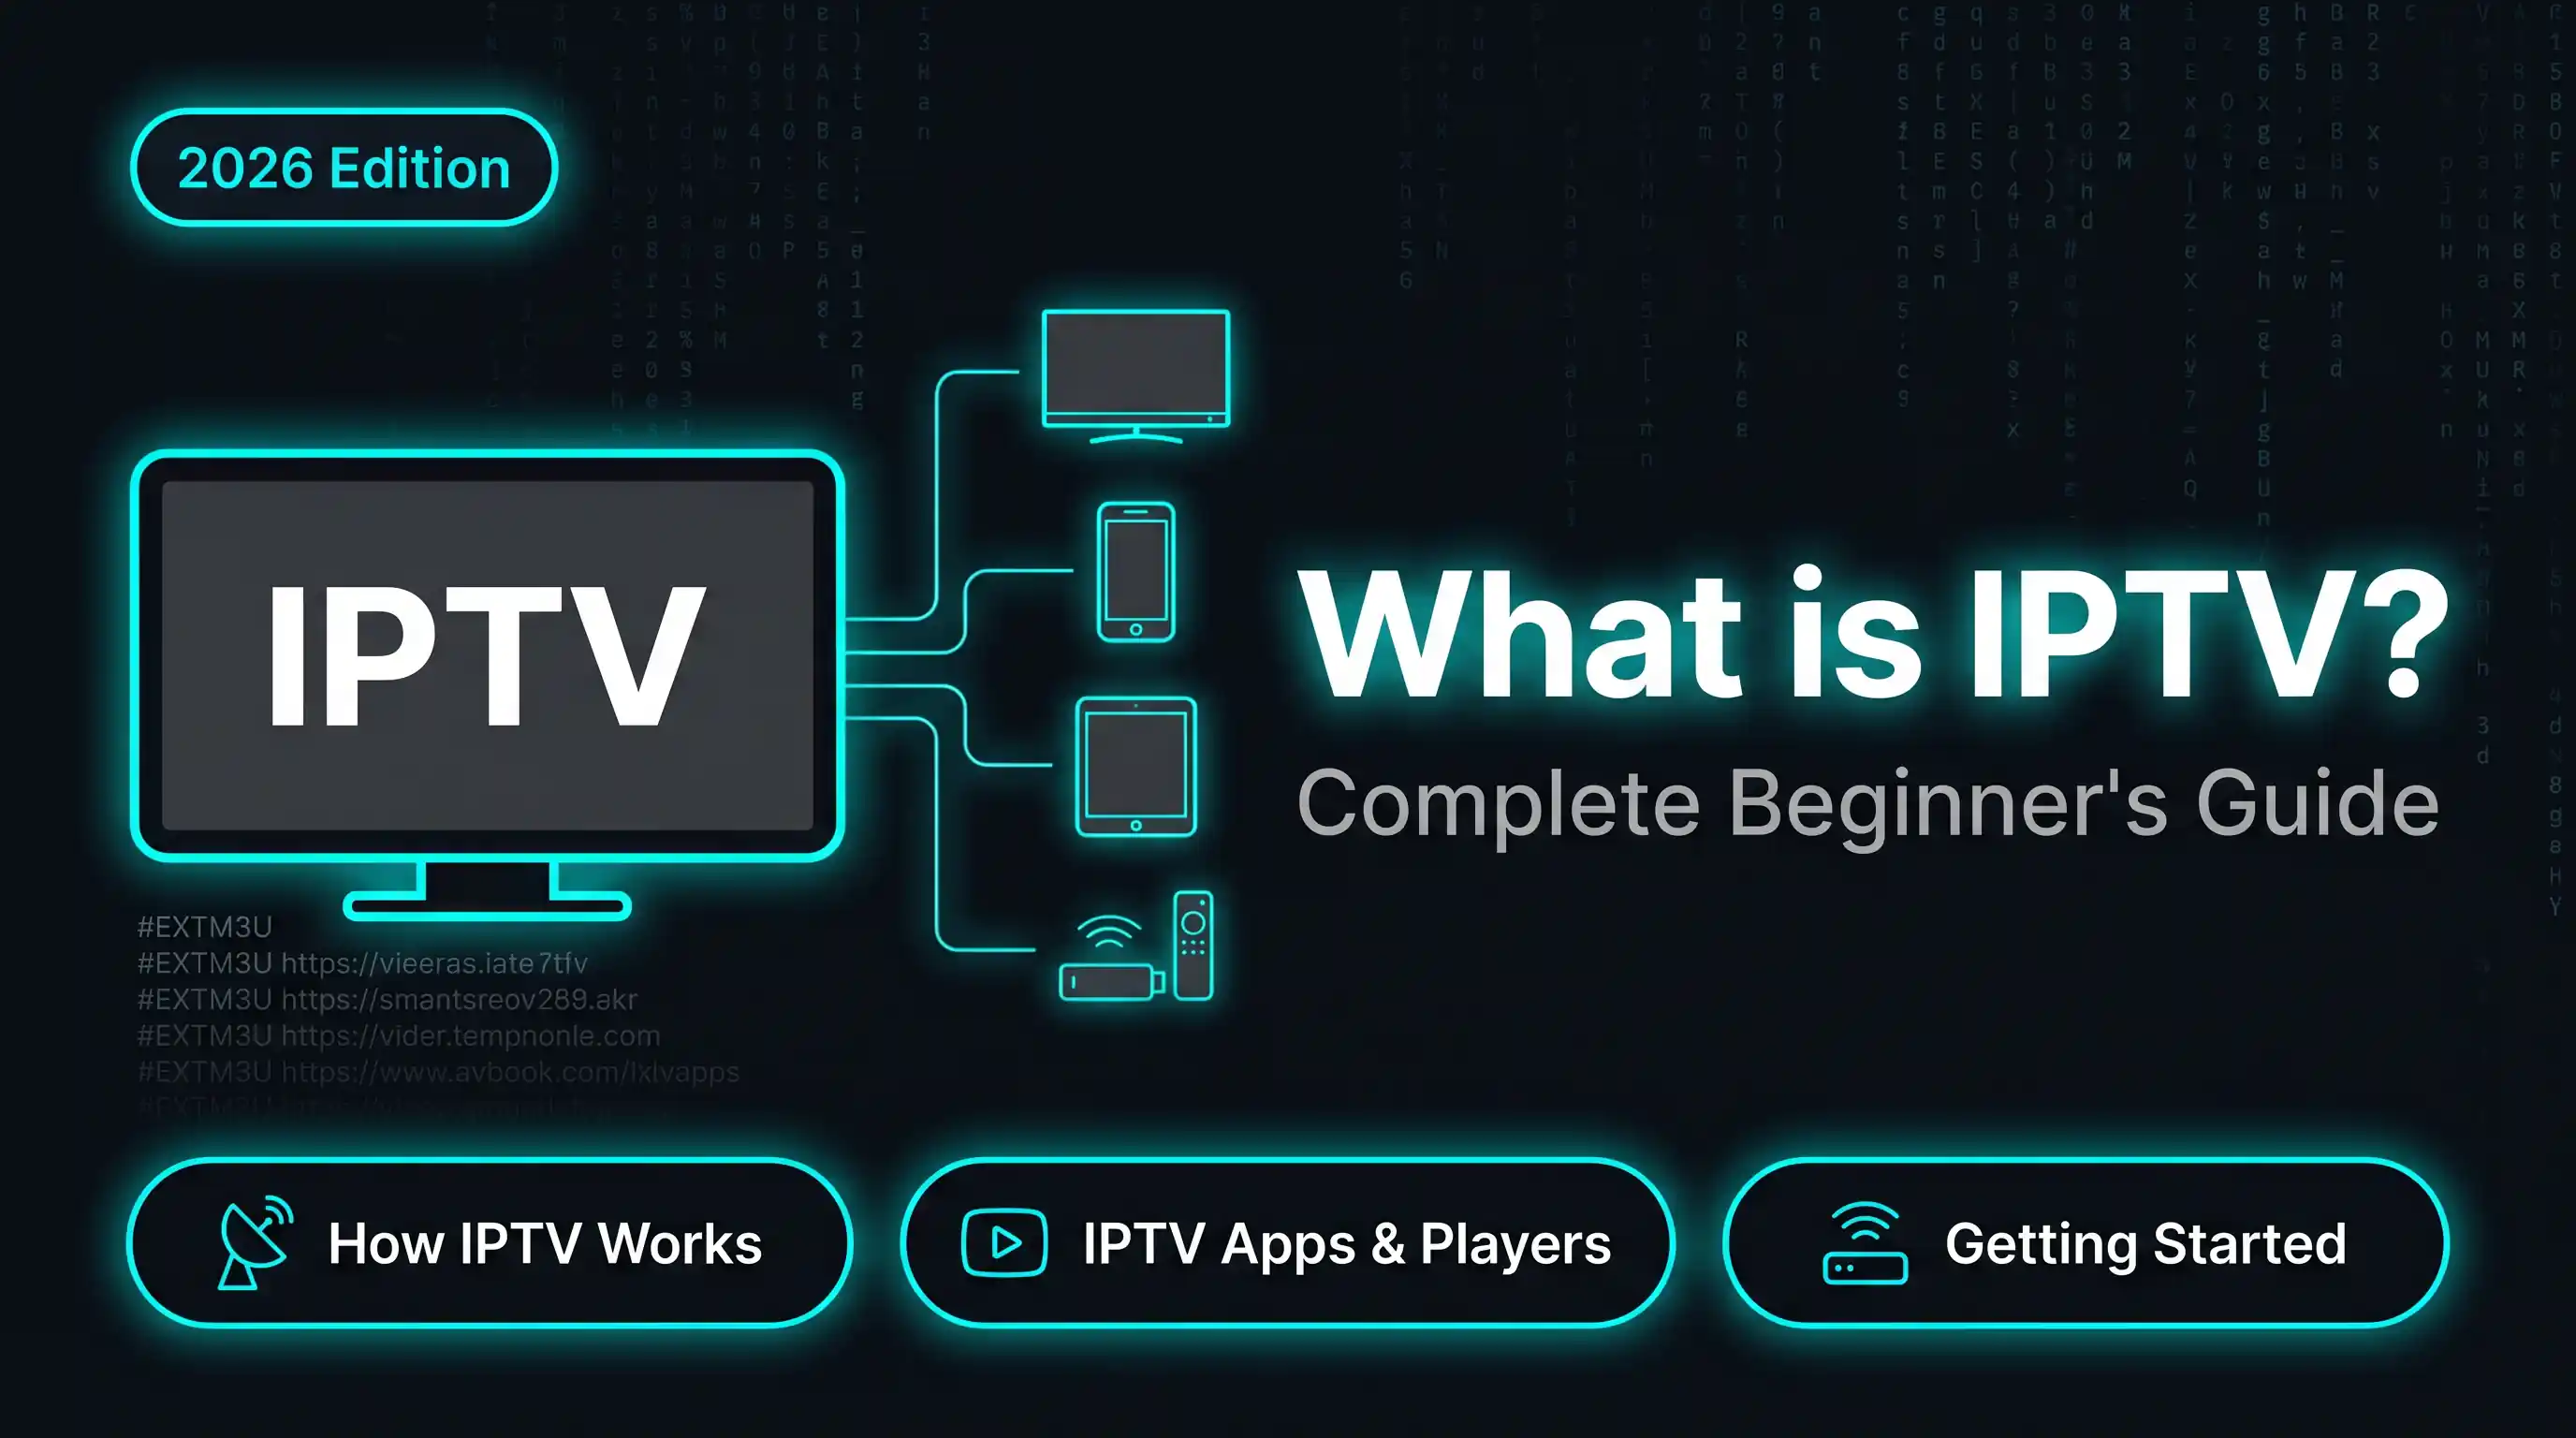
What is IPTV? It is Internet Protocol Television: live channels and on-demand content streamed over your internet connection instead of cable or satellite. You watch through an app like TiviMate or IPTV Smarters, and you connect using either Xtream Codes (server URL + username + password) or an M3U playlist URL from your provider.
How to get IPTV: Sign up with an IPTV provider, get your credentials, then jump to the section below for your device. No technical experience needed.
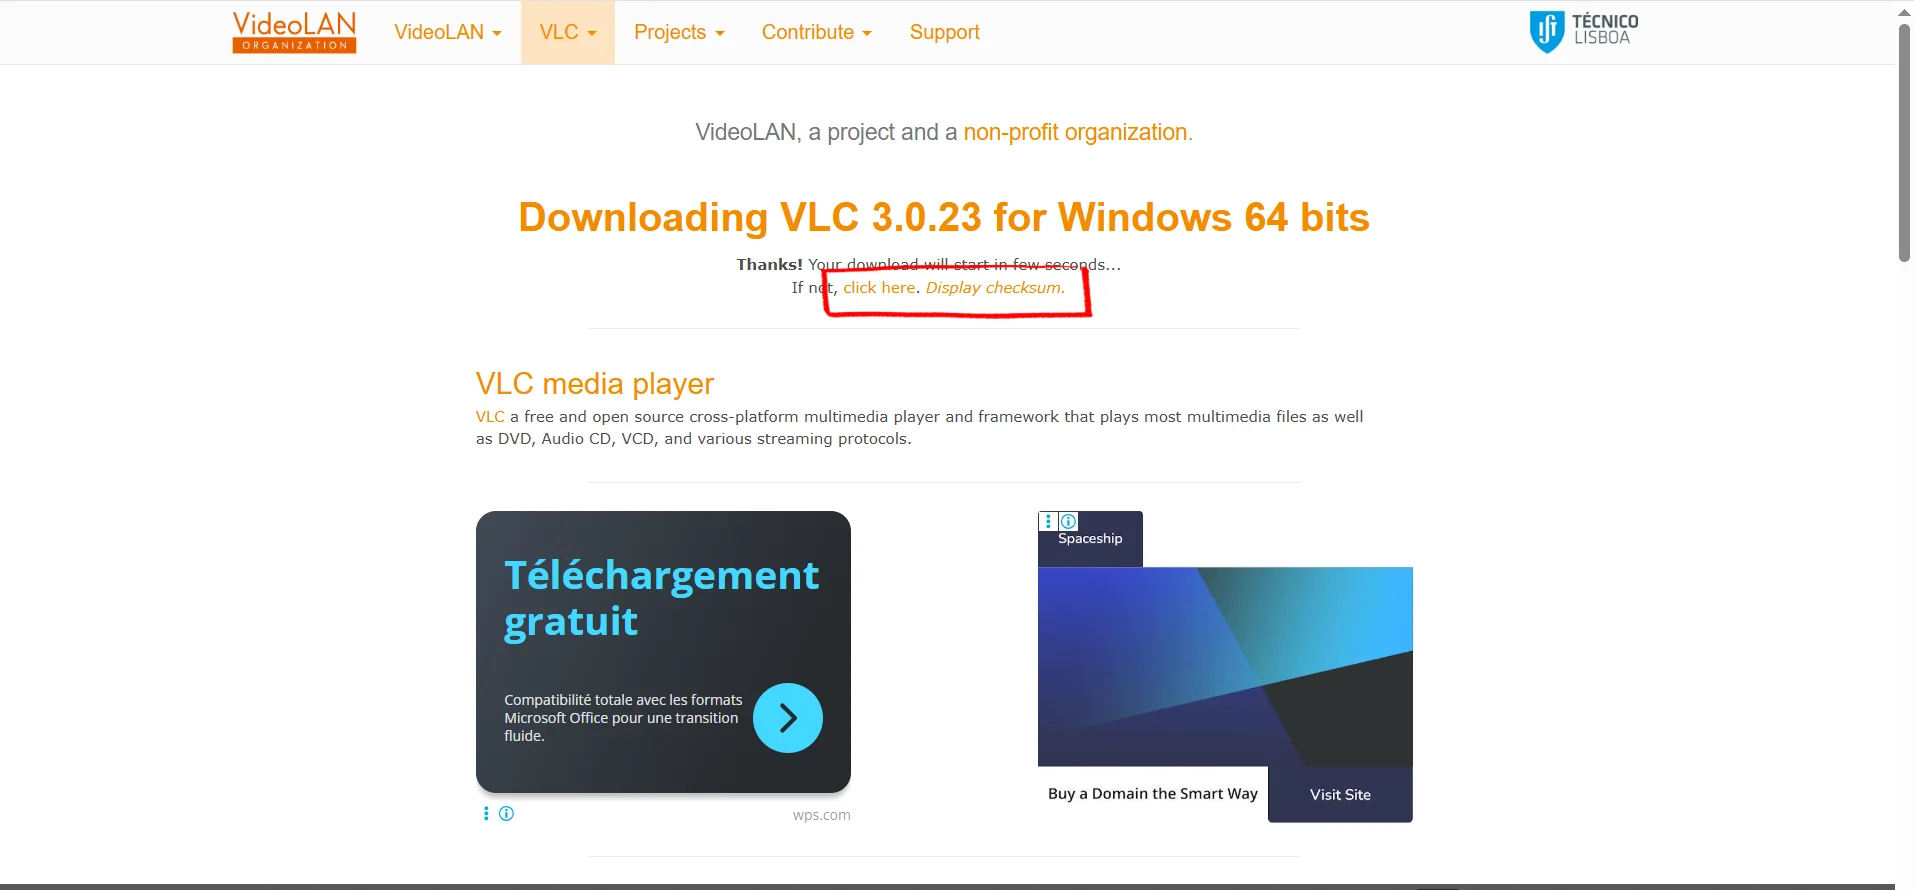
Before you start, verify your credentials →. Ten seconds. Saves you from the most common setup errors.
What you need:
- An active IPTV subscription (Xtream Codes or M3U URL)
- Your streaming device
- 15 minutes
Best device for IPTV: the Amazon Fire Stick is the popular pick — cheap, easy to set up, runs TiviMate well. Want more power for 4K or huge playlists? An Android TV Box like the Nvidia Shield or Mi Box handles them better. On a Smart TV, IPTV Smarters Pro installs straight from the App Store.
Choose Your Device — Jump to Your IPTV Setup Guide
Click your device to jump directly to its setup guide:
Amazon Fire Stick
Fire Stick, Fire TV Cube
⏱️ ~13 minAndroid TV Box
Nvidia Shield, Mi Box, Google TV
⏱️ 5-8 minAndroid Mobile
Android phones and tablets
⏱️ 4-6 miniPhone & iPad
iPhone, iPad, Apple TV
⏱️ 5-7 minWindows & Mac
Desktop and laptop computers
⏱️ 6-10 minSmart TV
Samsung, LG, Sony, Hisense
⏱️ 8-12 minHow to Setup IPTV on Amazon Fire Stick with TiviMate
▼
IPTV setup on Fire Stick uses TiviMate — the best IPTV player for Fire TV. It supports Xtream Codes API and M3U playlists with full EPG. The process is split into 3 parts and takes about 13 minutes total.
| Step | Action | Time |
|---|---|---|
| 1 | Install Downloader | 2 min |
| 2 | Enable Developer Options | 5 min |
| 3 | Install TiviMate + Add Playlist | 6 min |
Part 1: How to Install Downloader on Fire Stick
The Downloader app is a free browser/file manager that lets you install apps outside the Amazon App Store. You need it to install TiviMate.
From the Fire TV home screen, navigate to My Apps then click the Search icon in the top right.
Type "Downloader" in the search field. The app by AFTVnews will appear at the top of the results.
Select the Downloader app from the search results. You will see the app detail page with a Download button.

Press Download and wait for the installation to complete. The app is free and takes about 30 seconds to install.
Downloader is installed on your Fire Stick. Do NOT open it yet — complete Part 2 first to enable app installation from unknown sources.
Part 2: How to Enable Developer Options on Fire Stick
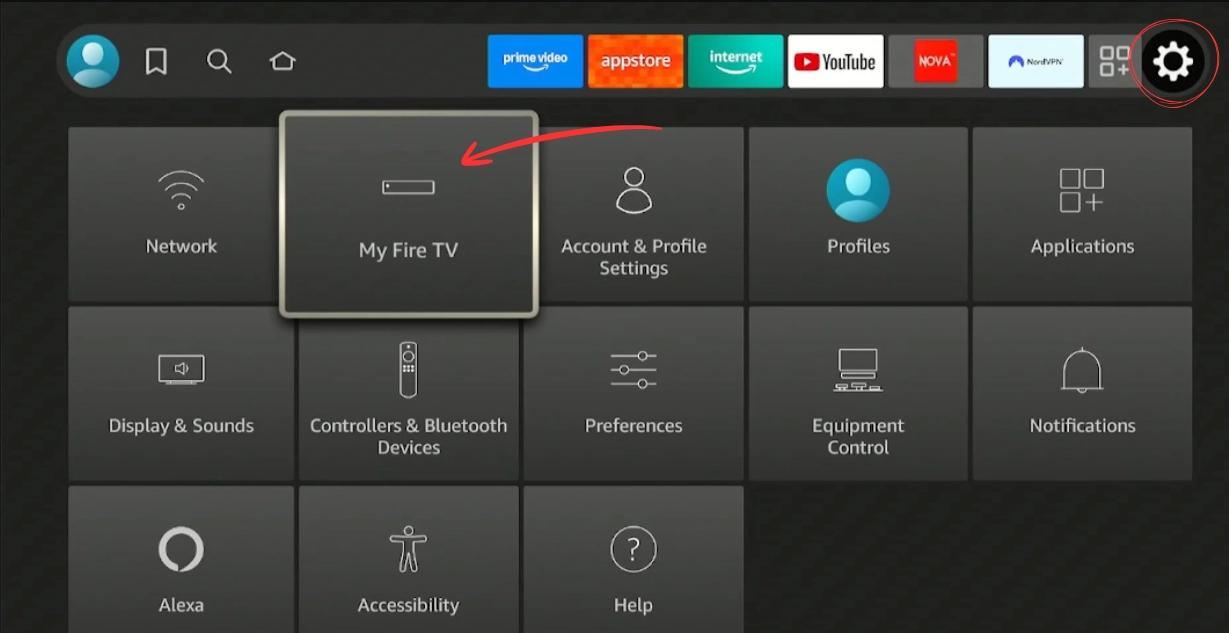
From the Fire Stick home screen, go to Settings (gear icon in the top menu). Scroll right and select My Fire TV.
Inside My Fire TV, scroll down and select About. This is where the hidden developer unlock is located.
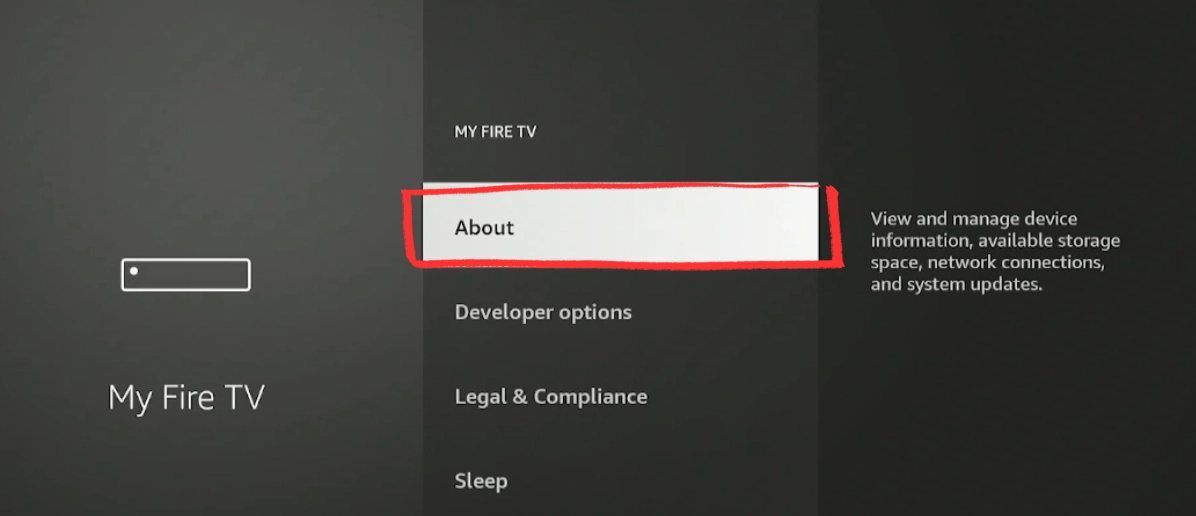
The About screen shows your Fire Stick model, serial number, and software version. You will use this screen to unlock Developer Options.
Select Fire TV Stick (your device name) and click it rapidly 7 times in a row. A counter will appear on screen showing how many clicks remain.
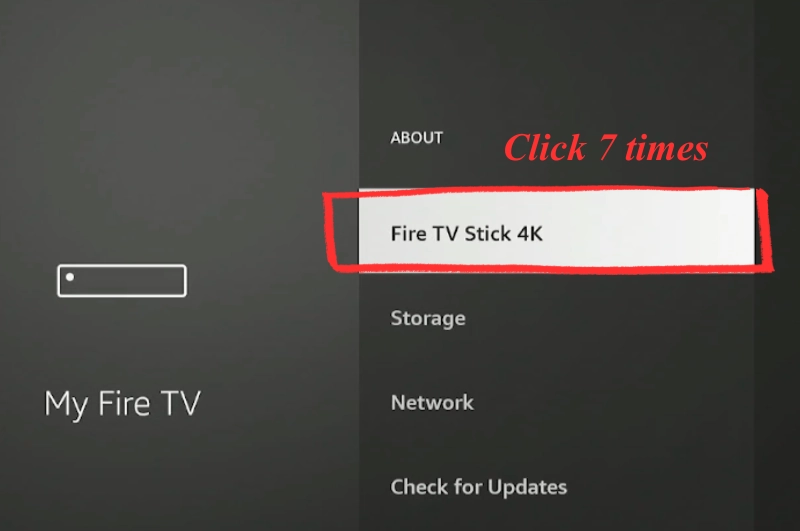
After 7 clicks, you will see the message "You are now a developer". Developer Options is now unlocked.
Press Back to return to the My Fire TV menu. You will now see a new Developer Options entry that was not there before.
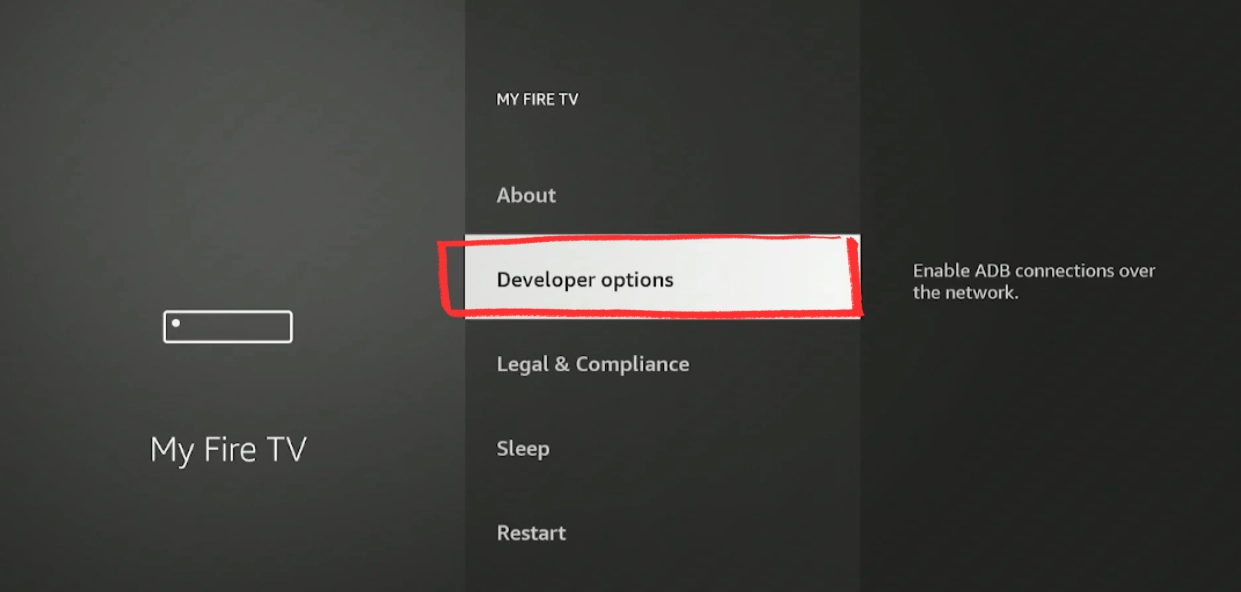
Select Developer Options to open the developer settings panel.
Inside Developer Options, find ADB Debugging and toggle it to ON. Confirm the dialog if prompted.
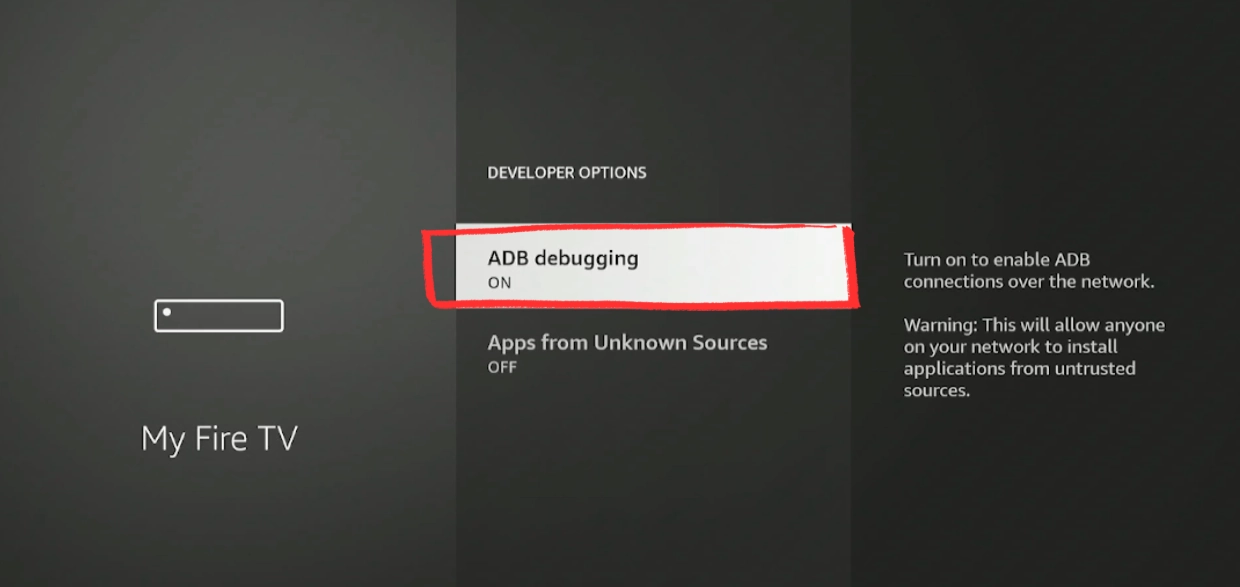
ADB Debugging must be ON before you can enable app installation from unknown sources. Both settings are required.
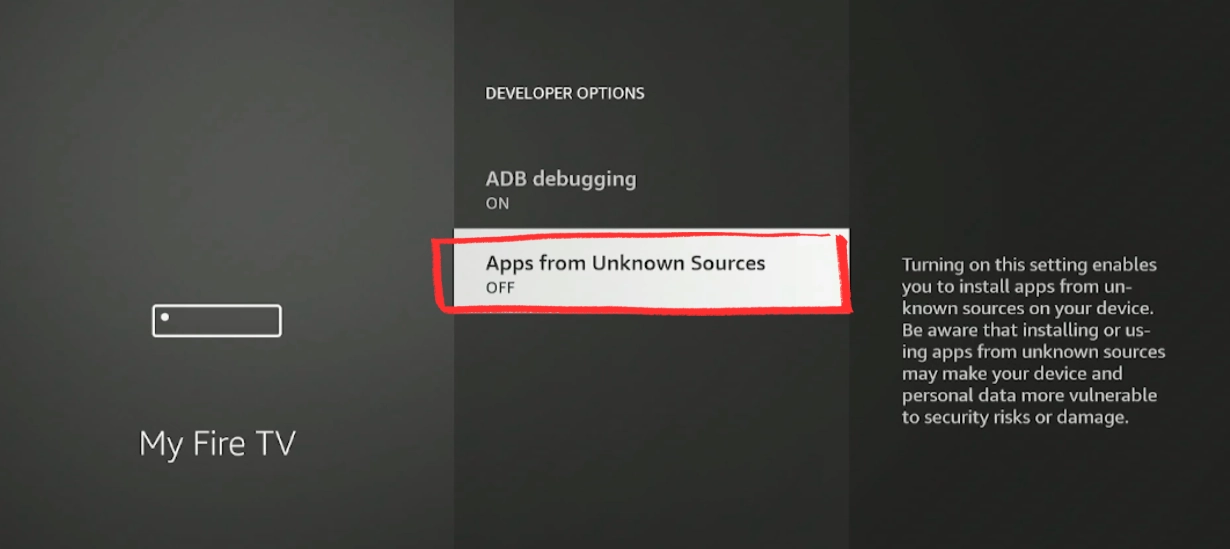
Press Back to return to Developer Options. Select Install Unknown Apps to see the list of apps that can be granted install permission.
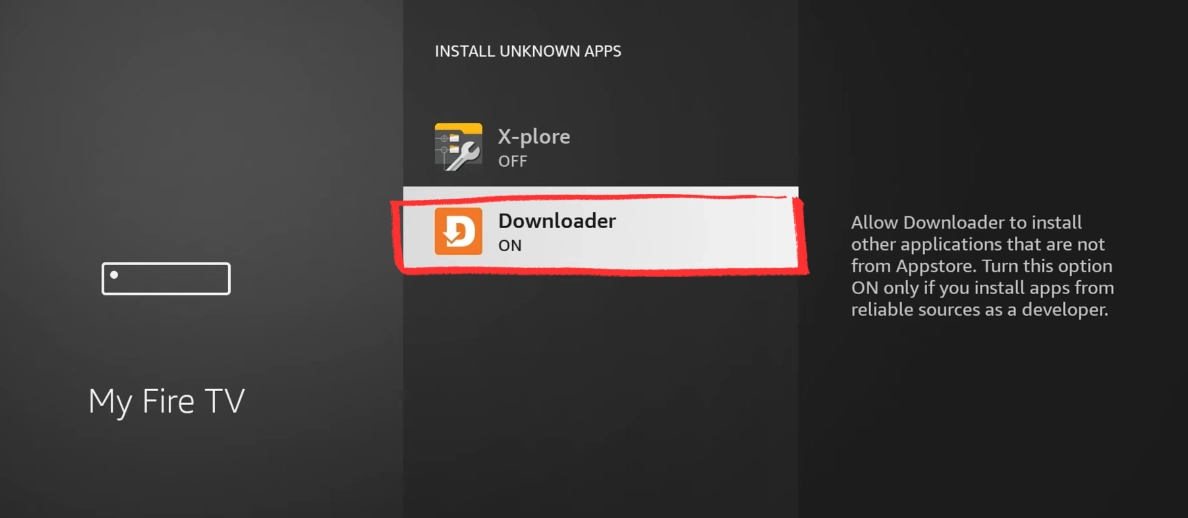
Find Downloader in the list and toggle it to ON. Press OK to confirm. This gives Downloader permission to install APK files like TiviMate.
Press the Home button to return to the home screen.
Developer Options are enabled and Downloader has permission to install apps. You are now ready to install TiviMate.
Part 3: How to Install TiviMate via Downloader on Fire Stick
Find the Downloader app in your Fire Stick app list and open it.
On first launch, Downloader will ask for permission to access files on your device.
When prompted, press Allow to grant Downloader access to your Fire Stick storage. This is required to save and install the TiviMate APK file.

Without this permission, Downloader cannot save downloaded files and the installation will fail.
In the Downloader URL field, enter the short code 272483 and press GO. This is the official TiviMate short code that redirects to the latest APK download.
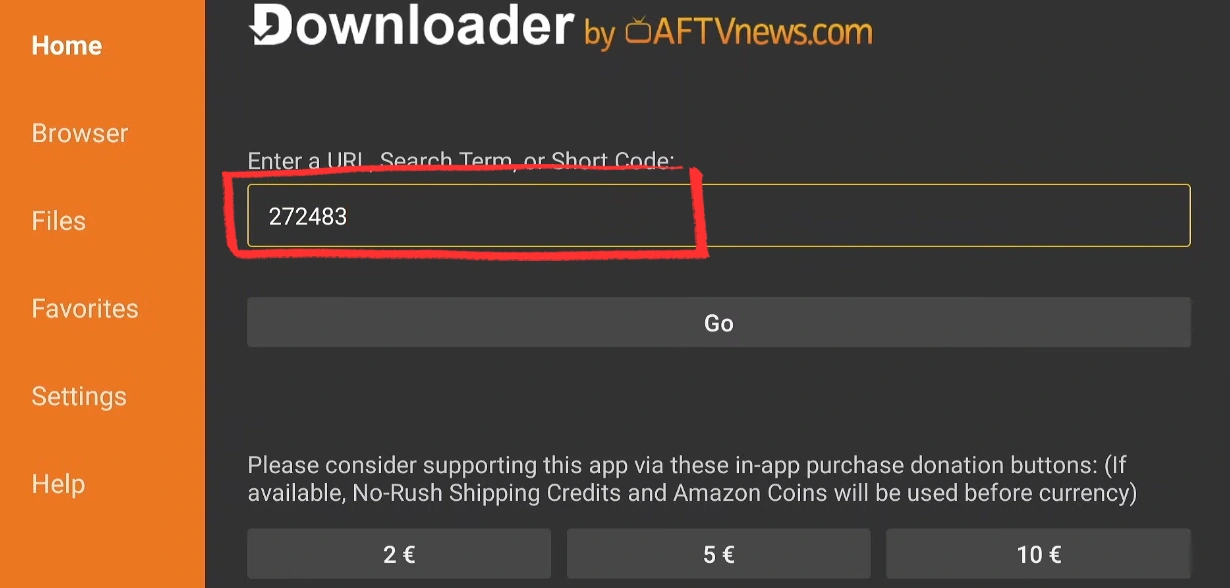
Downloader will connect to the TiviMate server and begin downloading the APK file automatically. The download takes 15–30 seconds depending on your connection speed.
Accept the Privacy Policy, then press Install. Confirm Install again if a second prompt appears. When installation is complete, press OPEN.
TiviMate will launch and immediately show the Add Playlist screen on first run.
Press Add Playlist, select Xtream Codes API (recommended), enter your server URL, username and password, then press Done. Channels load in 1–2 minutes.
- Choose Xtream Codes API (recommended) or M3U URL
- Enter your Server URL, Username, and Password
- Press Next, keep Live TV and VOD selected, then Done
- Wait 1–2 minutes for all channels to load
TiviMate is set up on your Fire Stick. To unlock a better experience, see the Premium section below.
TiviMate Free vs Premium — Is It Worth Upgrading?
TiviMate works out of the box for free, but the free version has one key limitation: no favorites, no multi-playlist support. If you try adding a channel to favorites, TiviMate will prompt you to upgrade.
For casual use, the free version is fine. For anyone using IPTV daily, Premium is worth it.
Renews yearly. Best if you want to try Premium before committing.
Pays for itself in under 4 years. Covers future price increases.
Each license covers 5 devices simultaneously.
How to buy TiviMate Premium:
Go to tivimate.com, create a free account, choose your plan and complete the purchase. Then open TiviMate on your Fire Stick, go to Settings → Account and log in to activate Premium.
Go to tivimate.com, create an account, select your plan and complete the purchase.

Open TiviMate on your Fire Stick, go to Settings → Account and log in with your tivimate.com credentials to activate Premium instantly.
You are now enjoying the full TiviMate Premium experience — multi-playlist, EPG, recording and complete customization on your Fire Stick.
Common Problems & Fixes — Fire Stick TiviMate
Enter the full URL instead: https://tivimate.com/ — the short code occasionally changes but the URL always works.
Make sure ADB Debugging is ON first (Part 2, Step 5). The Unknown Sources option only becomes available after ADB is enabled.
Wait 2–3 minutes — large playlists with thousands of channels take time. If still empty, double-check your credentials with our IPTV Checker.
Credentials are case-sensitive. Copy-paste them if possible. Make sure the server URL includes http:// or https:// and the correct port number.
How to Setup IPTV on Android TV Box (TiviMate & IPTV Smarters)
▼/iptv-setup-android-tv-box-tivimate-installation-guide.webp)
Setting up IPTV on an Android TV Box takes under 15 minutes once you know which method to follow. This guide covers two apps: TiviMate (recommended for its clean TV interface and EPG support) and IPTV Smarters Pro (a reliable alternative).
Two apps are recommended depending on your device and preference. Prefer a traditional TV grid interface? Perfect Player IPTV is a free alternative — download it from the Play Store, open Settings → Playlist, paste your M3U URL, and restart the app. It doesn’t support Xtream Codes natively, so use our M3U to Xtream Converter if needed.
👇 Select your app to see the setup guide
Method 1: TiviMate on Android TV Box (Recommended)
Nvidia Shield · Mi Box S · Sony Bravia · Philips Android TV
LG Smart TV · Google TV · Chromecast GTV
Case A — Install TiviMate from Google Play Store
Part 1: Install TiviMate
Open Google Play Store on your Android TV Box. In the search bar, type "TiviMate IPTV Player".
/android-tv-google-play-store-search-downloader-iptv.webp)
Select the app by NZERINC LLC and press Install. Wait for the download to complete.
/tivimate-iptv-player-google-play-install-android-tv.webp)
TiviMate is installed on your Android TV Box. Open it to continue with Part 2.
Part 2: Add Your IPTV Playlist
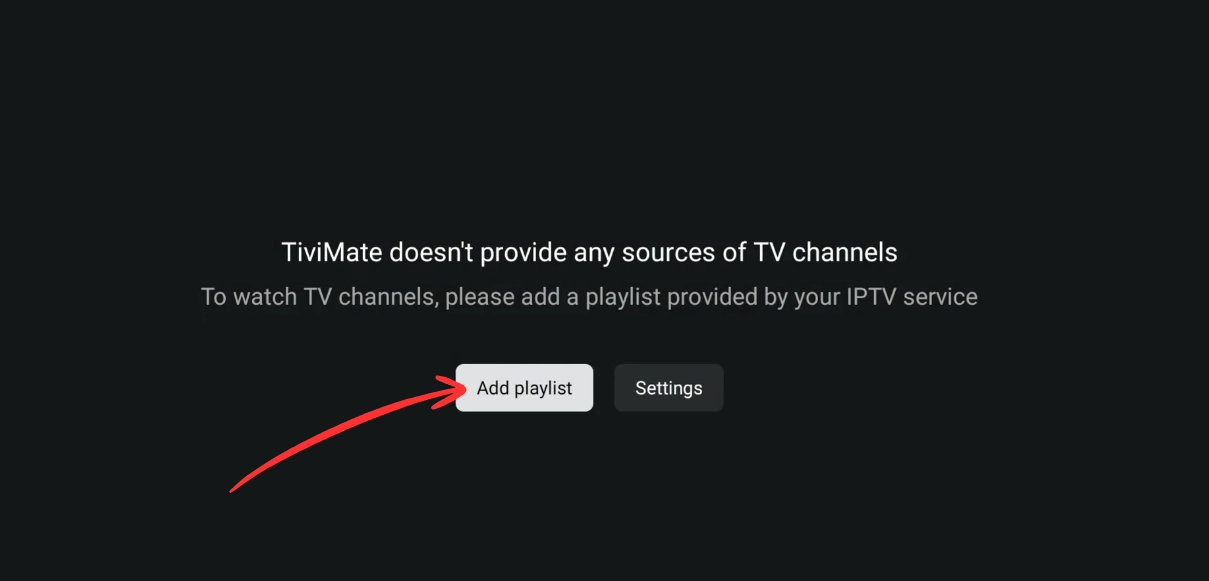
Open TiviMate. On first launch you will see: "TiviMate doesn't provide any sources of TV channels." This is normal — press Add Playlist to connect your IPTV subscription.
/tivimate-first-launch-add-playlist-android-tv-box-iptv.webp)
Press Add Playlist, select Xtream Codes API (recommended), enter your server URL, username and password, then press Done. Channels load in 1–2 minutes.
/tivimate-playlist-type-m3u-xtream-codes-android-tv-box-iptv.webp)
Your IPTV playlist is connected and channels are loading. TiviMate is ready to use.
Case B — TiviMate Not Available (Sideload via Downloader)
/tivimate-not-available-google-play-android-tv-box-iptv.webp)
If you see the message above, your device is not supported by direct install. Follow these steps to sideload TiviMate in under 5 minutes.
Part 1: Install Downloader
Open Google Play Store. In the search bar type "Downloader" — it appears in Popular Apps (orange icon by AFTVnews). Install it.
/android-tv-box-google-play-store-search-downloader-app-iptv.webp)
Downloader will appear in your Favorite Apps row on the Android TV home screen.
Downloader is installed. Continue to Part 2 to install TiviMate.
Part 2: Install TiviMate via Code 272483
Open Downloader. In the URL field type 272483 and press Go. Downloader automatically finds and downloads the TiviMate APK file.
/downloader-enter-code-272483-install-tivimate-android-tv-box-iptv.webp)
When the install popup appears → press Install. Confirm again if asked a second time.
TiviMate is installed. Continue to Part 3 to add your IPTV playlist.
Part 3: Add Your IPTV Playlist
Open TiviMate. On first launch you will see: "TiviMate doesn't provide any sources of TV channels." This is normal — press Add Playlist to connect your IPTV subscription.
Press Add Playlist, select Xtream Codes API (recommended), enter your server URL, username and password, then press Done. Channels load in 1–2 minutes.
TiviMate is set up on your Android TV Box. To unlock a better experience, see the Premium section below.
TiviMate Free vs Premium — Is It Worth Upgrading?
The free version works for basic playback, but you’ll quickly notice its limits. The program guide loads with no information, EPG settings are locked, and appearance customization is unavailable. Most key features — multi-playlist, recording, advanced EPG — are behind the Premium version.
If you want the full TiviMate experience, follow the steps below to upgrade.
Renews yearly. Best if you want to try Premium before committing.
Pays for itself in under 4 years. Covers future price increases.
Each license covers 5 devices simultaneously.
How to buy TiviMate Premium:
Go to tivimate.com, create a free account, choose your plan and complete the purchase.
Open TiviMate on your Android TV Box, go to Settings → Unlock Premium.
/tivimate-settings-unlock-premium-playlists-android-tv-box-iptv.webp)
Log in with your tivimate.com credentials to activate Premium instantly.
/tivimate-premium-enter-mail-password-android-tv-box-iptv.webp)
You are now enjoying the full TiviMate Premium experience — multi-playlist, EPG, recording and complete customization on your Android TV Box.
/iptv-smarters-pro-player-google-play-install-android-tv-box.webp)
/iptv-smarters-pro-choose-playlist-type-xtream-codes.webp)
/google-play-search-iptv-smarters-not-available-android-tv.webp)
/downloader-enter-code-530411-iptv-smarters-android-tv-box.webp)
/downloader-browser-mediafire-iptv-smarters-apk-download.webp)
/iptv-smarters-pro-install-confirmation-android-tv-box.webp)
Use Downloader code 272483 to sideload TiviMate. See Case B above for detailed steps.
Check your internet connection, or enter the full URL: https://tivimate.com/
Verify your server URL, username and password. Test them at IPTV Checker.
Increase buffer in TiviMate Settings → Playback. Use wired Ethernet. See our IPTV Buffering Fix guide.
How to Setup IPTV on Android Phone and Tablet (TiviMate & IPTV Smarters)
▼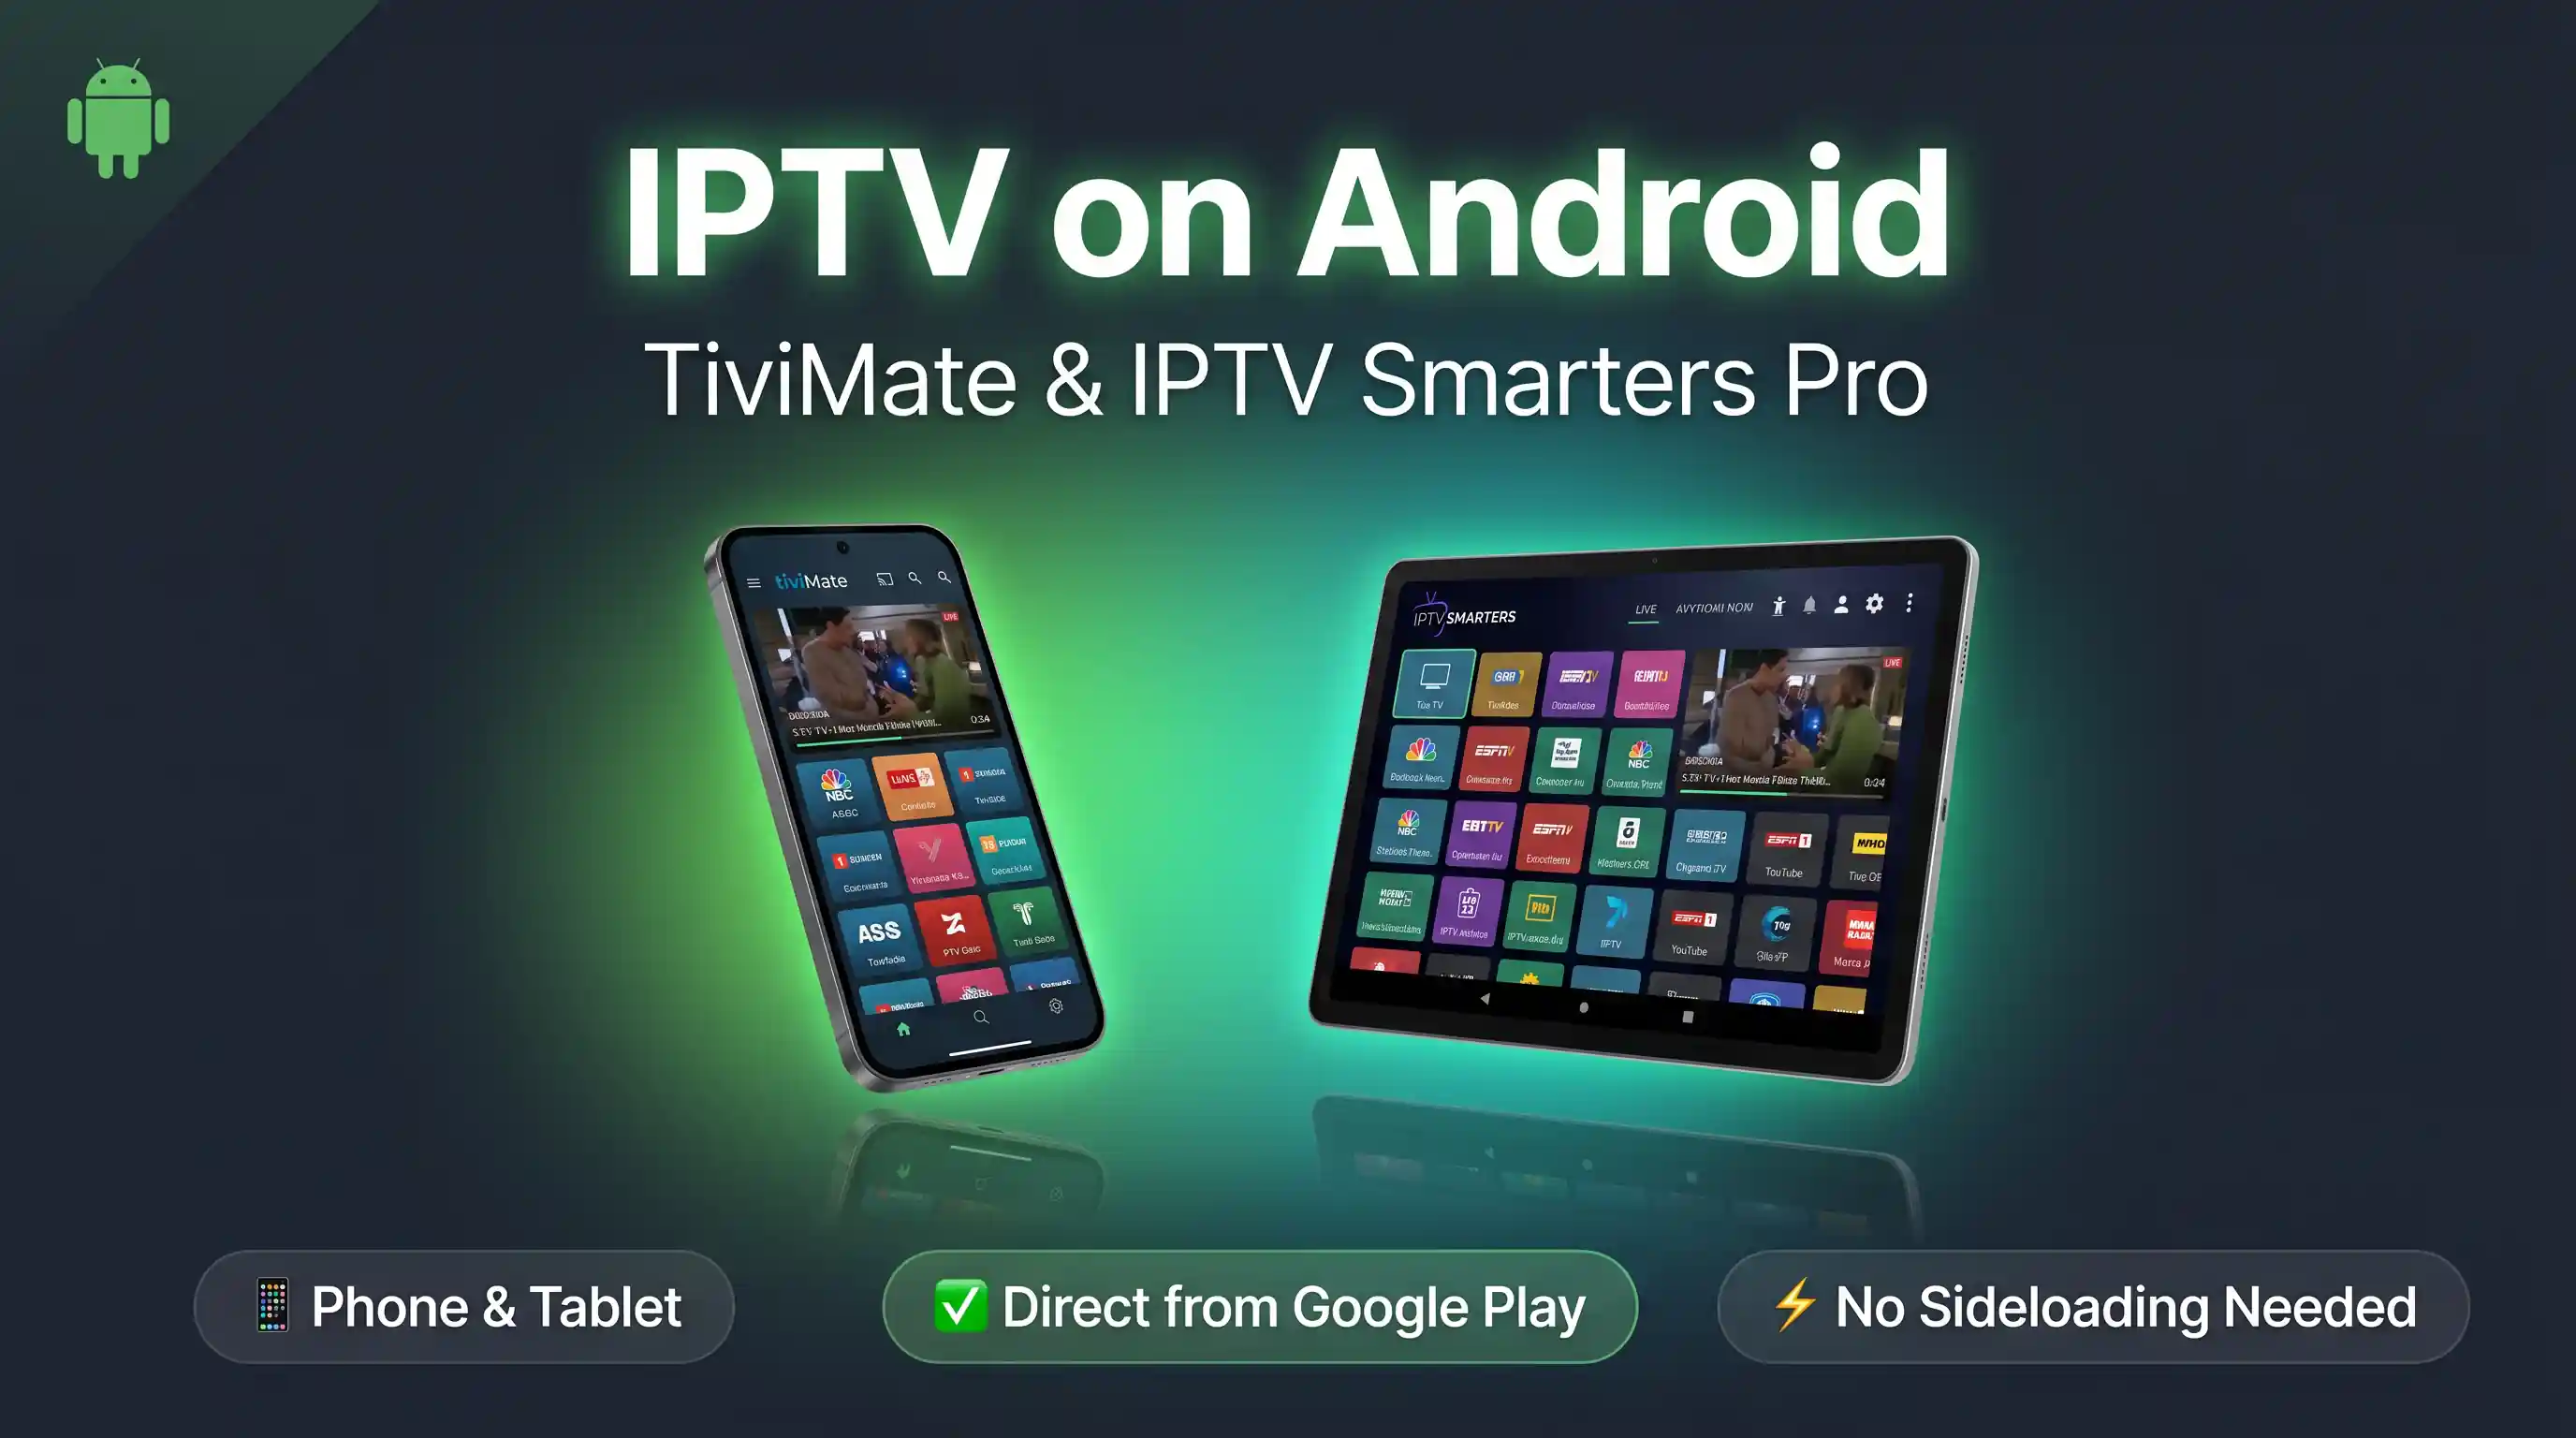
IPTV setup on Android phone and tablet is the quickest of all devices — both TiviMate and IPTV Smarters Pro install directly from Google Play in seconds. No sideloading, no developer mode, no extra steps required.
| Step | Action | Time |
|---|---|---|
| 1 | Install your IPTV app | 1 min |
| 2 | Add your IPTV playlist | 2 min |
| 3 | Start watching | 1 min |
👇 Select your app to see the setup guide
Method 1: TiviMate on Android Phone and Tablet (Recommended)
TiviMate is the go-to IPTV player for Android users who want a clean, fast interface with full EPG support. It handles both Xtream Codes and M3U playlists, and the setup takes under 5 minutes.
Part 1: Install TiviMate
Open Google Play Store on your Android phone or tablet and search for "TiviMate IPTV Player".
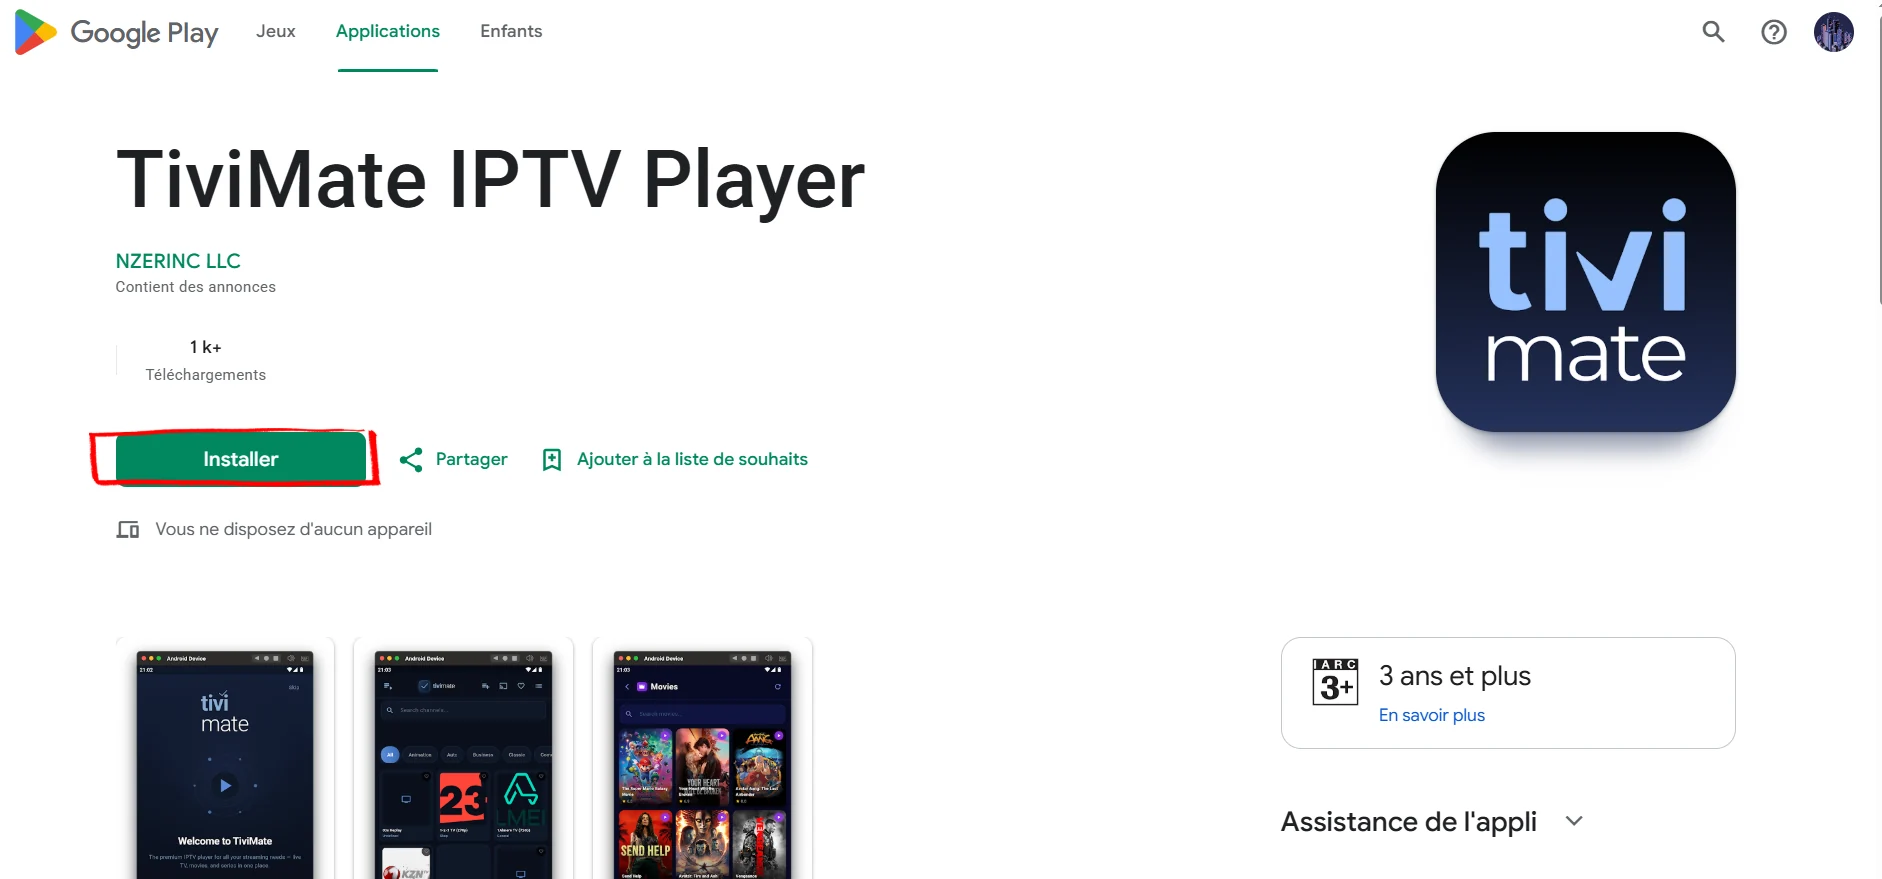
Select the app published by NZERINC LLC — that is the only official TiviMate IPTV Player on Google Play. Tap Install and wait about 30 seconds for the download to complete.
TiviMate is installed on your Android device. Open it to continue with Part 2.
Part 2: Add Your IPTV Playlist
Open TiviMate. On first launch you will see the message: "TiviMate doesn't provide any sources of TV channels." This is completely normal — the app does not include any content by design.
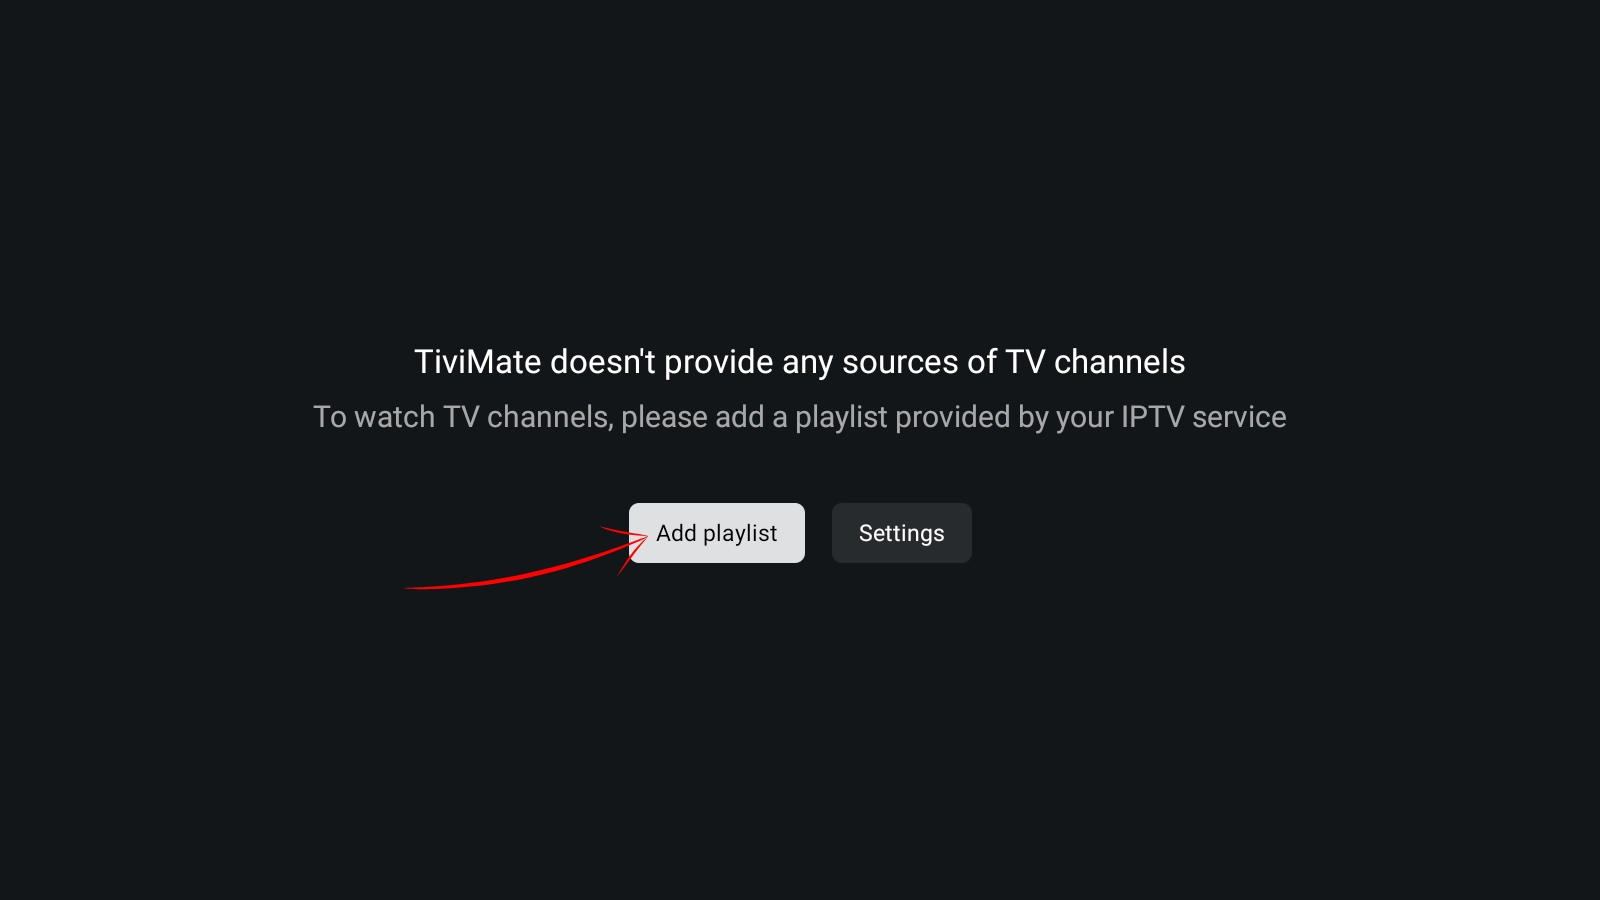
Tap Add Playlist to connect your IPTV subscription.
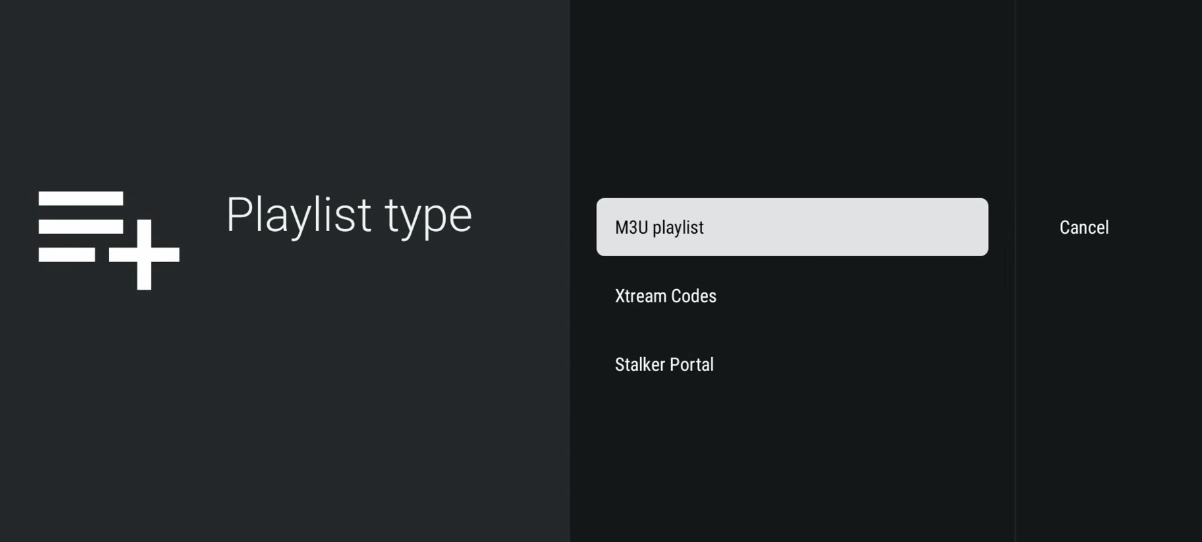
Choose your playlist format. Use Xtream Codes (recommended) if your provider gave you a server URL, username and password. Use M3U playlist if you only have a .m3u or .m3u8 link.
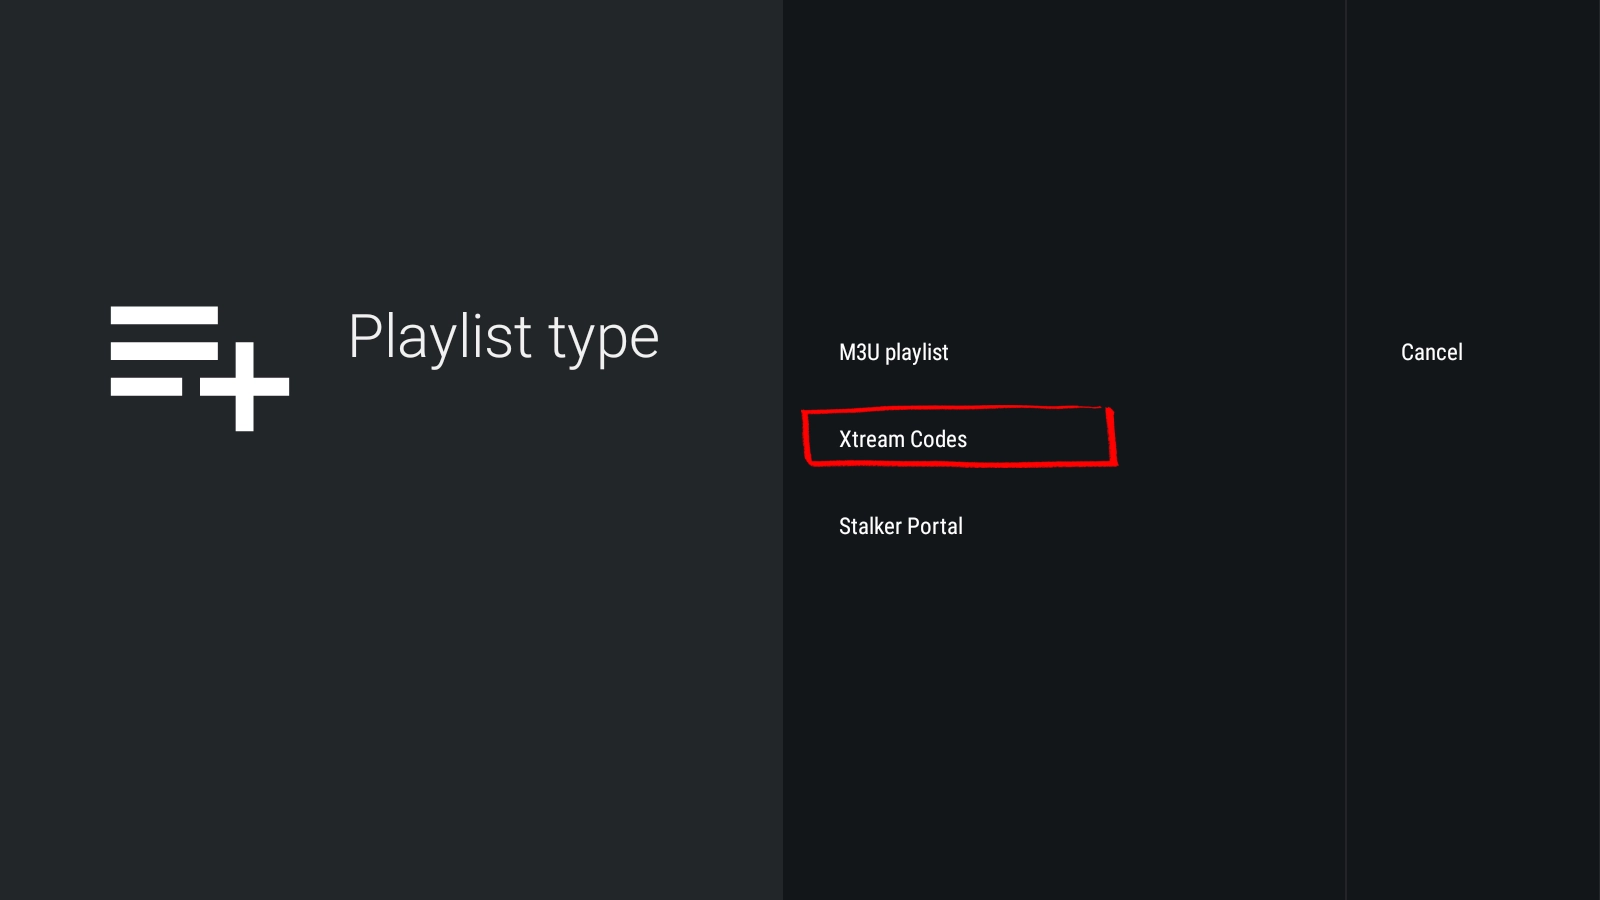
Enter your Server URL, Username and Password exactly as provided by your IPTV service. Tap Next, keep Live TV and VOD selected, then tap Done.
TiviMate will now download and process your full channel list. This screen confirms when your playlist is ready:
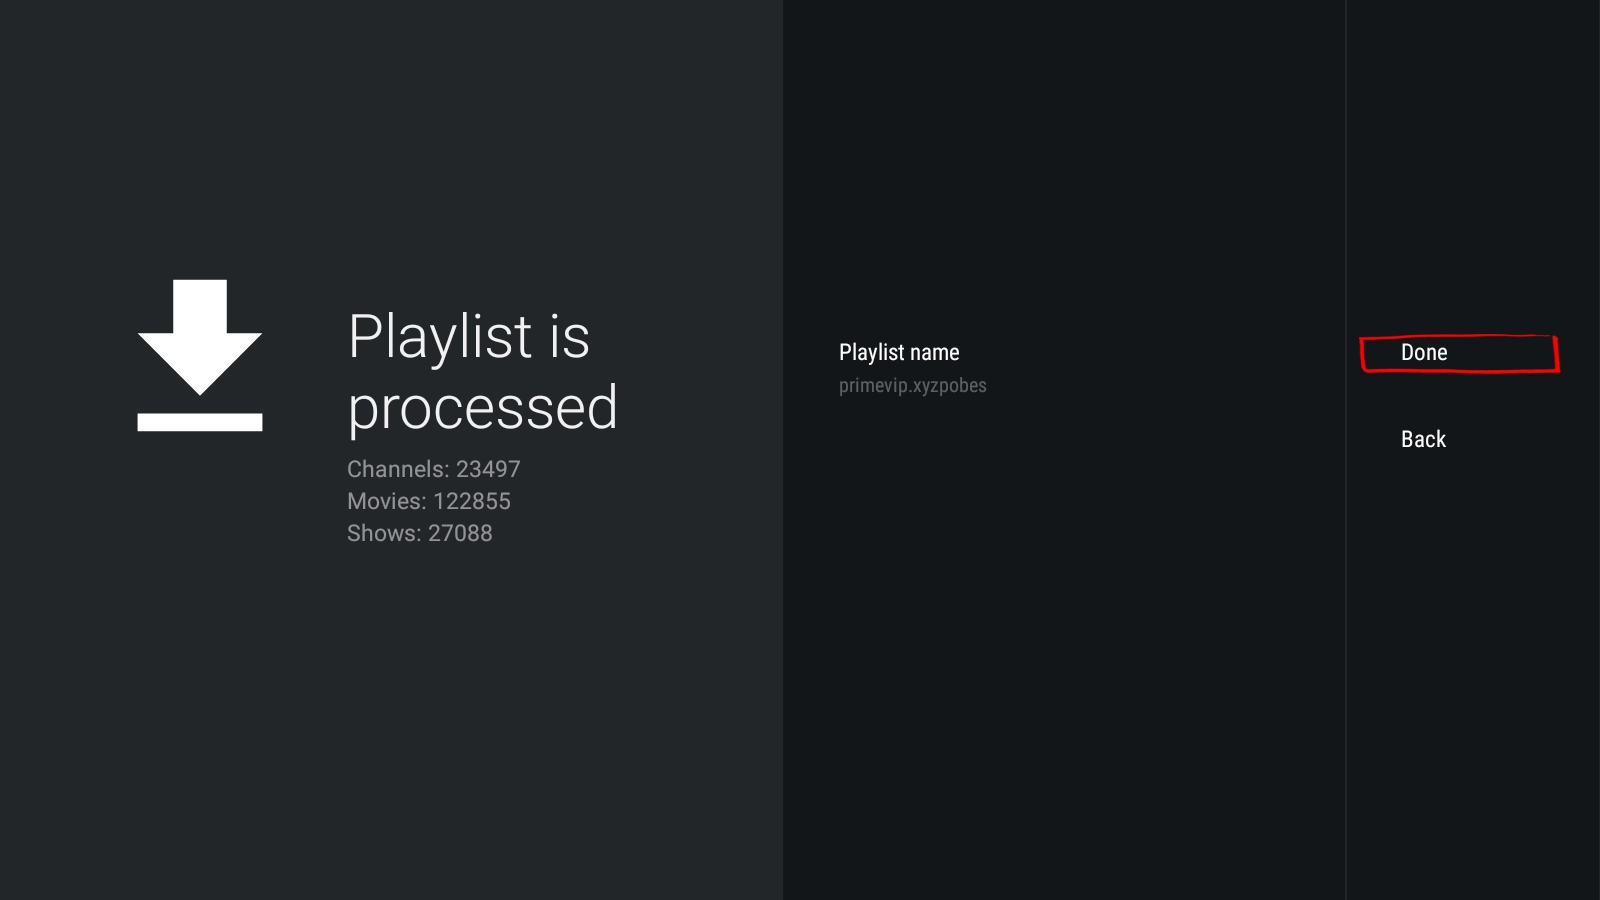
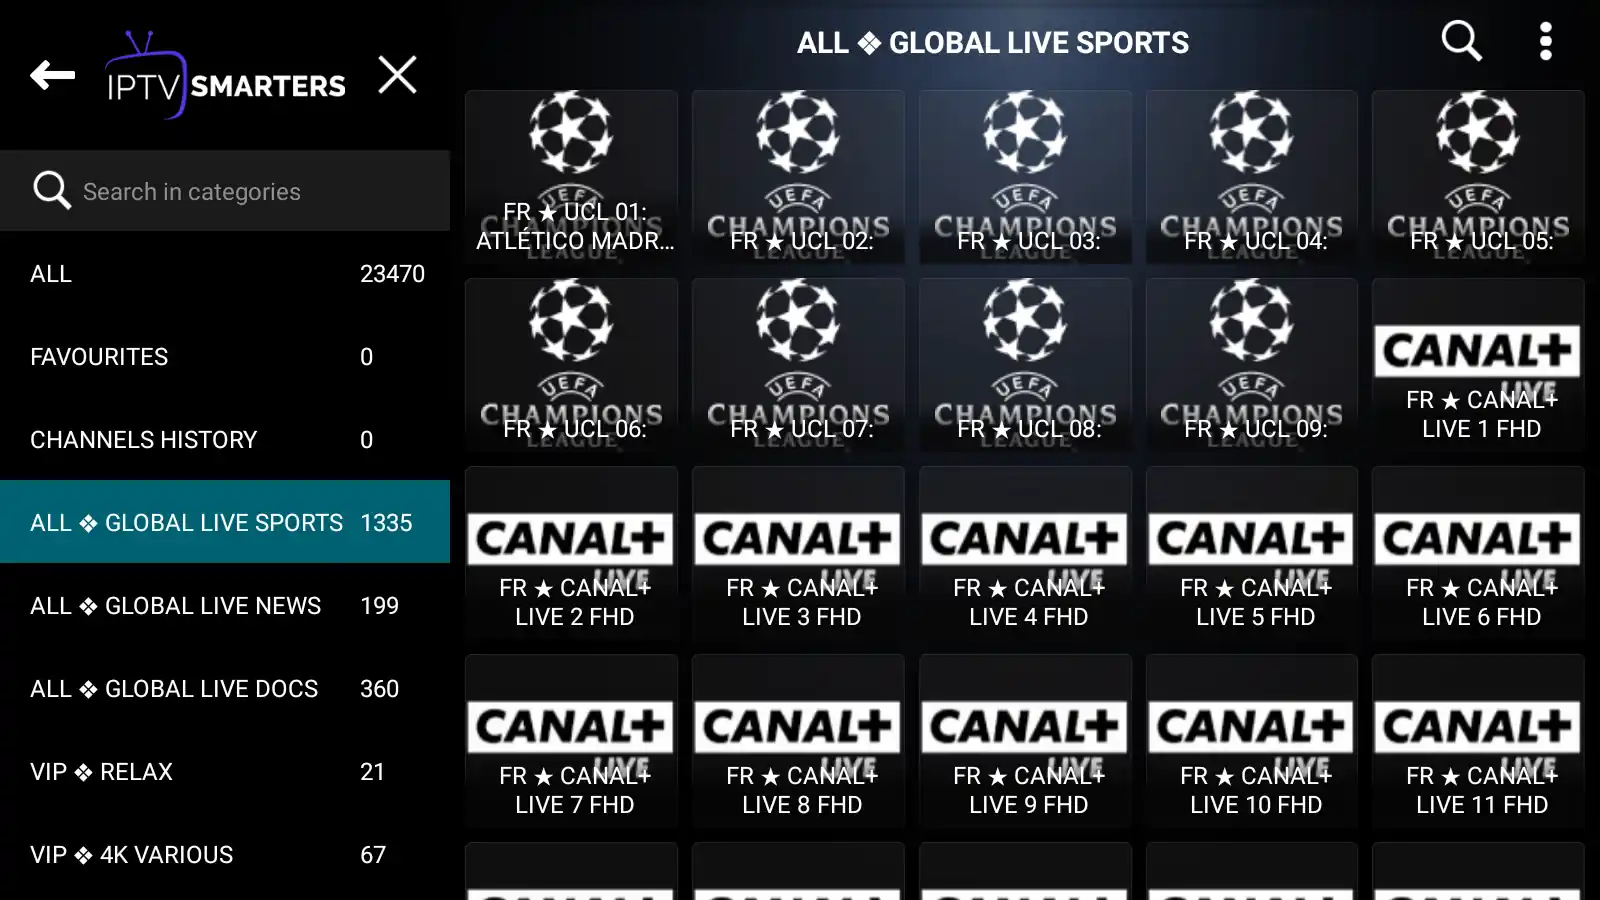
In this example, the playlist loaded 23,497 live channels, 122,855 movies and 27,088 TV shows. Your numbers will vary depending on your provider. Tap Done to start watching.
Your IPTV playlist is connected and all channels are loaded. TiviMate is ready to use on your Android device.
TiviMate Free vs Premium — Is It Worth Upgrading?
TiviMate works out of the box with your playlist, but the free version limits you to a single playlist with no favorites or recording. For daily IPTV use, Premium is worth it — especially the lifetime option which covers 5 devices.
Includes a 7-day free trial. Best if you want to test Premium before committing.
Pay once, use forever on up to 5 devices. Covers future updates.
Each license covers 5 devices simultaneously — so one purchase works across your phone, tablet, Fire Stick and Android TV Box.
How to activate TiviMate Premium on Android:
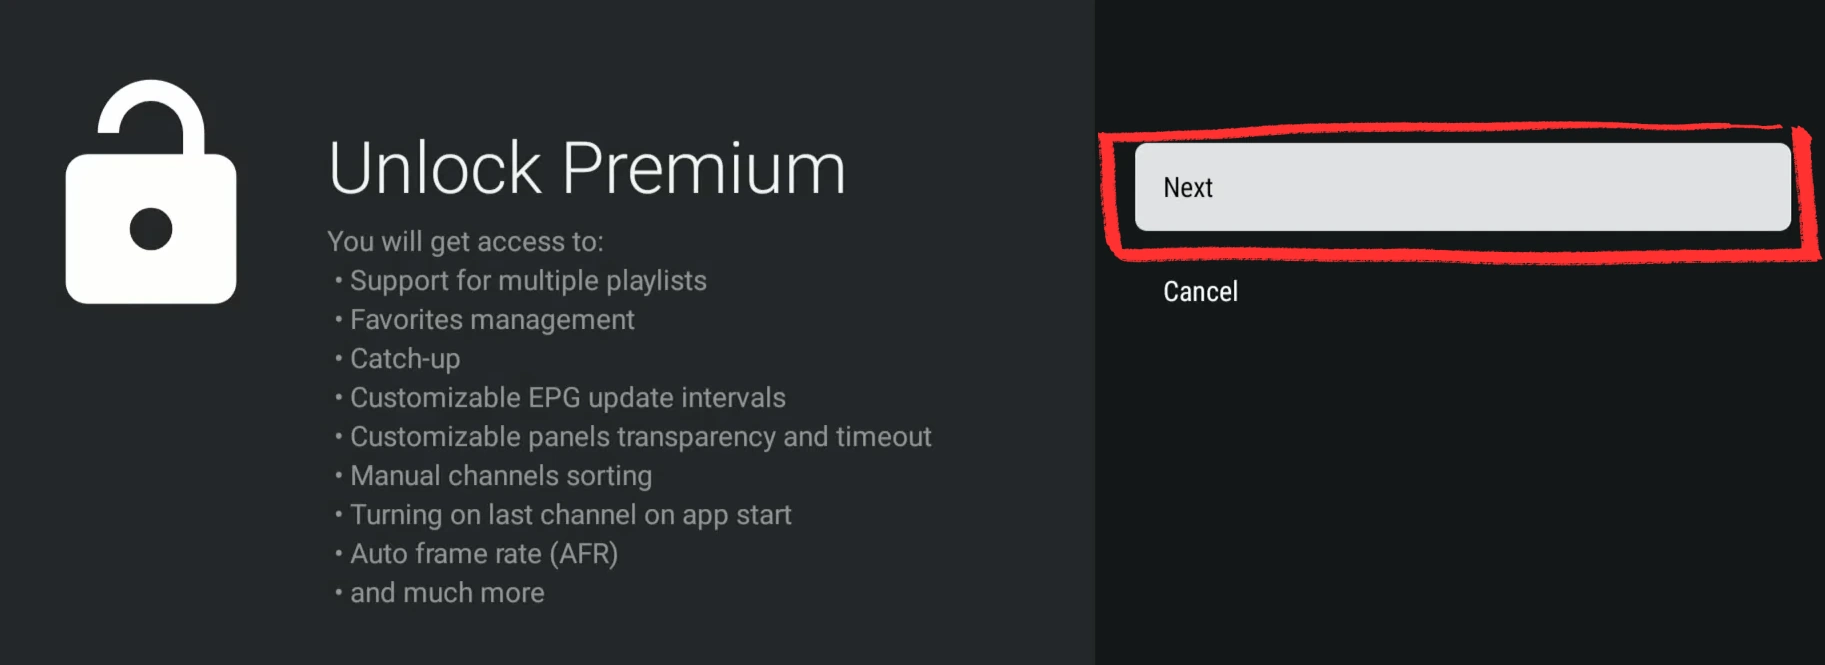
Inside TiviMate, open Settings from the left sidebar. At the top of the settings panel you will see the Unlock Premium option.
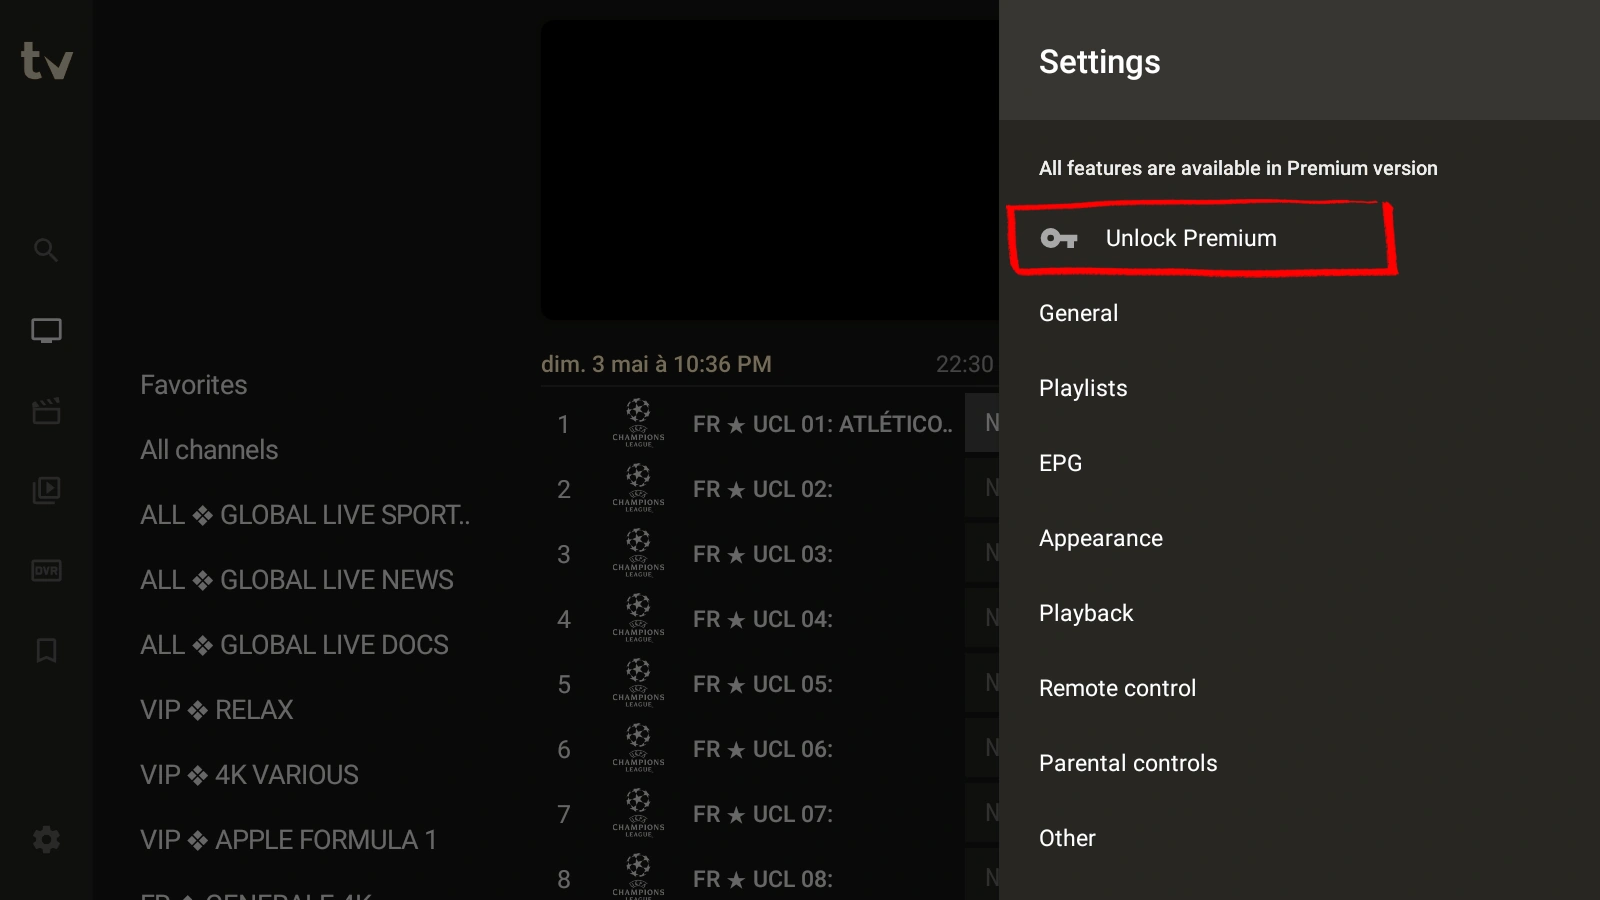
Tap Unlock Premium to begin the activation process.
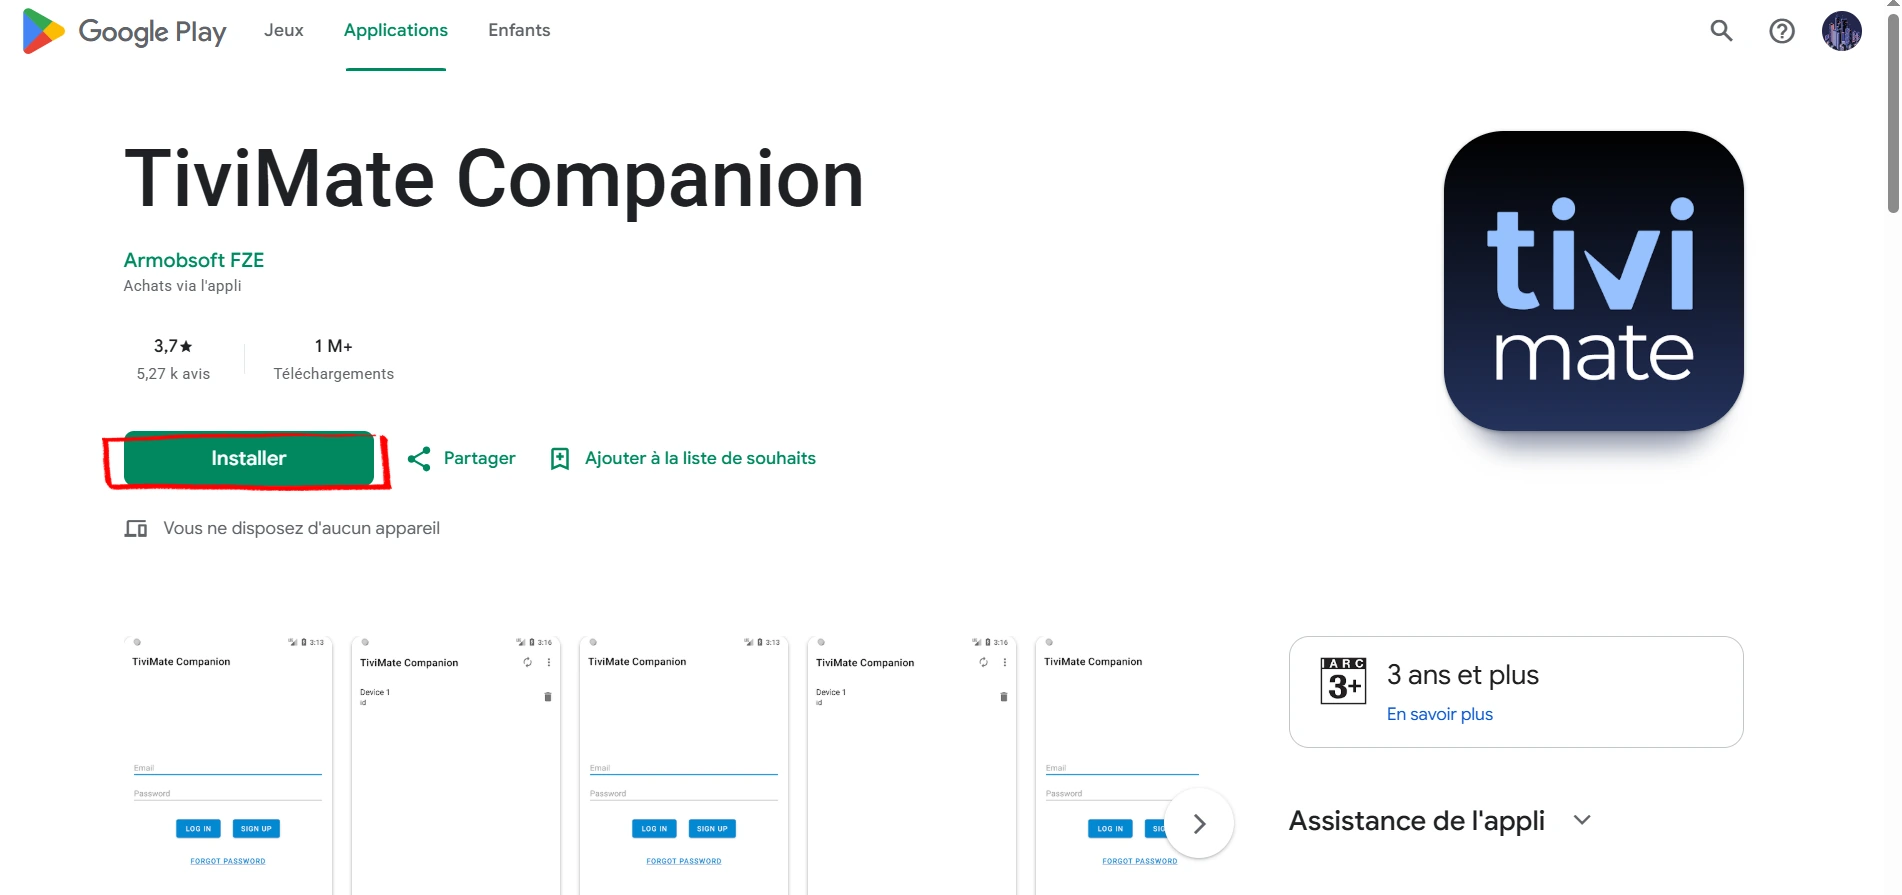
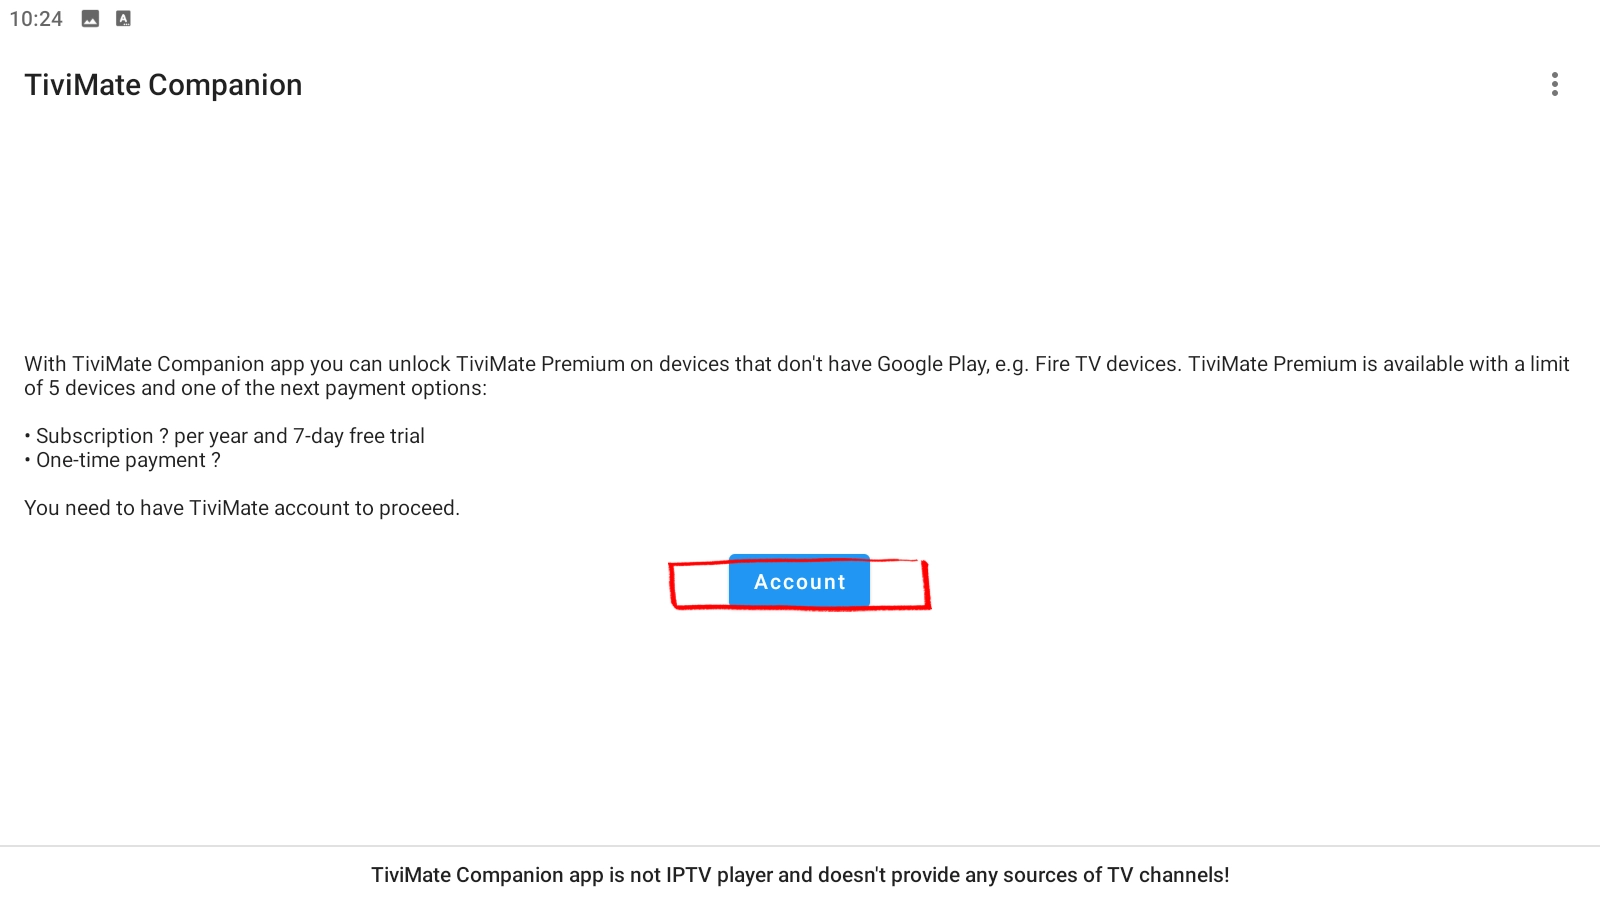
TiviMate Premium is purchased and managed through a separate app called TiviMate Companion. Install it from Google Play — it is published by Armobsoft FZE and has over 1 million downloads.
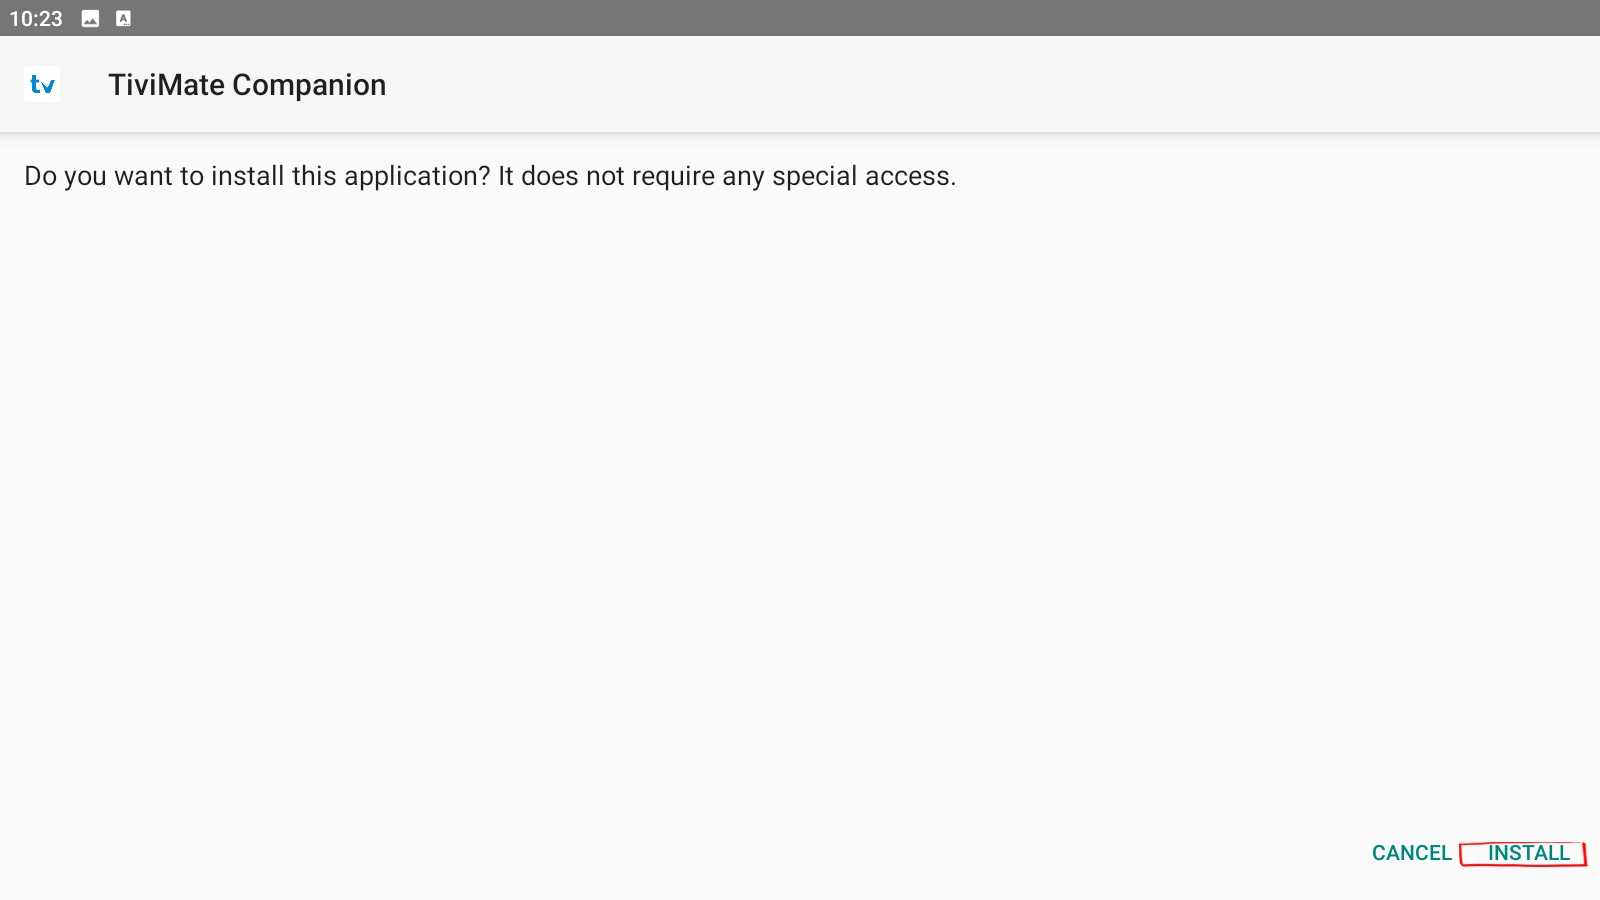
When the prompt appears asking "Do you want to install this application?", tap Install. Don't worry — TiviMate Companion doesn't ask for any special permissions. It's a lightweight tool that simply manages your account, nothing more.
Open TiviMate Companion. Tap Account to proceed to the plan selection screen.
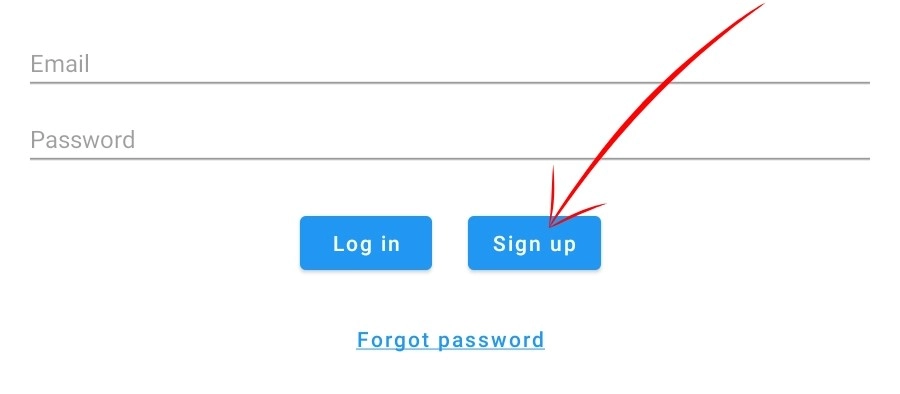
You'll see a simple login screen with two options. If you're new, tap Sign Up and register with your email address — it only takes a minute. Already have an account? Skip ahead and tap Log in instead.
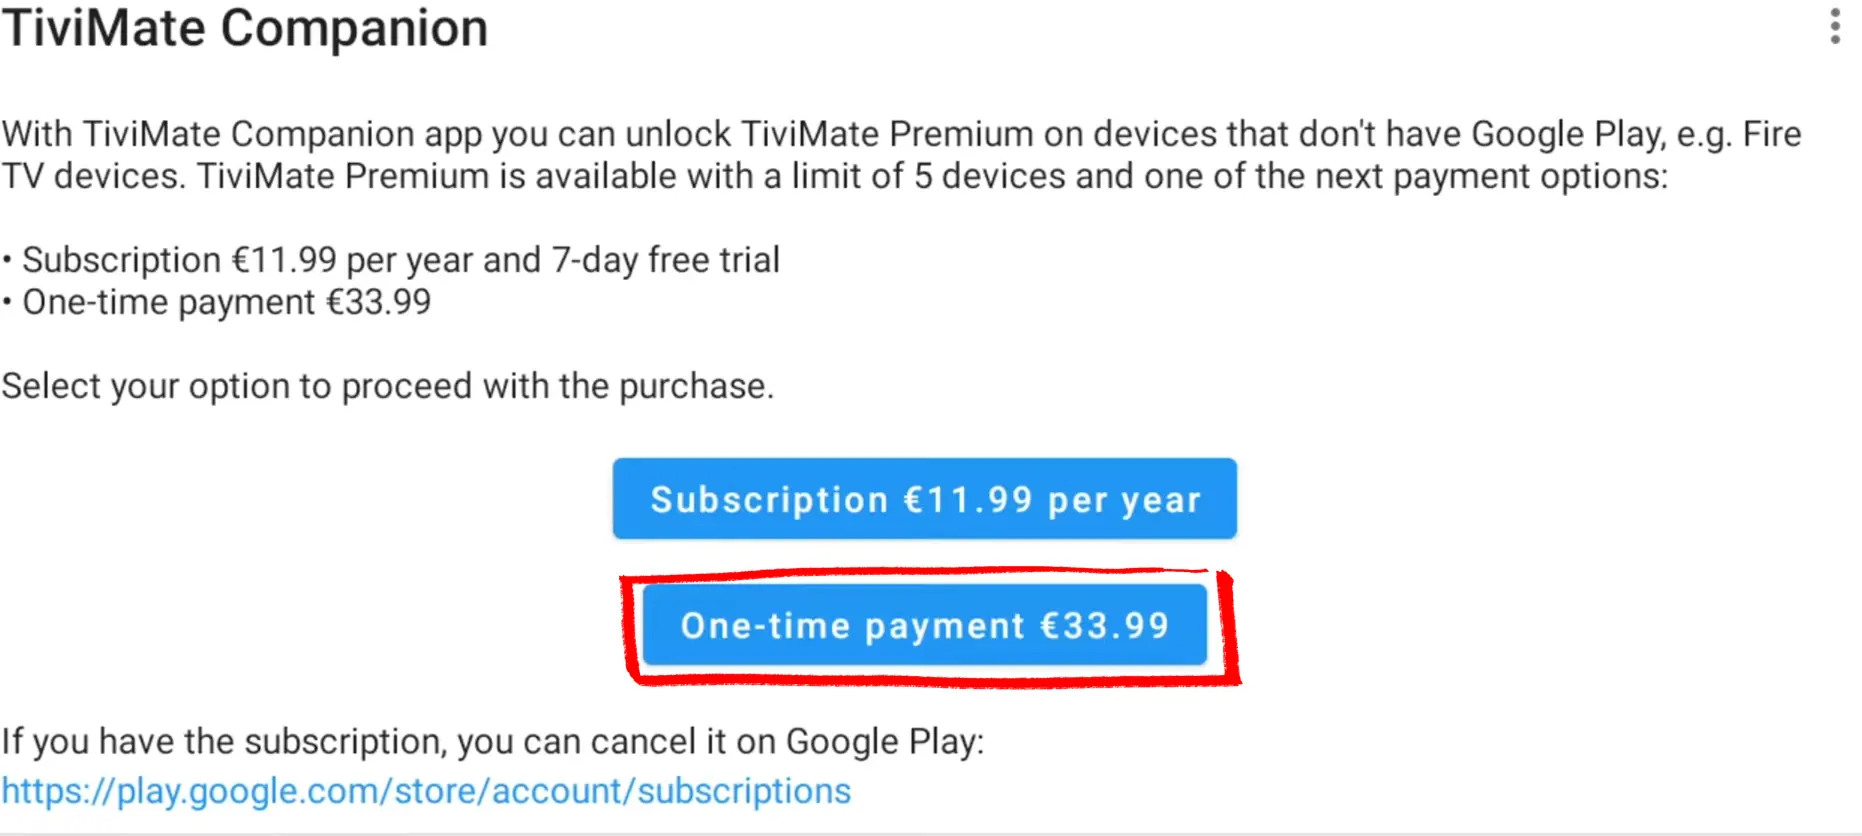
After logging in, you'll see two payment options clearly displayed. You can go with the Subscription at €11.99 per year (which includes a 7-day free trial), or grab the One-time payment at €33.99 for lifetime access. For anyone who watches IPTV regularly, the lifetime option pays for itself quickly — that's why it's highlighted here.
Complete your purchase through the secure payment screen. You'll need a valid payment method linked to your account.
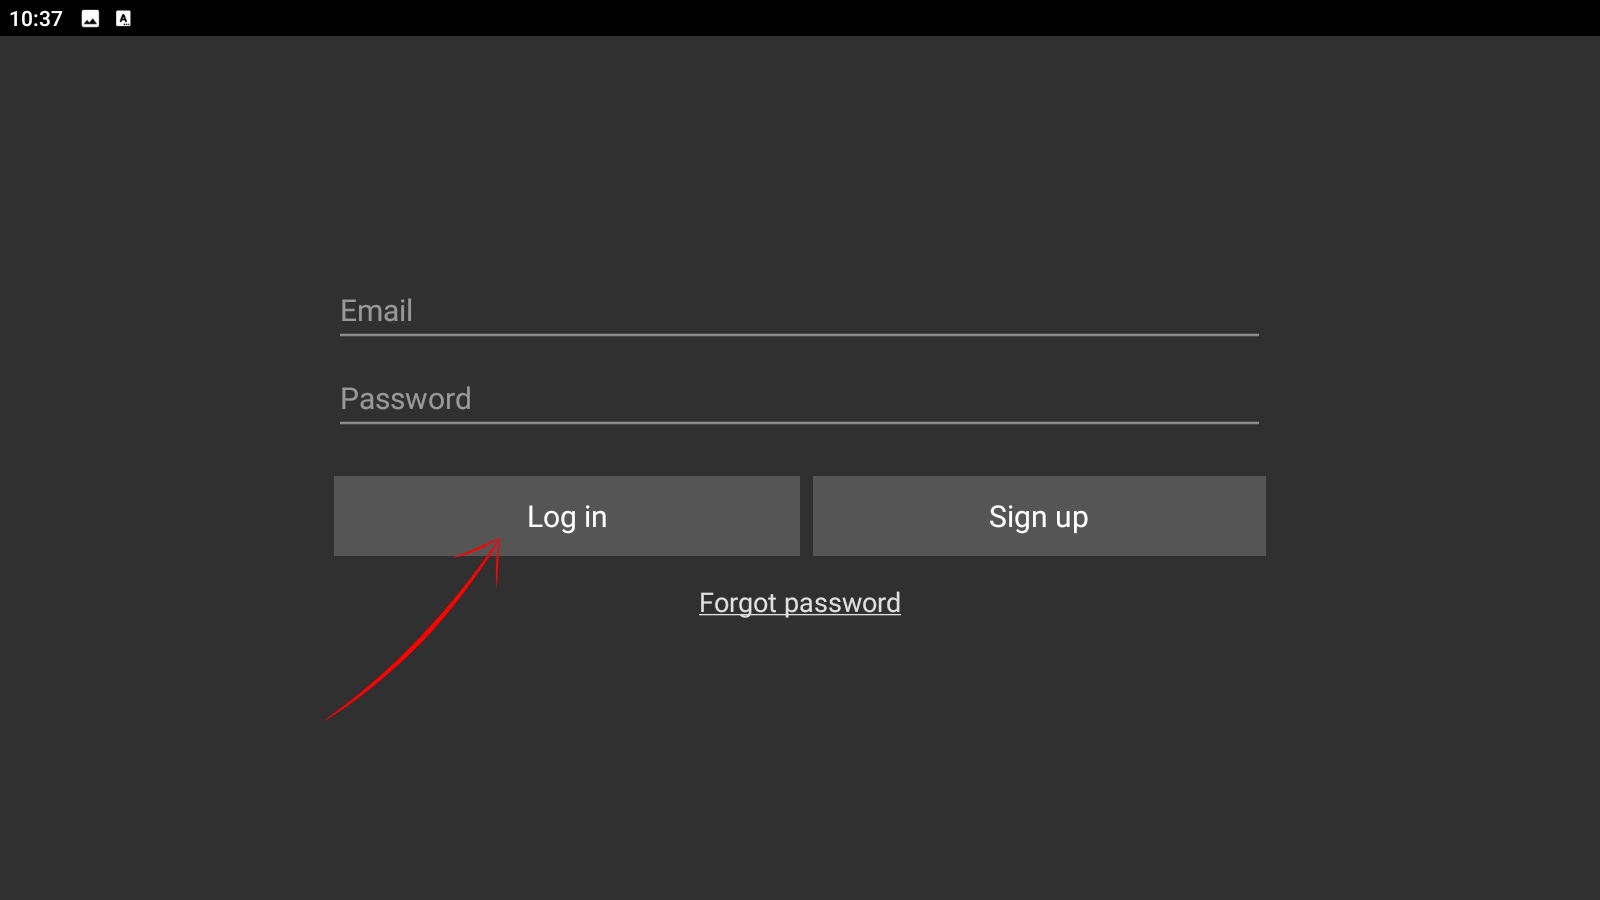
Back on your Android device, open TiviMate and go to the login screen. Enter your email and password, then tap Log in. Your Premium access activates immediately — no restart, no waiting, no extra steps.
You now have full access to TiviMate Premium on your Android phone — multi-playlist, EPG, recording and complete customization are all unlocked.

Android Phone IPTV — Common Problems & Quick Fixes
The most common reason is a typo in your credentials. Server URLs, usernames and passwords are all case-sensitive. Copy-paste them directly from your provider's email if you can. Use our free IPTV Checker to test your credentials before blaming the app.
Mobile data (4G/5G) can handle HD IPTV — you need at least 10 Mbps for stable 1080p. Test your connection speed with our IPTV Speed Test. If you're buffering, switch to WiFi or lower the stream quality in your app settings.
IPTV streaming is intensive. Close background apps, lower screen brightness, and in TiviMate go to Settings → Playback and enable hardware acceleration — it offloads video decoding to your GPU and significantly reduces battery drain.
Make sure your phone and your Chromecast are on the same WiFi network. Restart both devices if the cast icon doesn't appear. This is the #1 reason casting fails on Android.
How to Setup IPTV on iPhone, iPad and Apple TV
▼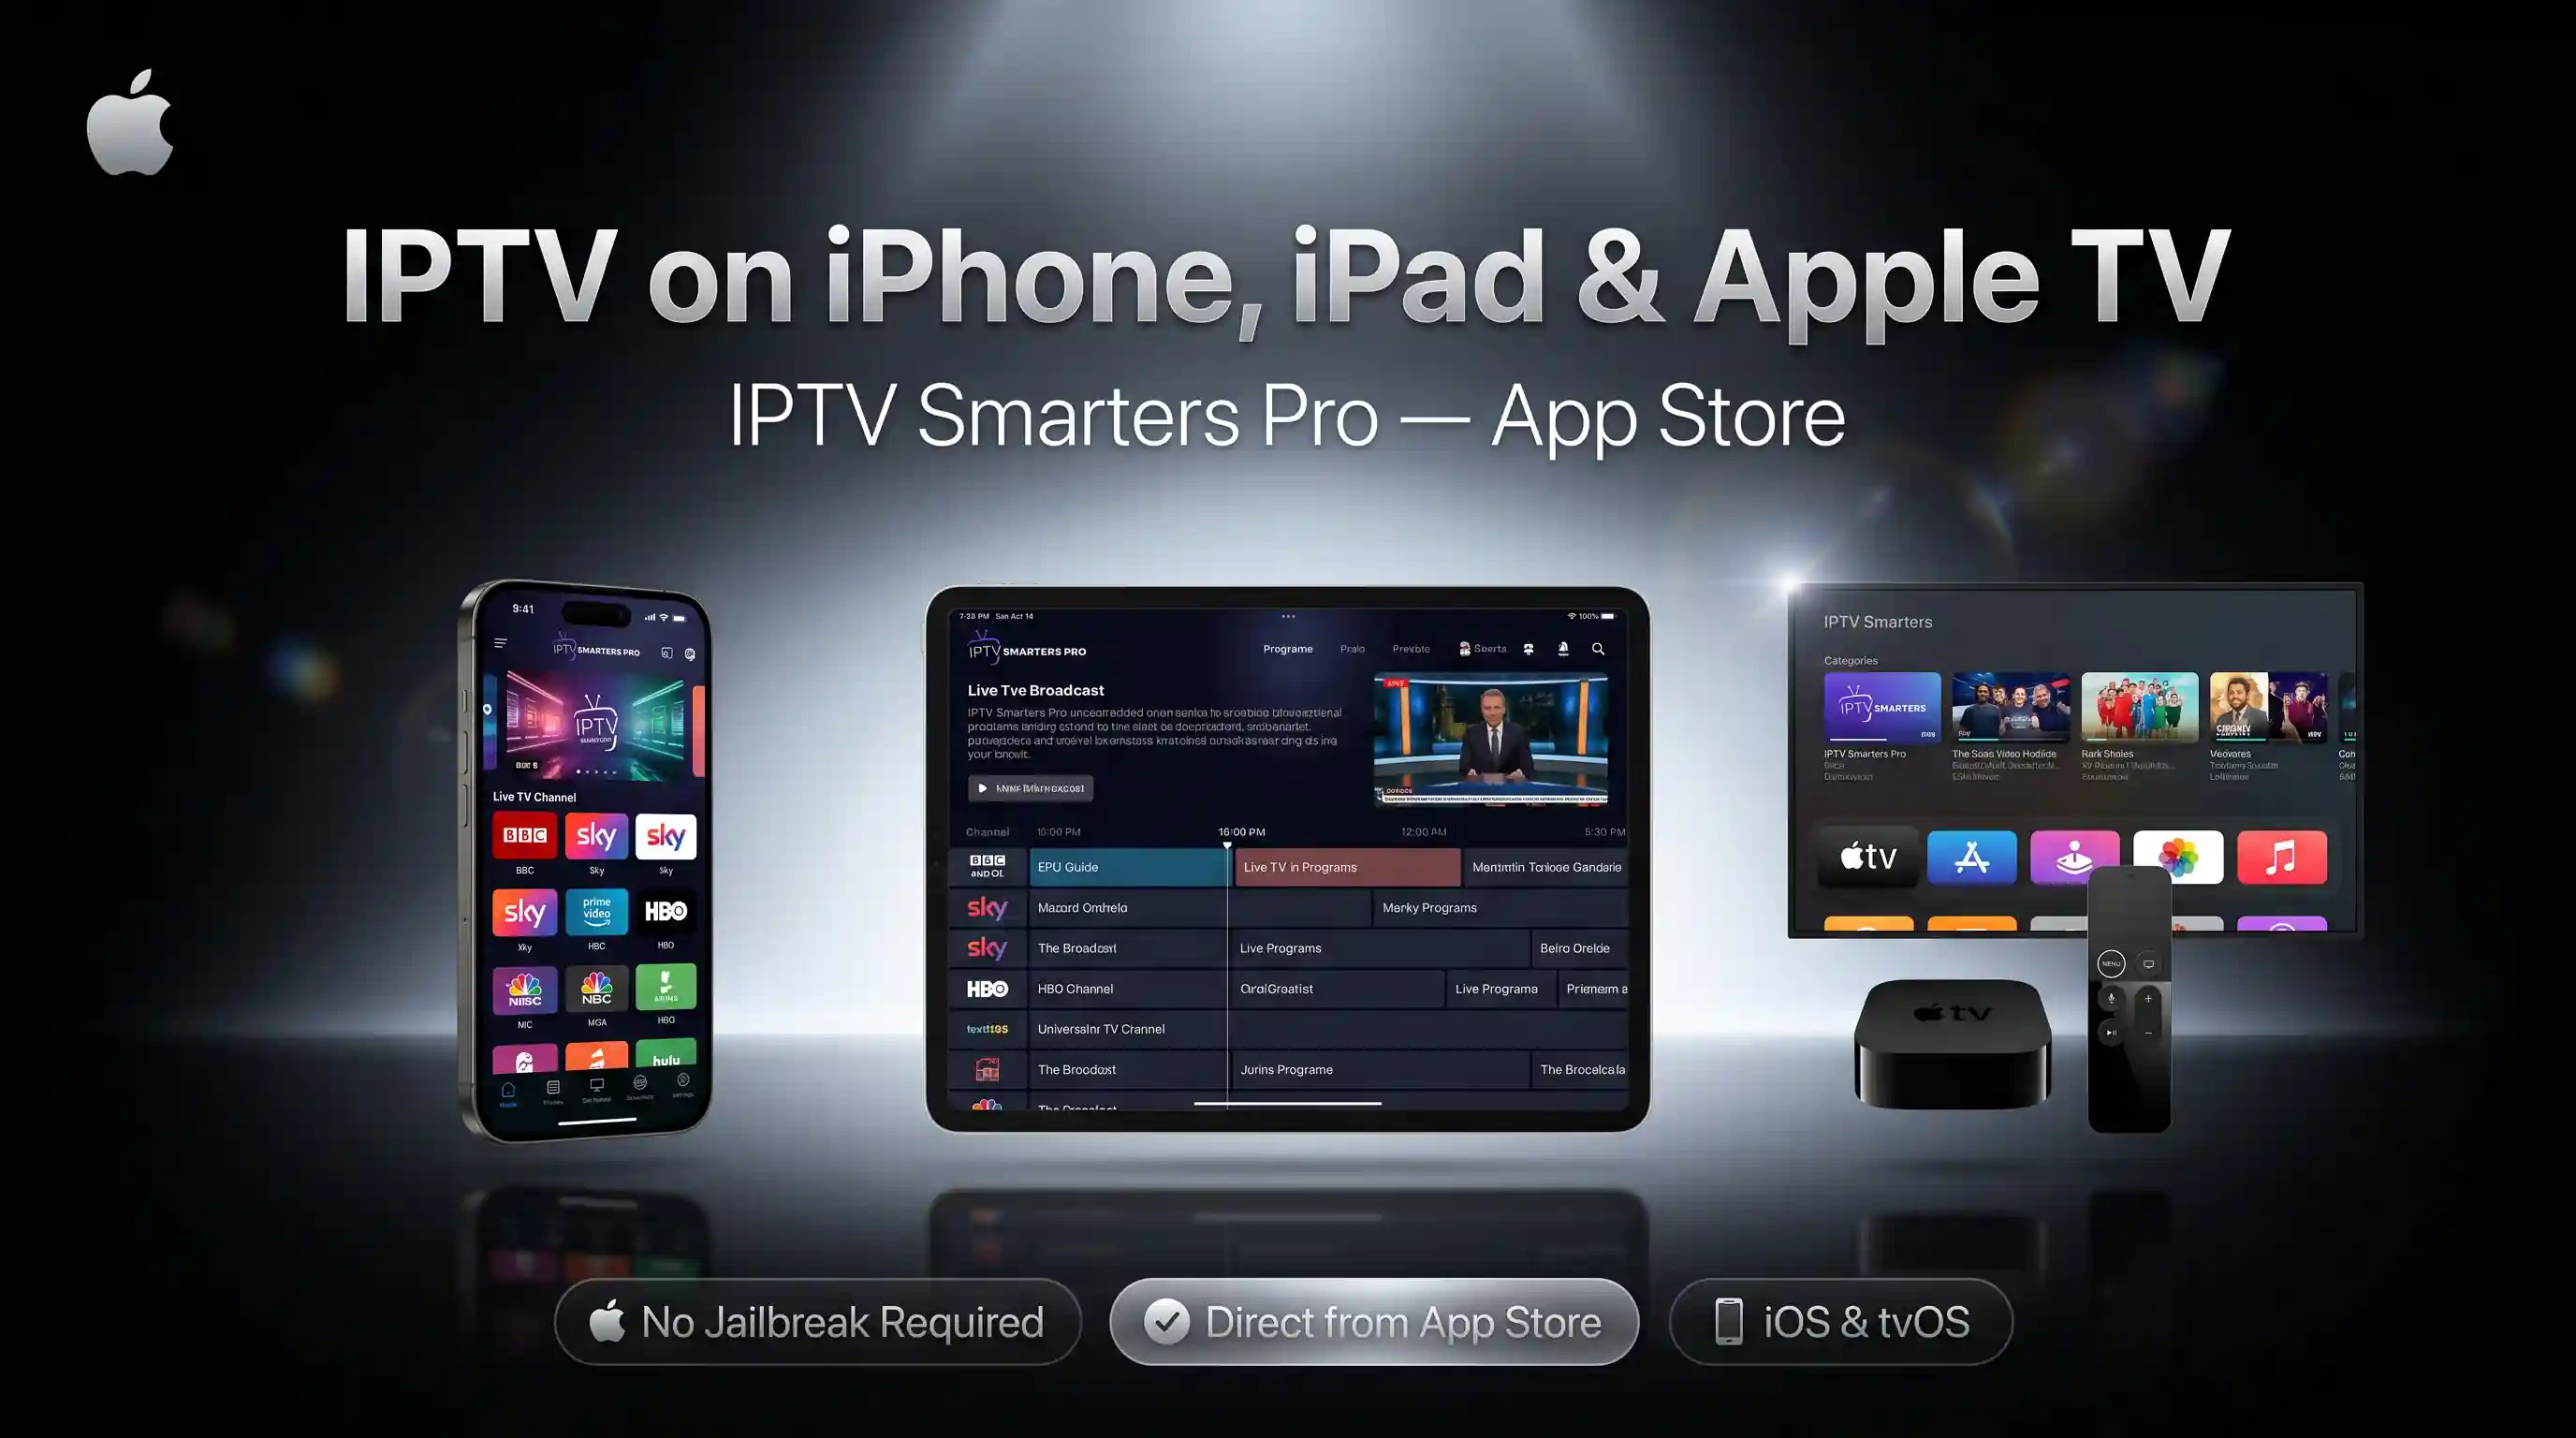
IPTV setup on iPhone, iPad and Apple TV requires zero technical steps — no jailbreak, no sideloading. Smarters Player Lite is available directly from the App Store and works on all iOS and tvOS devices running iOS 13 or later.
| Step | Action | Time |
|---|---|---|
| 1 | Install Smarters Player Lite | 1 min |
| 2 | Launch and open Add Playlist | 1 min |
| 3 | Choose Xtream Code and enter credentials | 3 min |
Part 1: Install Smarters Player Lite on iPhone or iPad
Open the App Store on your iPhone or iPad. Search "Smarters Player Lite" and look for the app by WHMCS SMARTERS — it has 7,300+ ratings and a 4.7-star score.
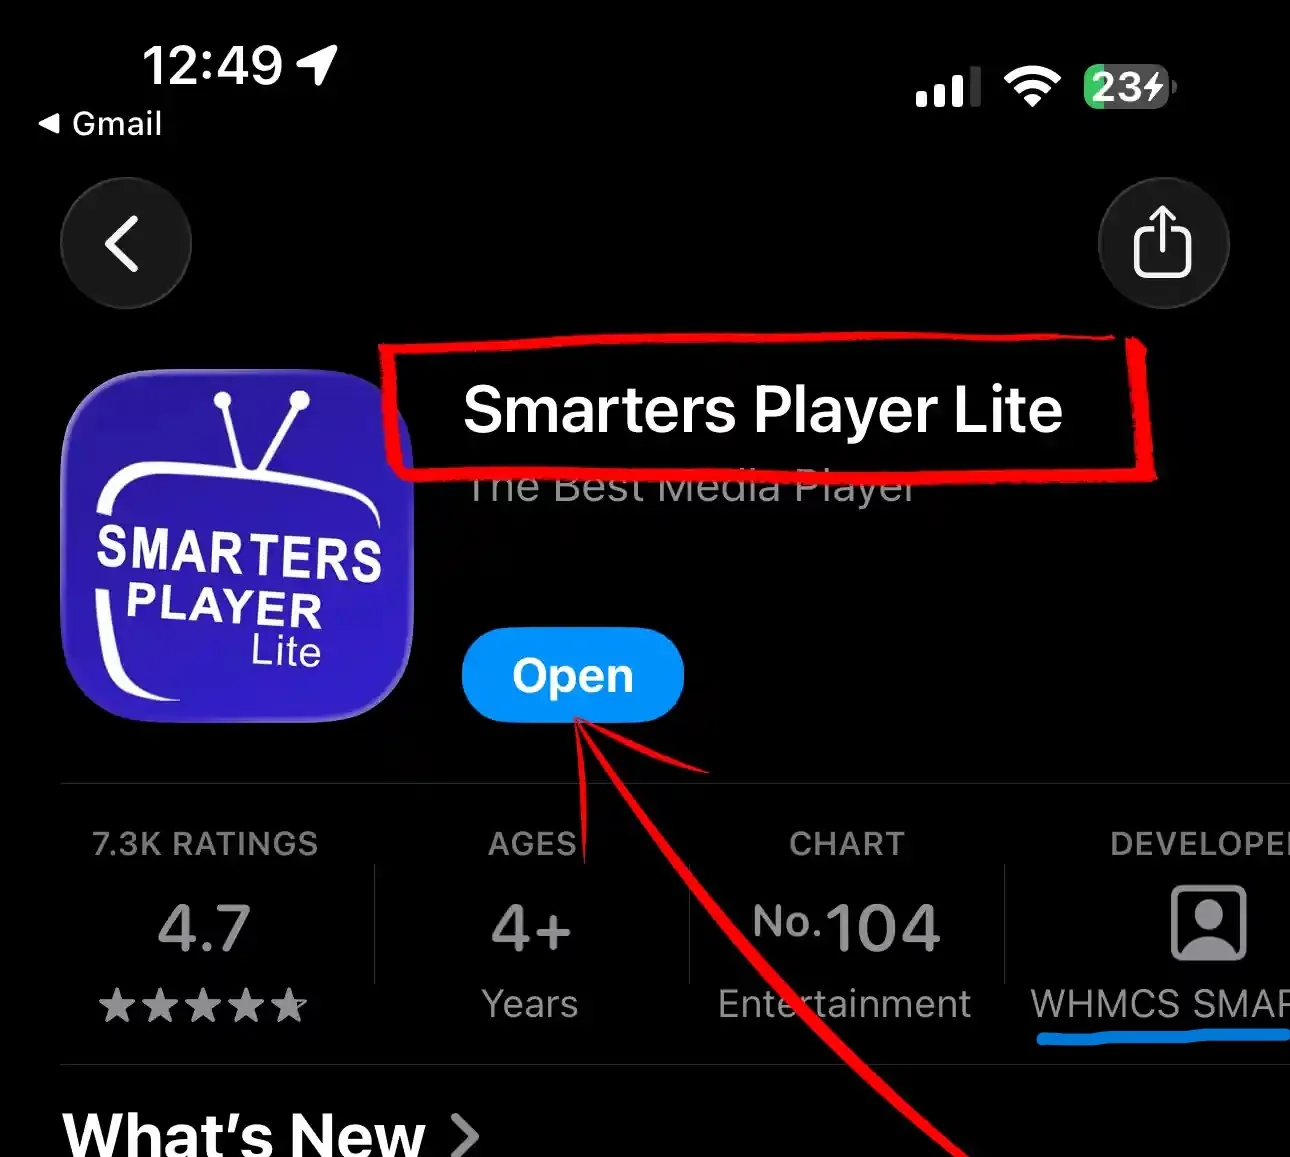
Tap Get to install (it shows Open if already installed). The app is free to download and works on iPhone, iPad and Apple TV with the same account.
Smarters Player Lite is installed on your iPhone or iPad. Open it to continue with Part 2.
Part 2: Launch the App and Add Your IPTV Playlist
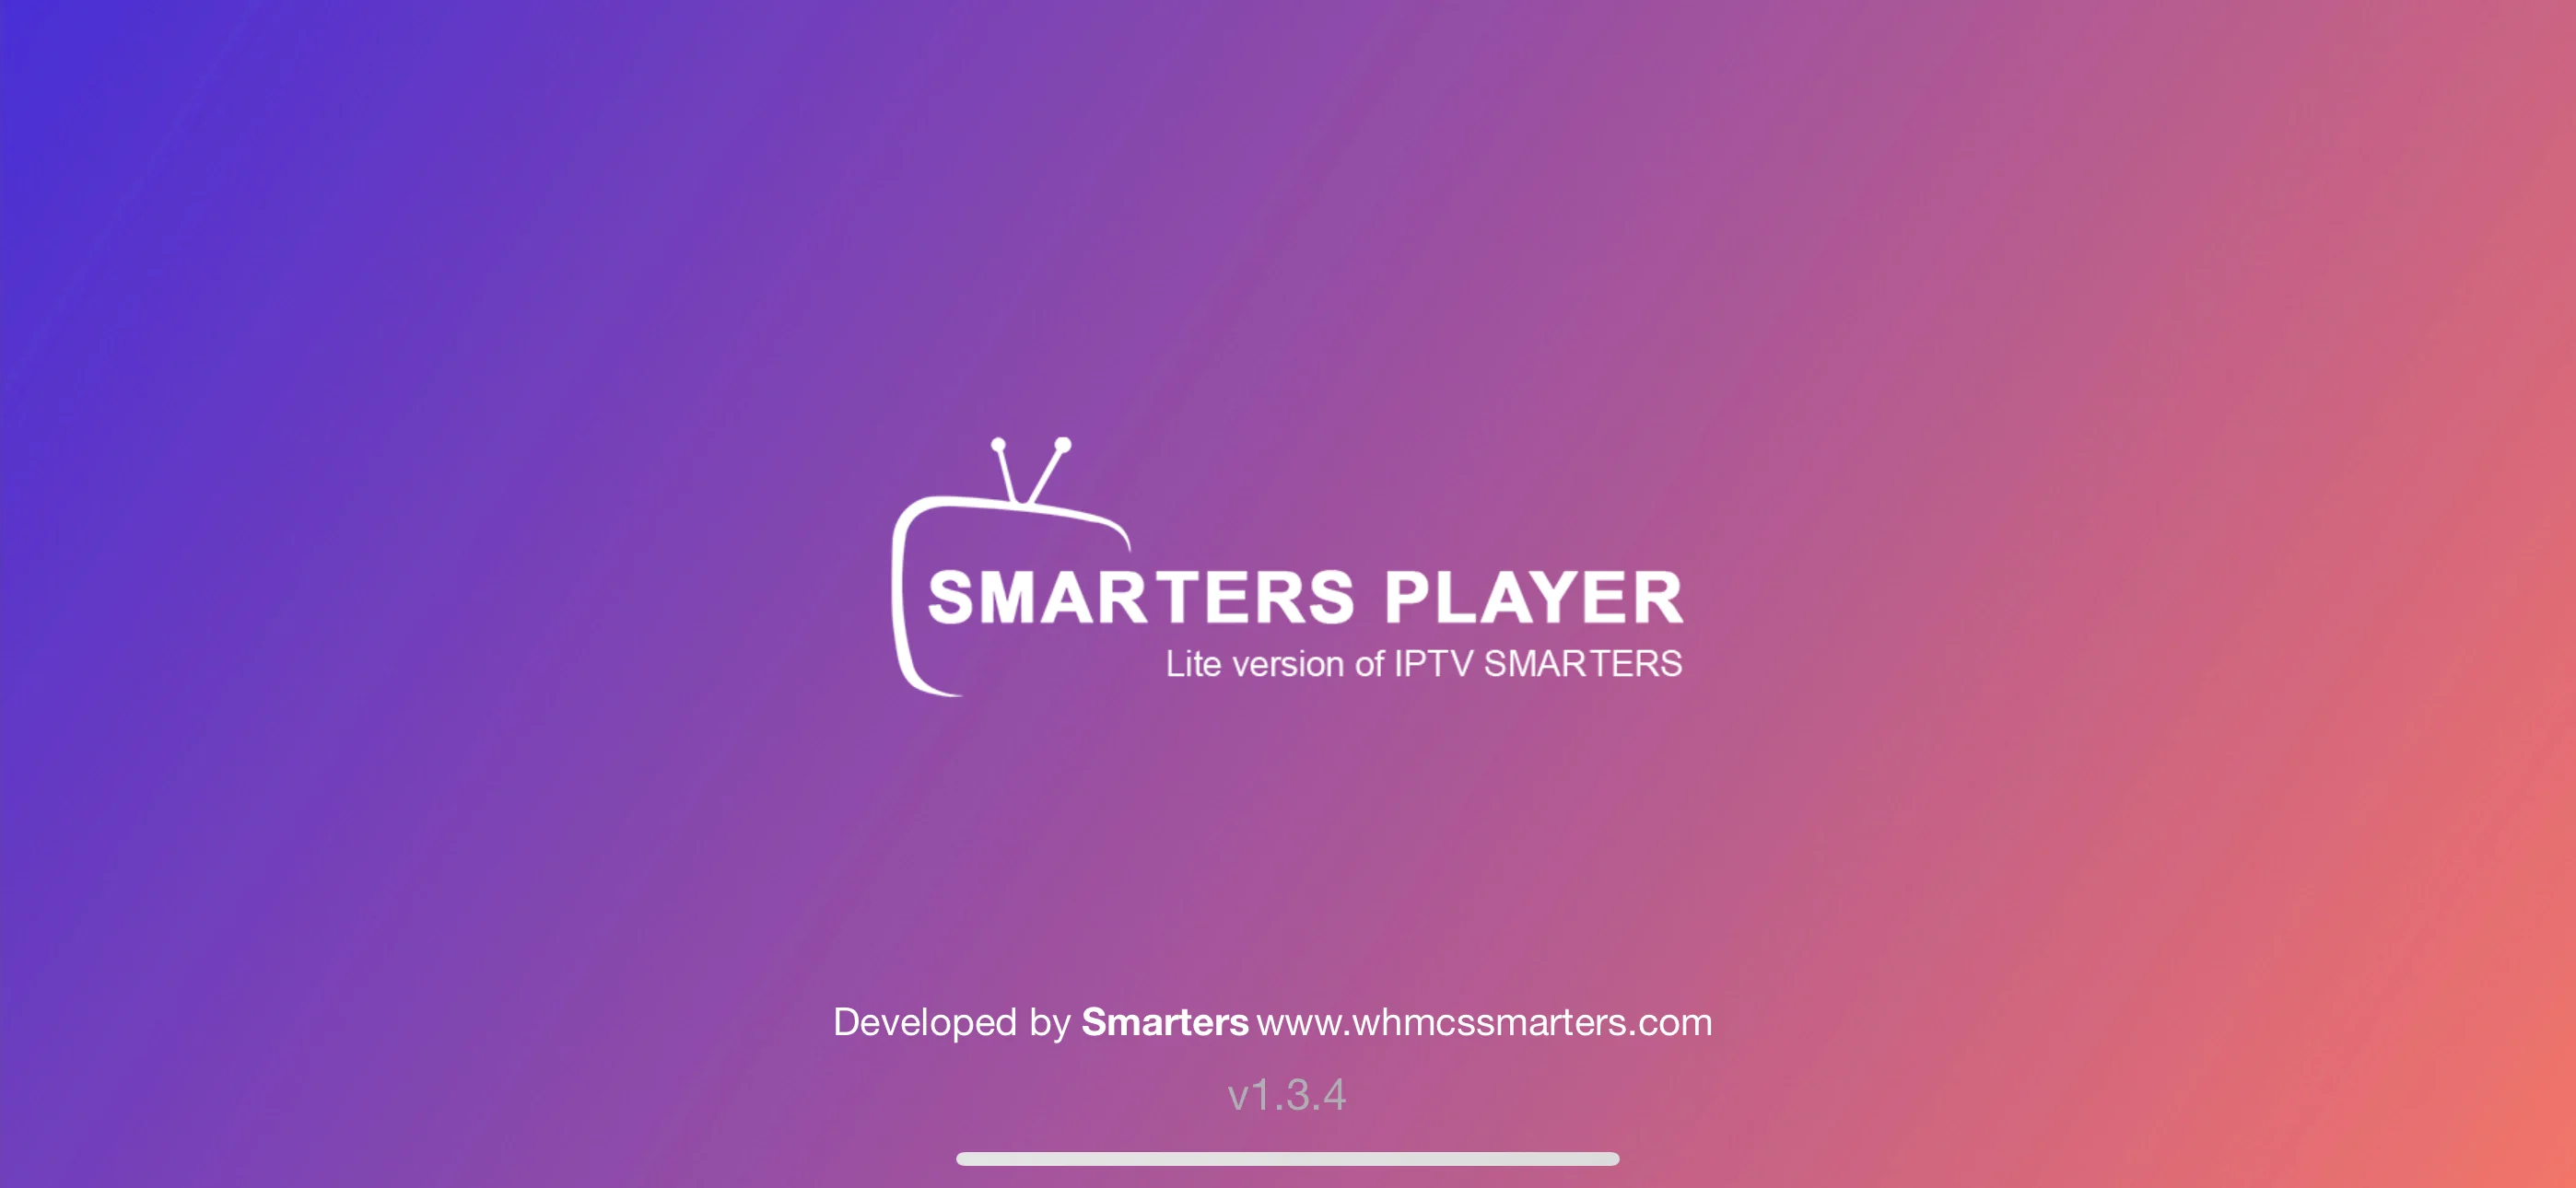
Open Smarters Player Lite from your iPhone home screen. On first launch you will see the loading splash screen — "Lite version of IPTV SMARTERS" — while the app initialises. This takes 2–3 seconds.
Wait for the splash to complete — the app will automatically take you to the playlist selection screen.
You will land on the Choose Your Playlist screen. You will see a single Add Playlist tile with a "+" icon. Tap it to begin connecting your IPTV service.
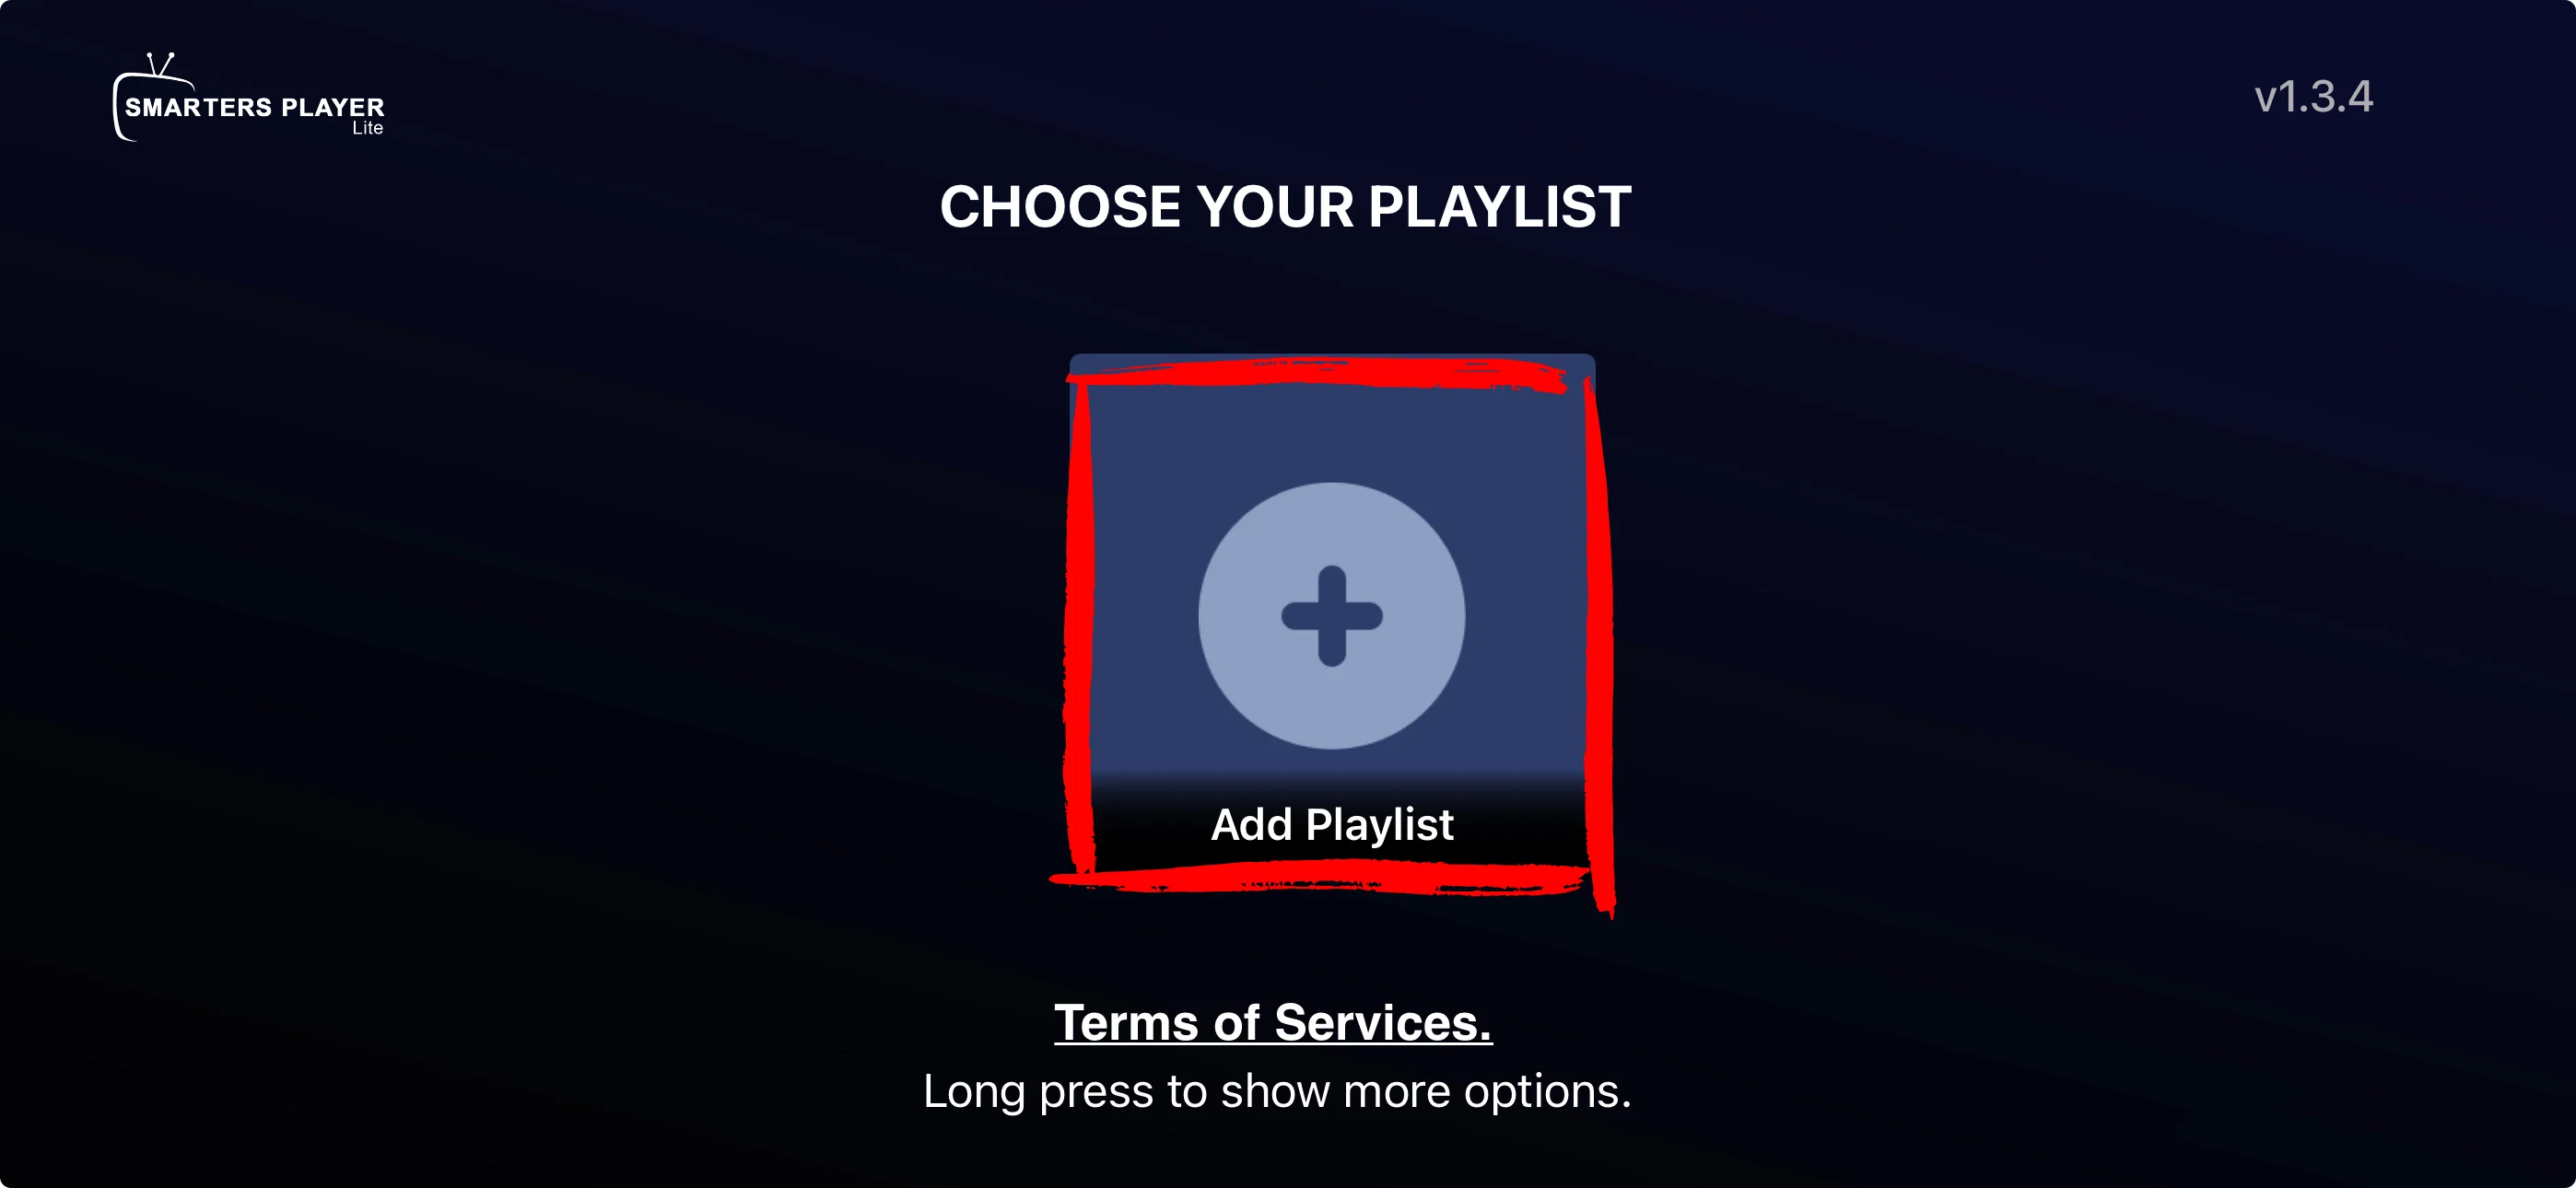
The text below reads "Long press to show more options" — ignore this for now. A single tap on the tile is all you need.
Your playlist is added. Continue to Part 3 to choose Xtream Code and enter your credentials.
Part 3: Choose Xtream Code and Enter Your Credentials
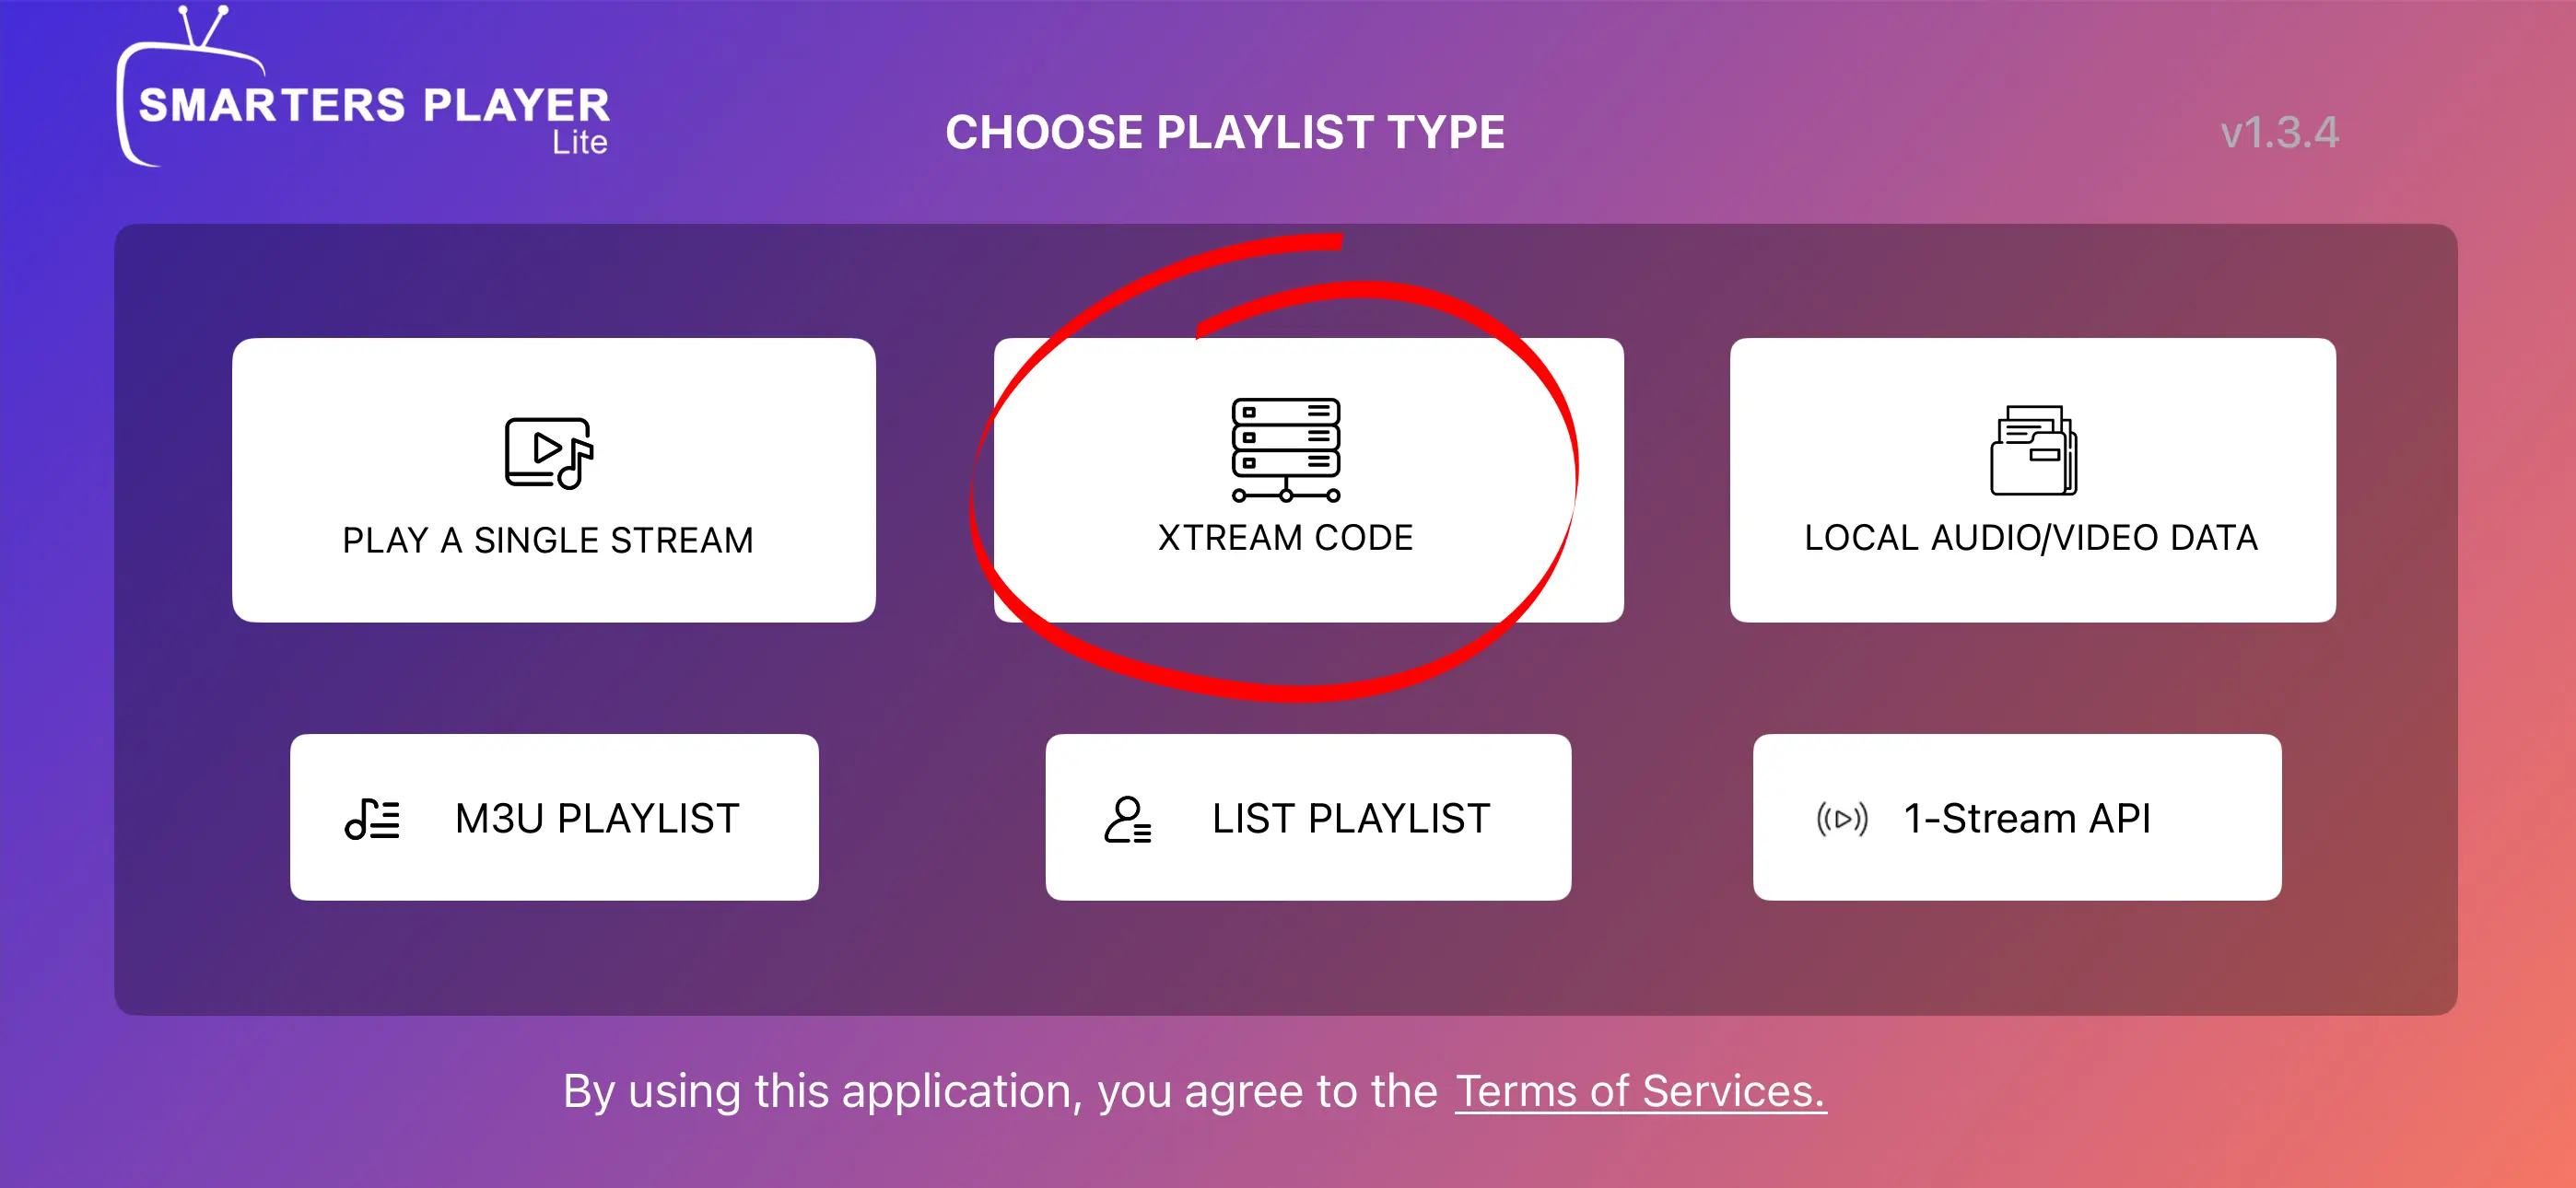
The Choose Playlist Type screen shows six options. Select Xtream Code — the option highlighted in the centre. This is the recommended method for all IPTV providers that give you a server URL, username and password.
Fill in the Xtream Code login form with the details provided by your IPTV service:
- Any Name — a label for this profile (e.g. "My IPTV")
- Server URL — the full URL including port (e.g. http://server.com:8080)
- Username — provided by your IPTV service
- Password — provided by your IPTV service
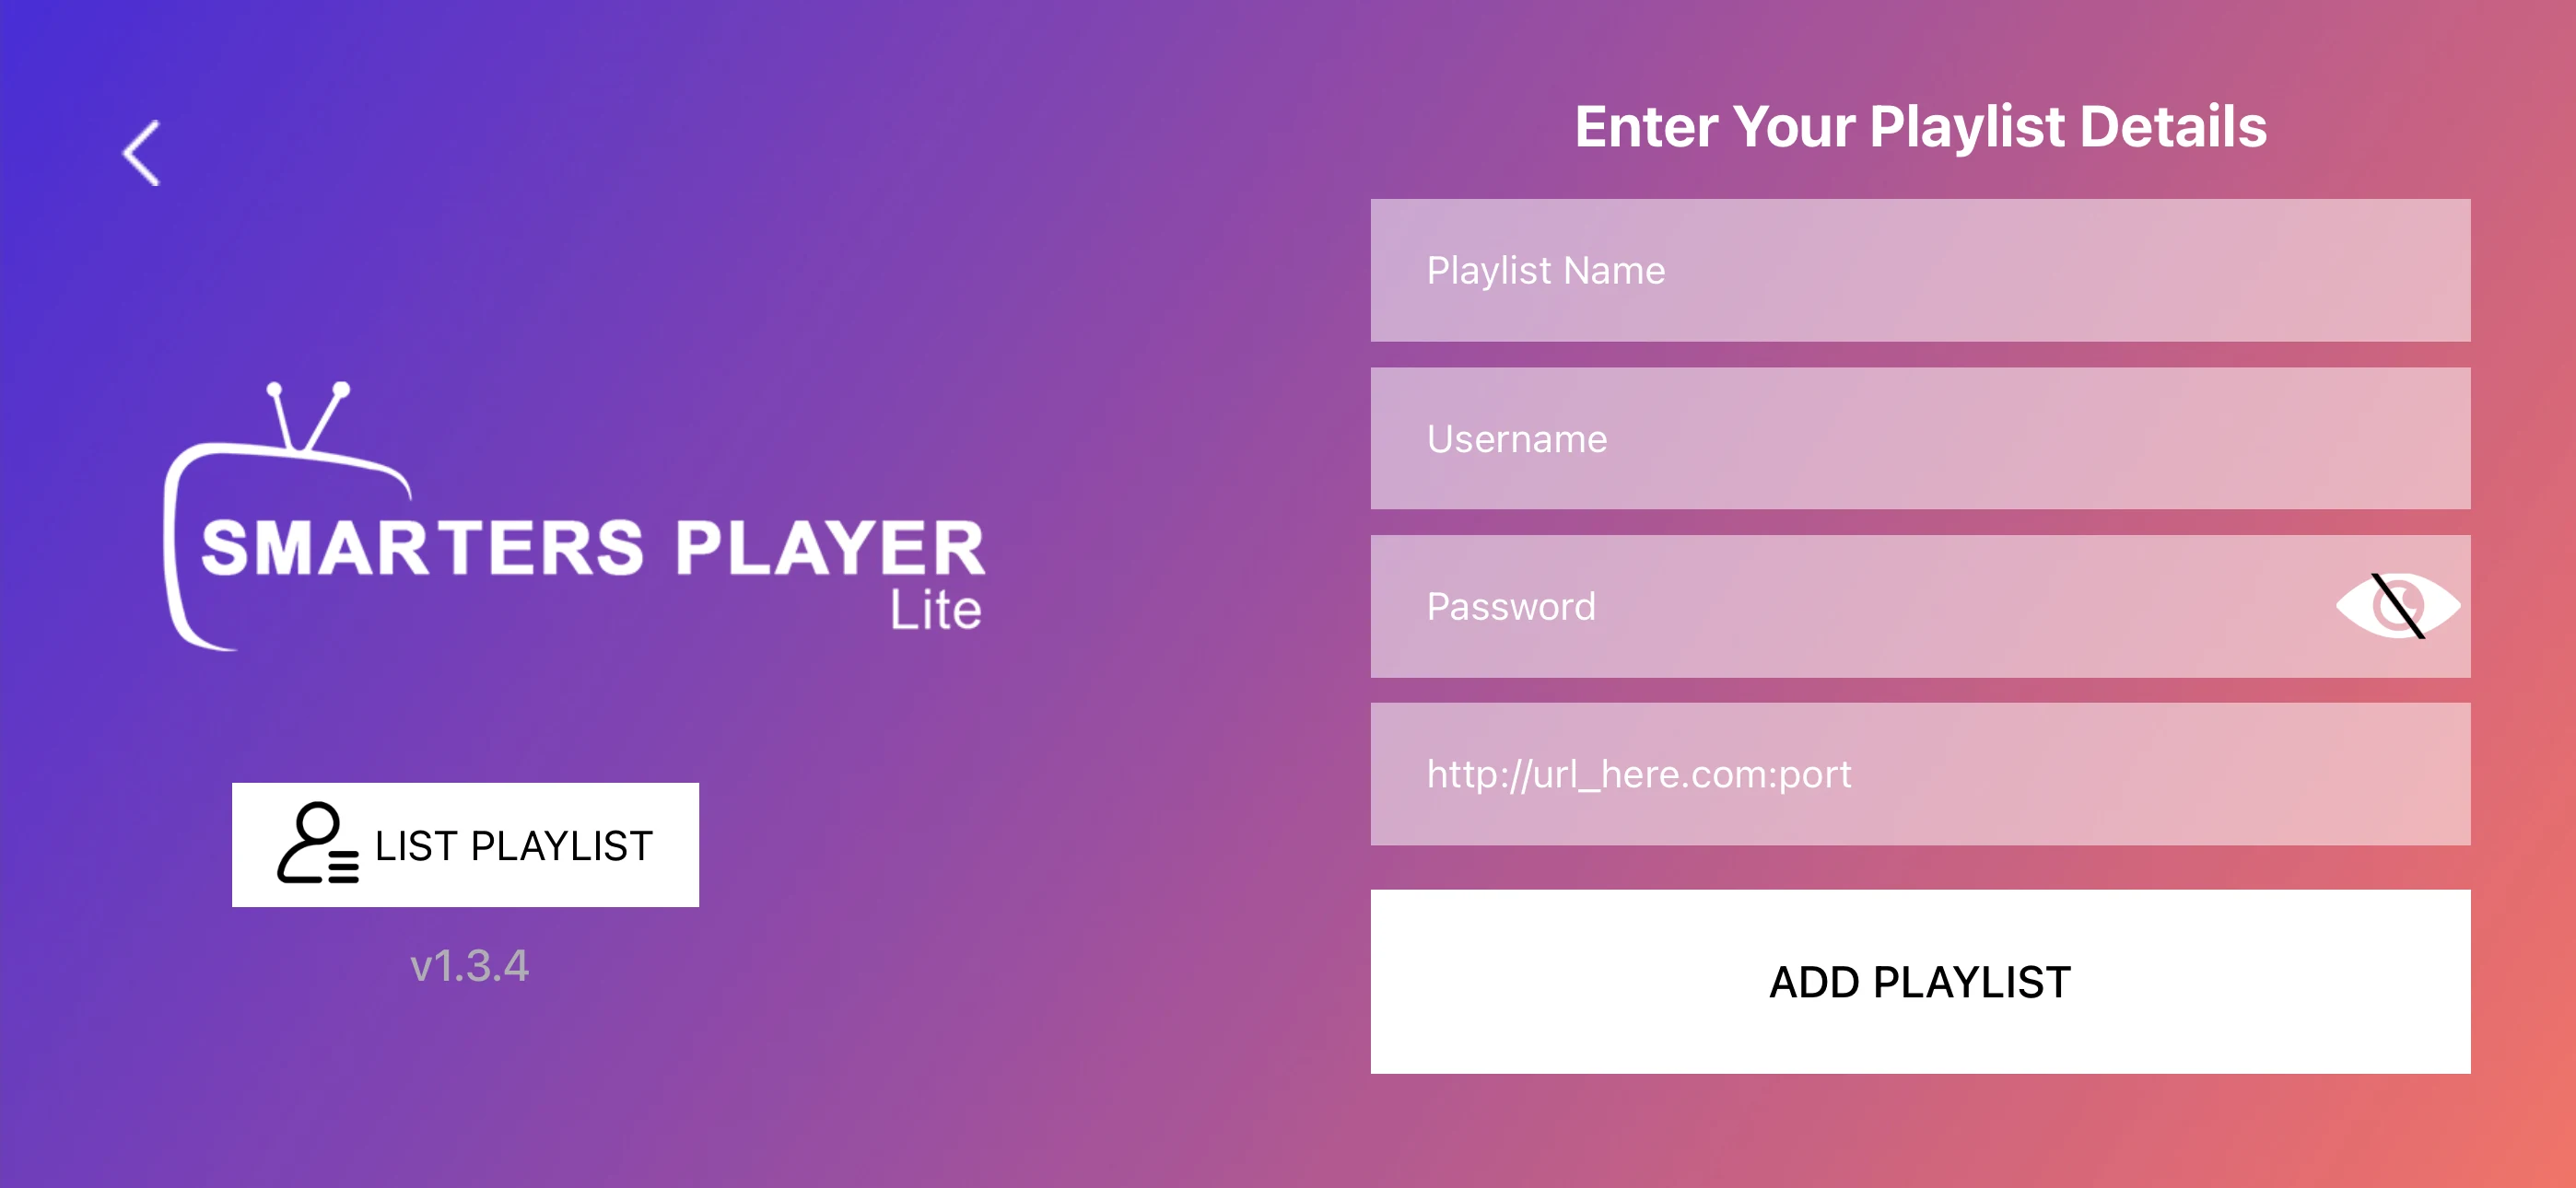
Tap Add User when all fields are filled. Smarters Player Lite will immediately begin loading your playlist.
After tapping Add User, you will see the loading screen — "Please wait, while we are getting things ready for the first time" — with a progress bar at the bottom. This is completely normal.
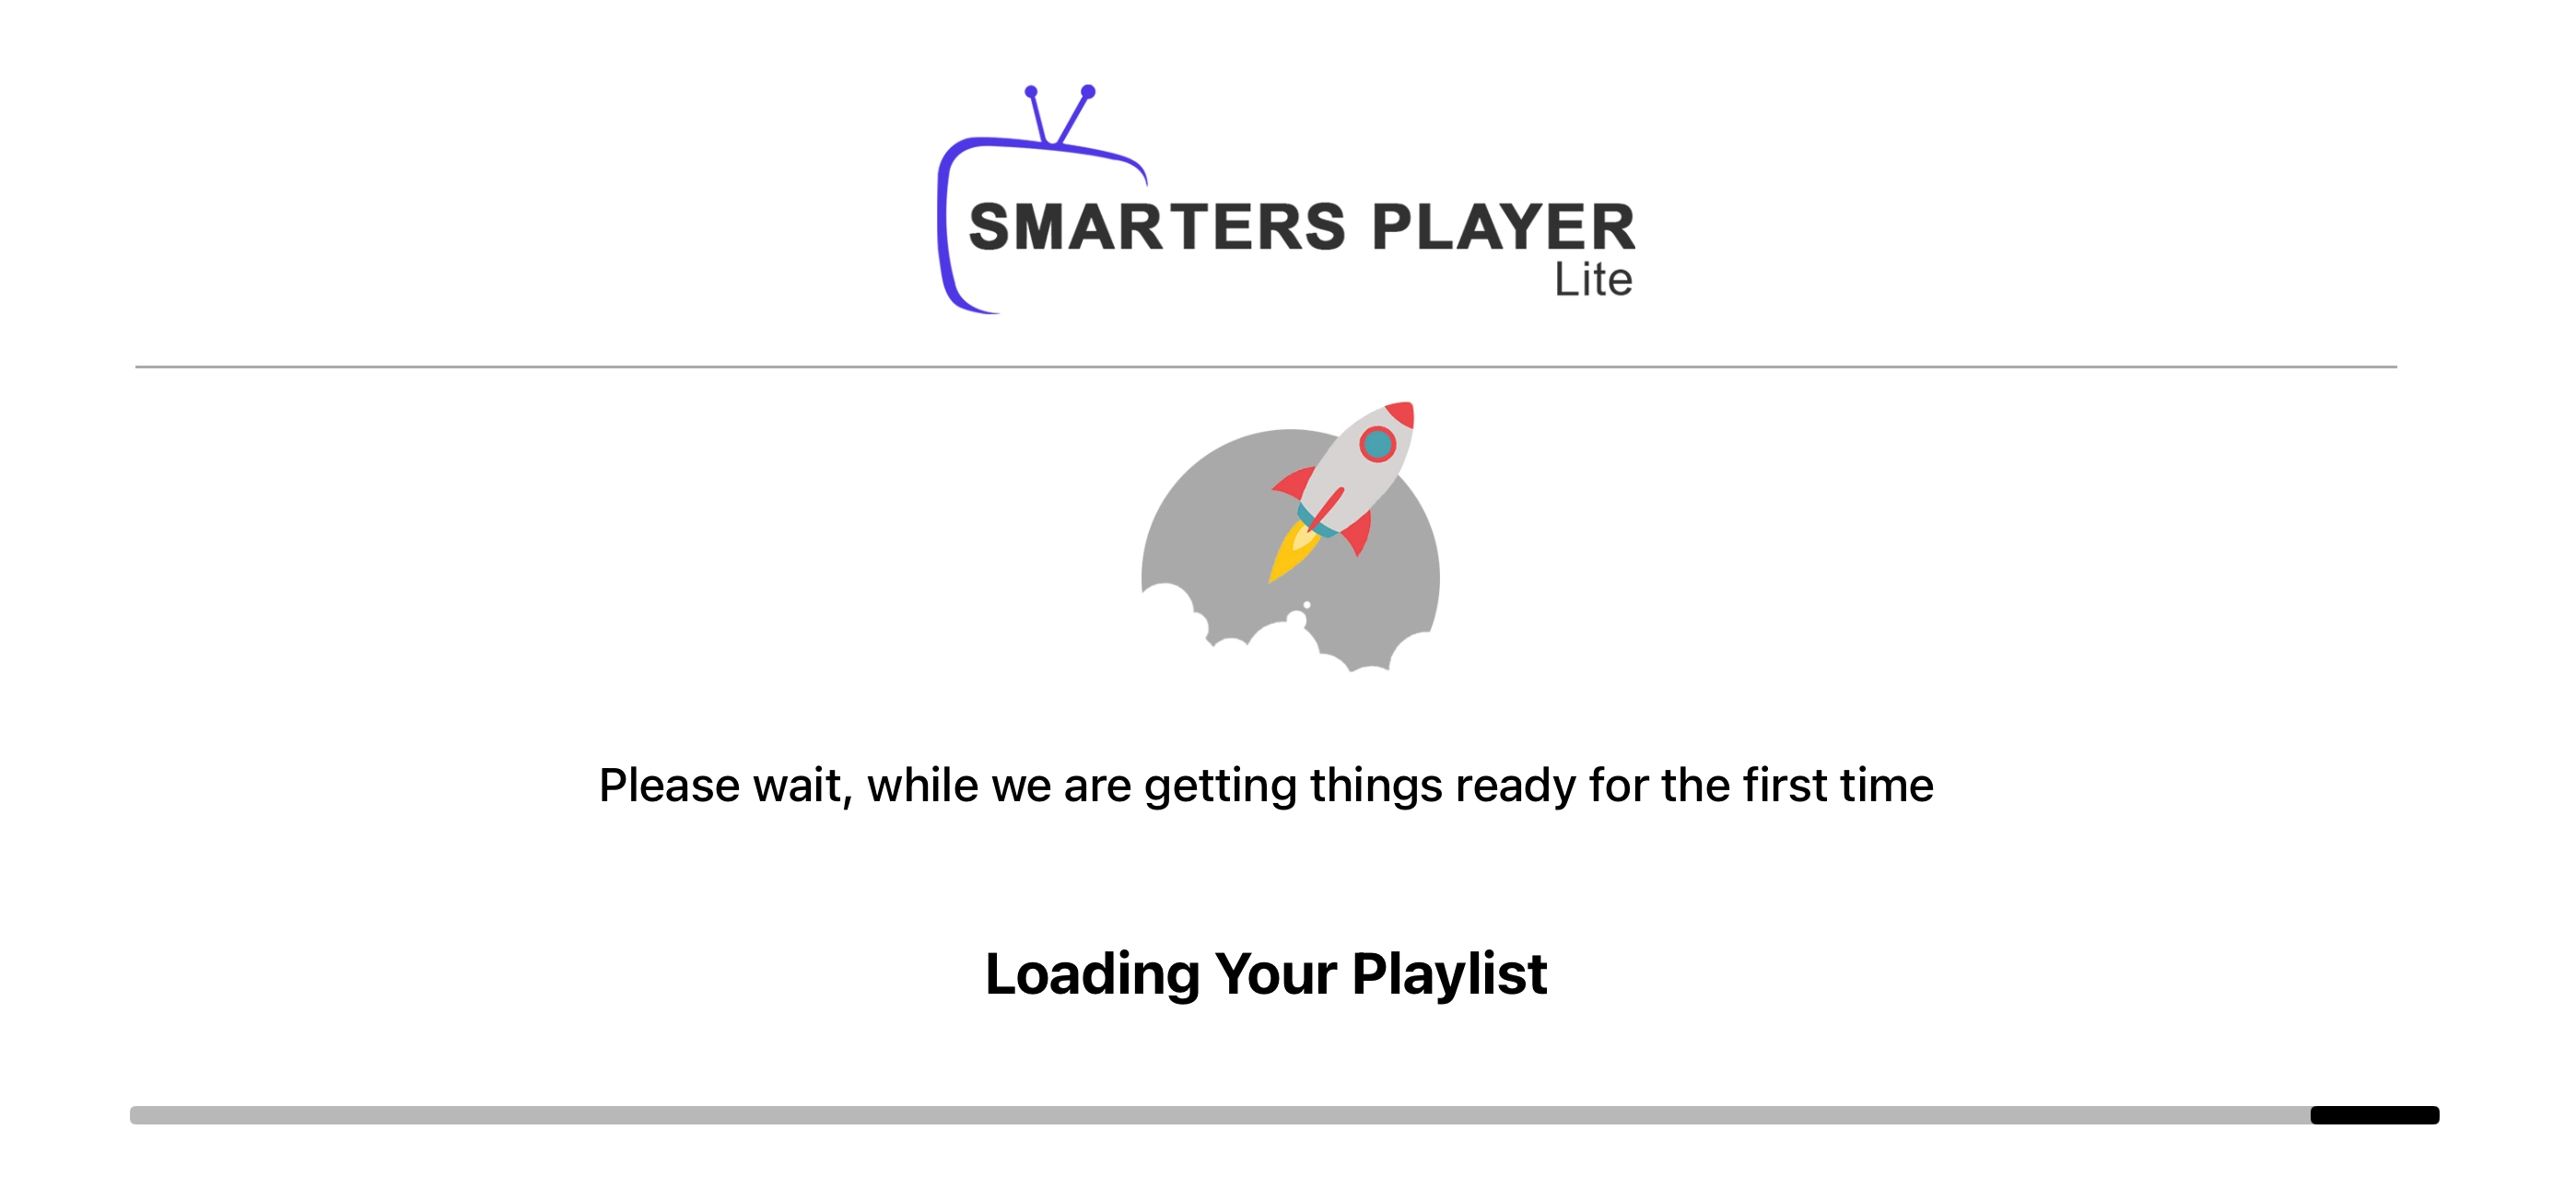
Loading time depends on your playlist size. Most playlists load in 30–90 seconds. Do not close the app during this step.
Smarters Player Lite is fully configured on your iPhone or iPad. Your IPTV channels are ready — tap Live TV to start watching.
iPhone IPTV — Common Problems & Quick Fixes
Server URLs, usernames and passwords are case-sensitive. Copy-paste them directly from your provider's welcome email. Use our free IPTV Checker to verify your credentials before re-entering them in the app.
You need at least 10 Mbps for stable 1080p on mobile. Test your connection with our IPTV Speed Test. If you are on cellular (4G/5G), switch to WiFi for a more stable stream. iOS also limits background data — keep the app open while streaming.
App Store availability varies by region. If Smarters Player Lite does not appear in search, use the direct link: apps.apple.com — Smarters Player Lite. Alternatively, search for GSE Smart IPTV or iMPlayer — both work with Xtream Codes on iOS.
Make sure your iPhone and Apple TV are on the same WiFi network. Swipe down from the top-right corner to open Control Centre, tap Screen Mirroring and select your Apple TV. Restart both devices if AirPlay does not appear.
How to Setup IPTV on Windows and Mac
▼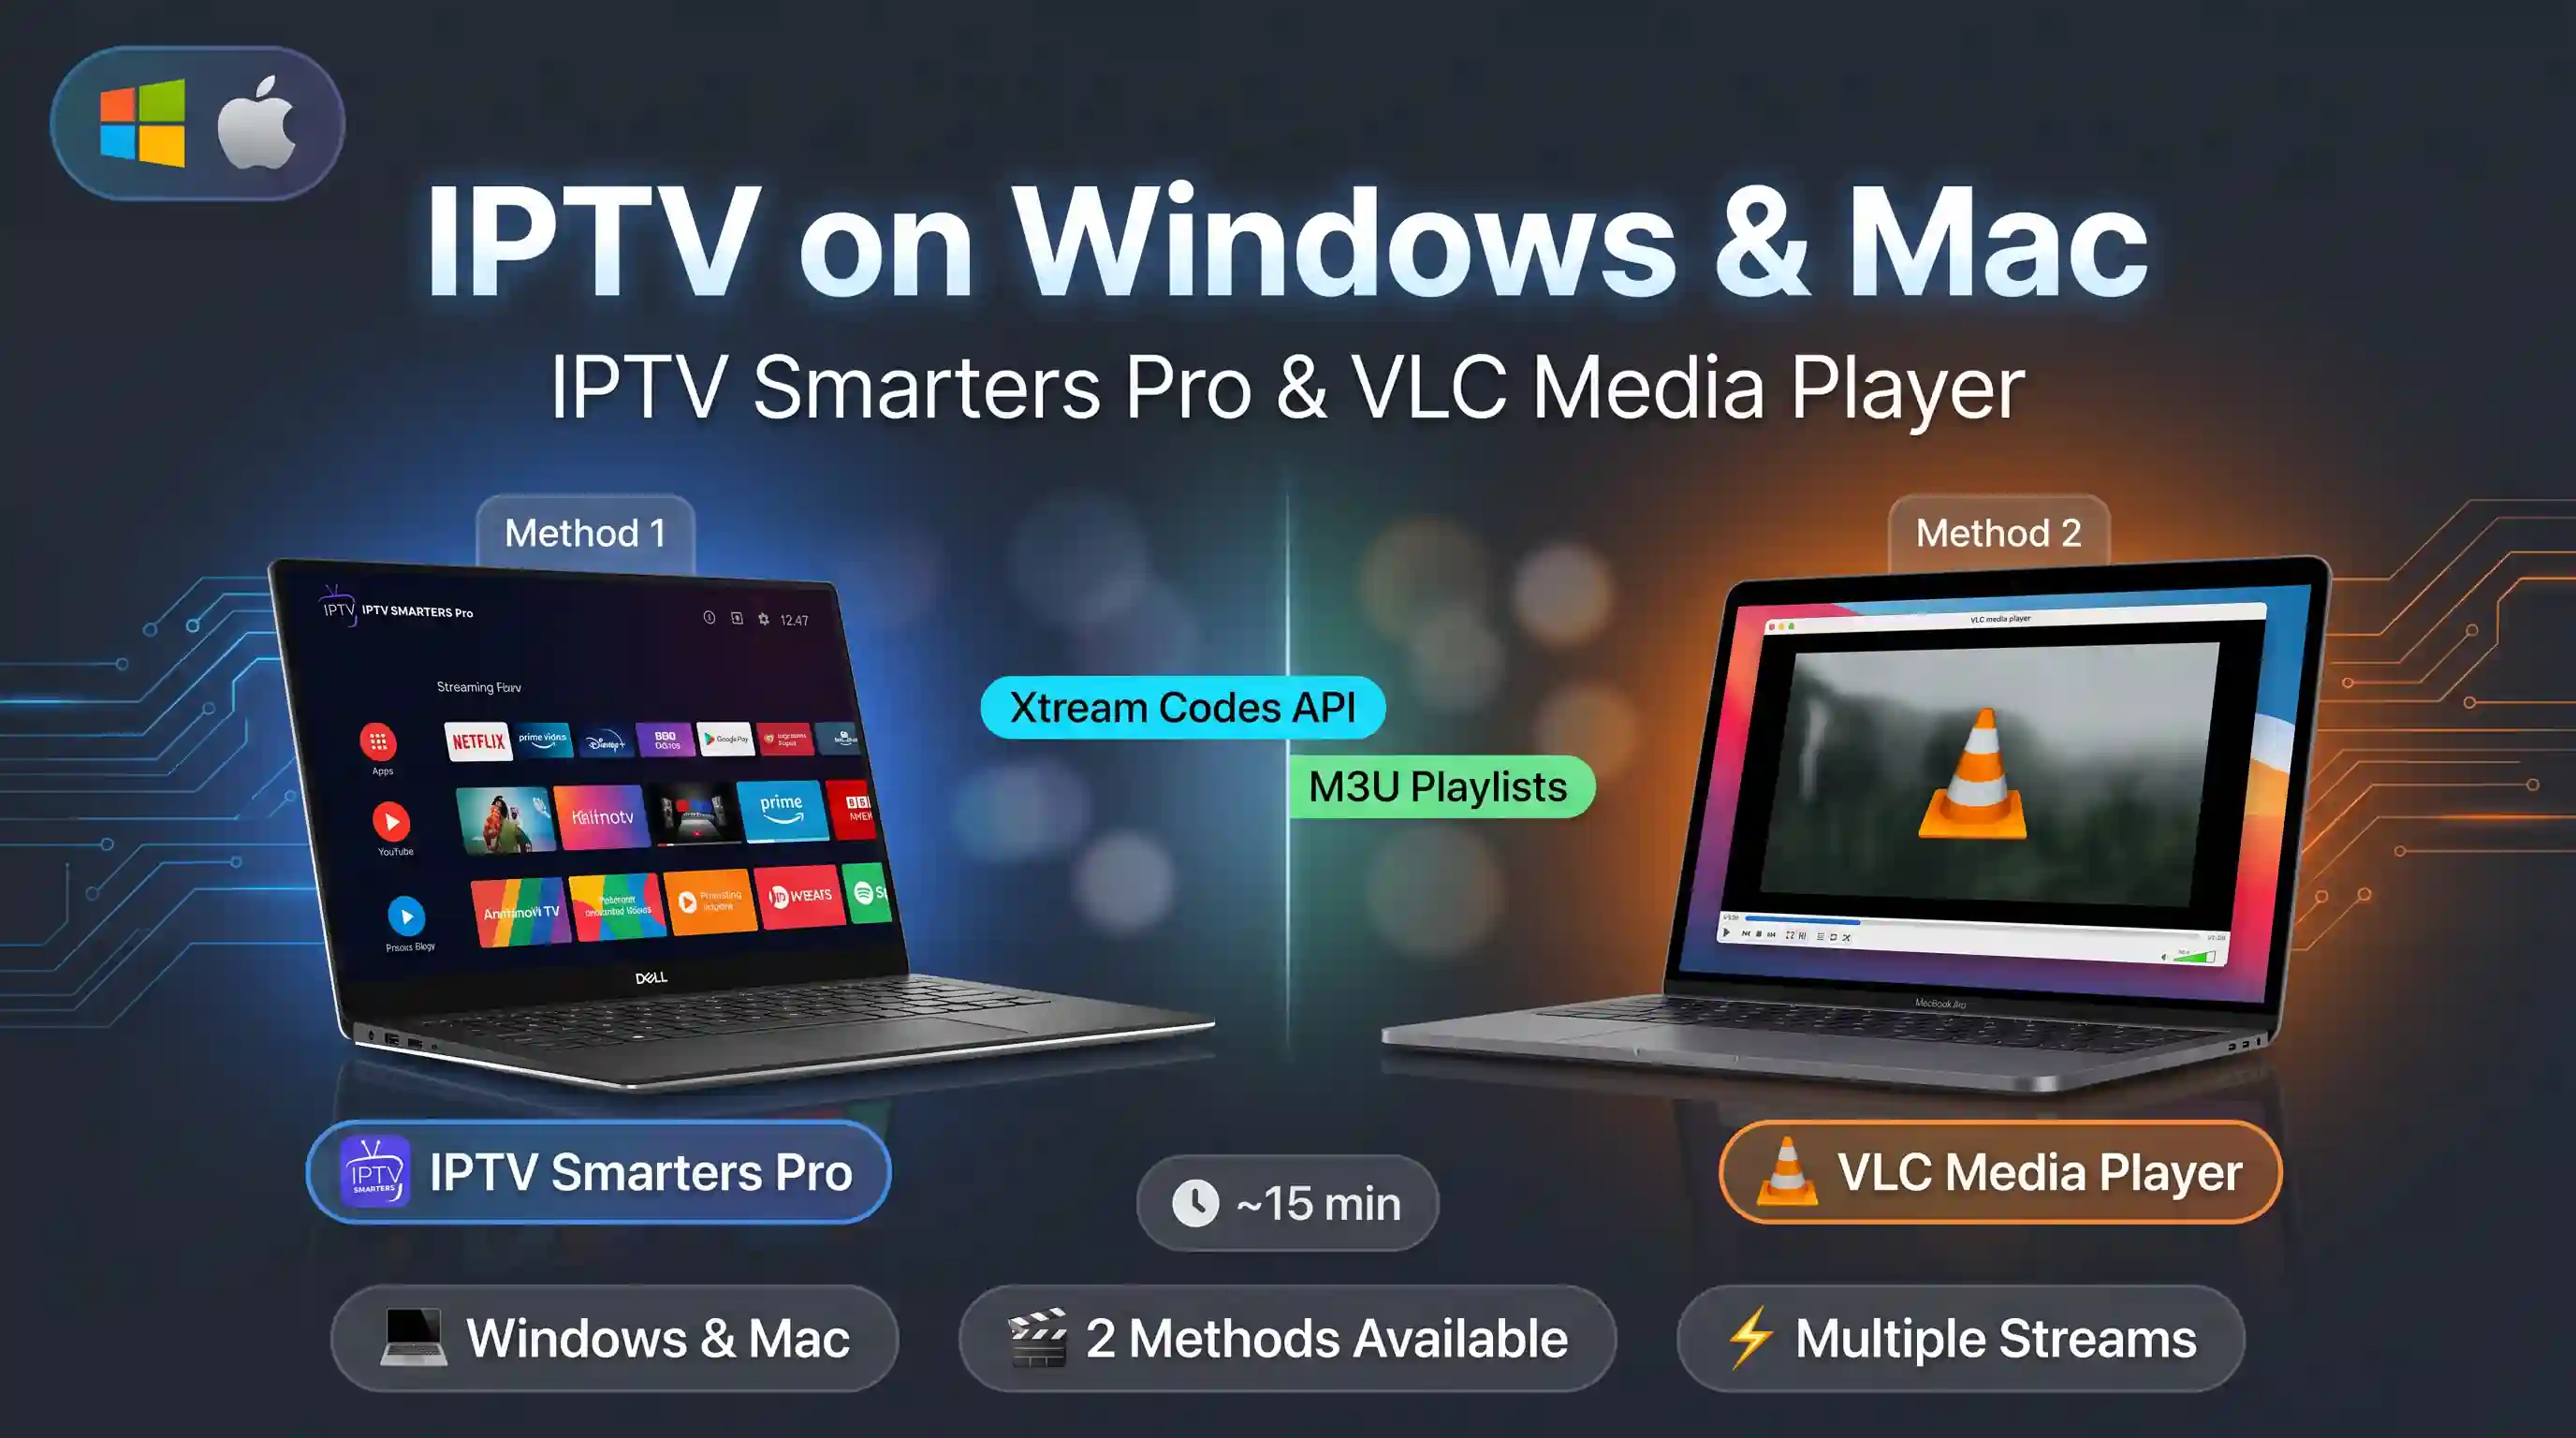
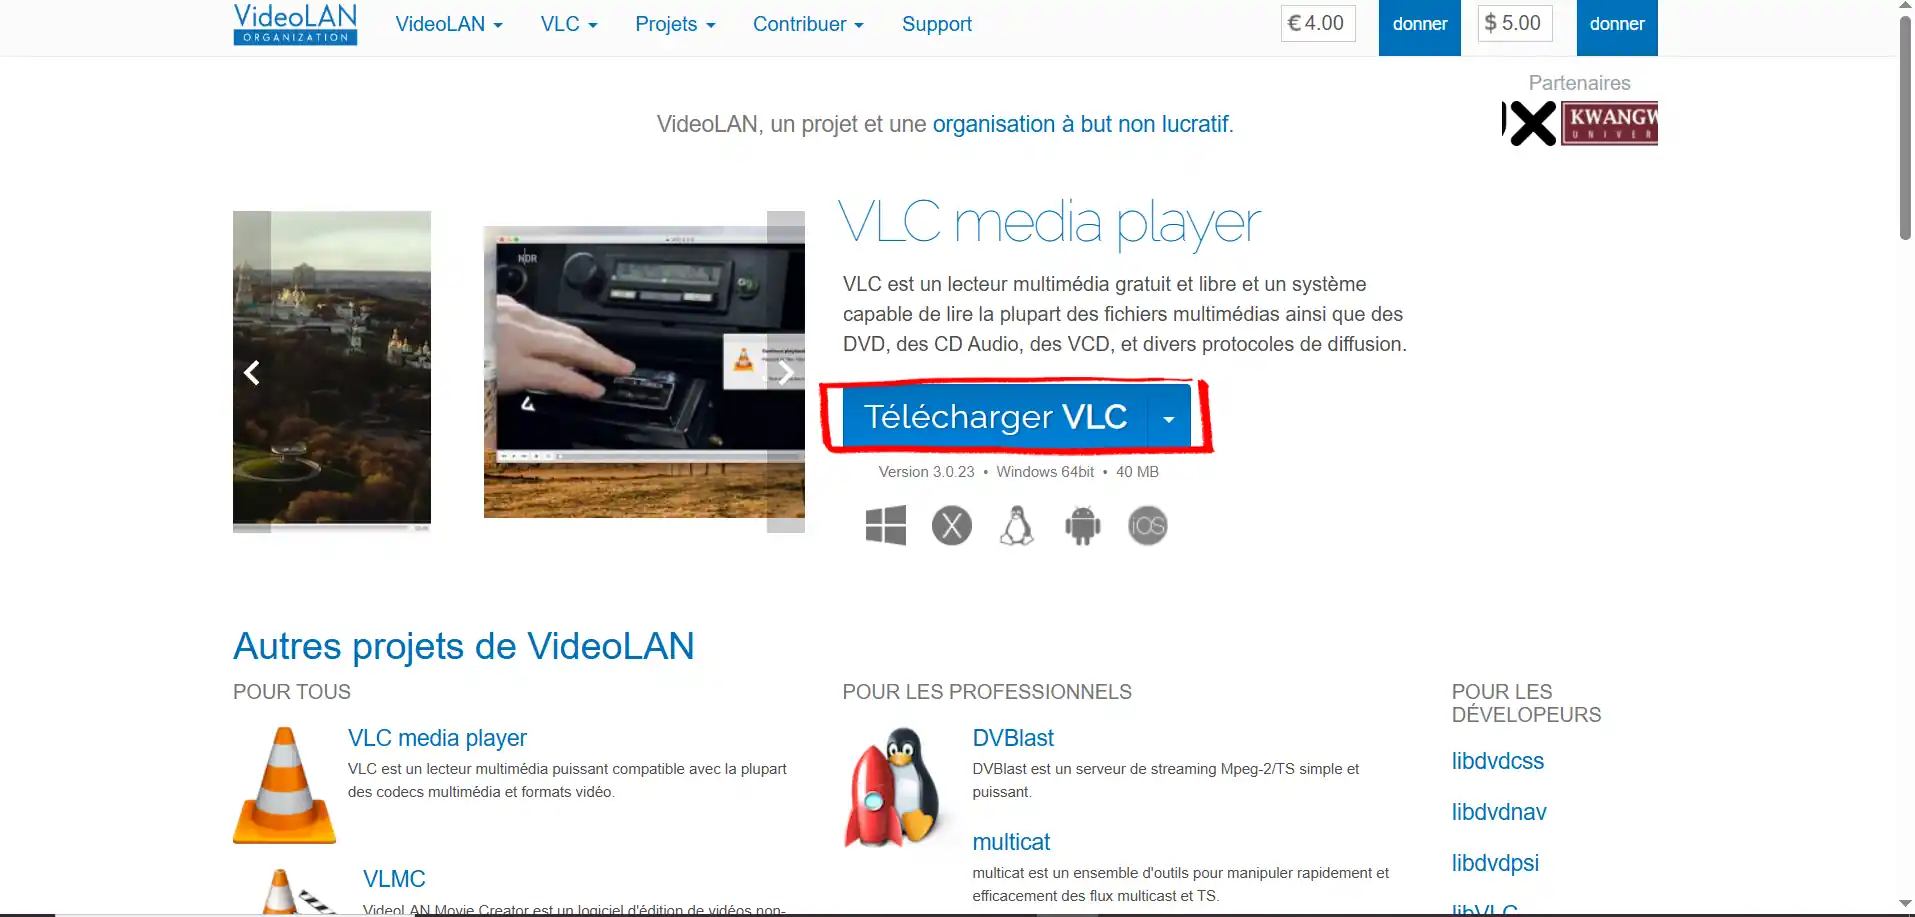
Setting up IPTV on a Windows PC or Mac is straightforward — no sideloading, no developer mode. Two methods are available: IPTV Smarters Pro for the full experience (EPG, VOD, multi-playlist), or VLC if you just want a quick M3U stream with zero setup.
| Step | Action | Time |
|---|---|---|
| 1 | Download and install the app | 3 min |
| 2 | Accept terms and choose login method | 1 min |
| 3 | Add your IPTV playlist | 3 min |
👇 Select your preferred method
Method 1: IPTV Smarters Pro on Windows & Mac (Recommended)
IPTV Smarters Pro is the same app you know from Android — the desktop version works identically. It supports Xtream Codes API and M3U, includes a full EPG, and handles VOD and series. Setup takes under 10 minutes.
Part 1: Download and Install IPTV Smarters Pro
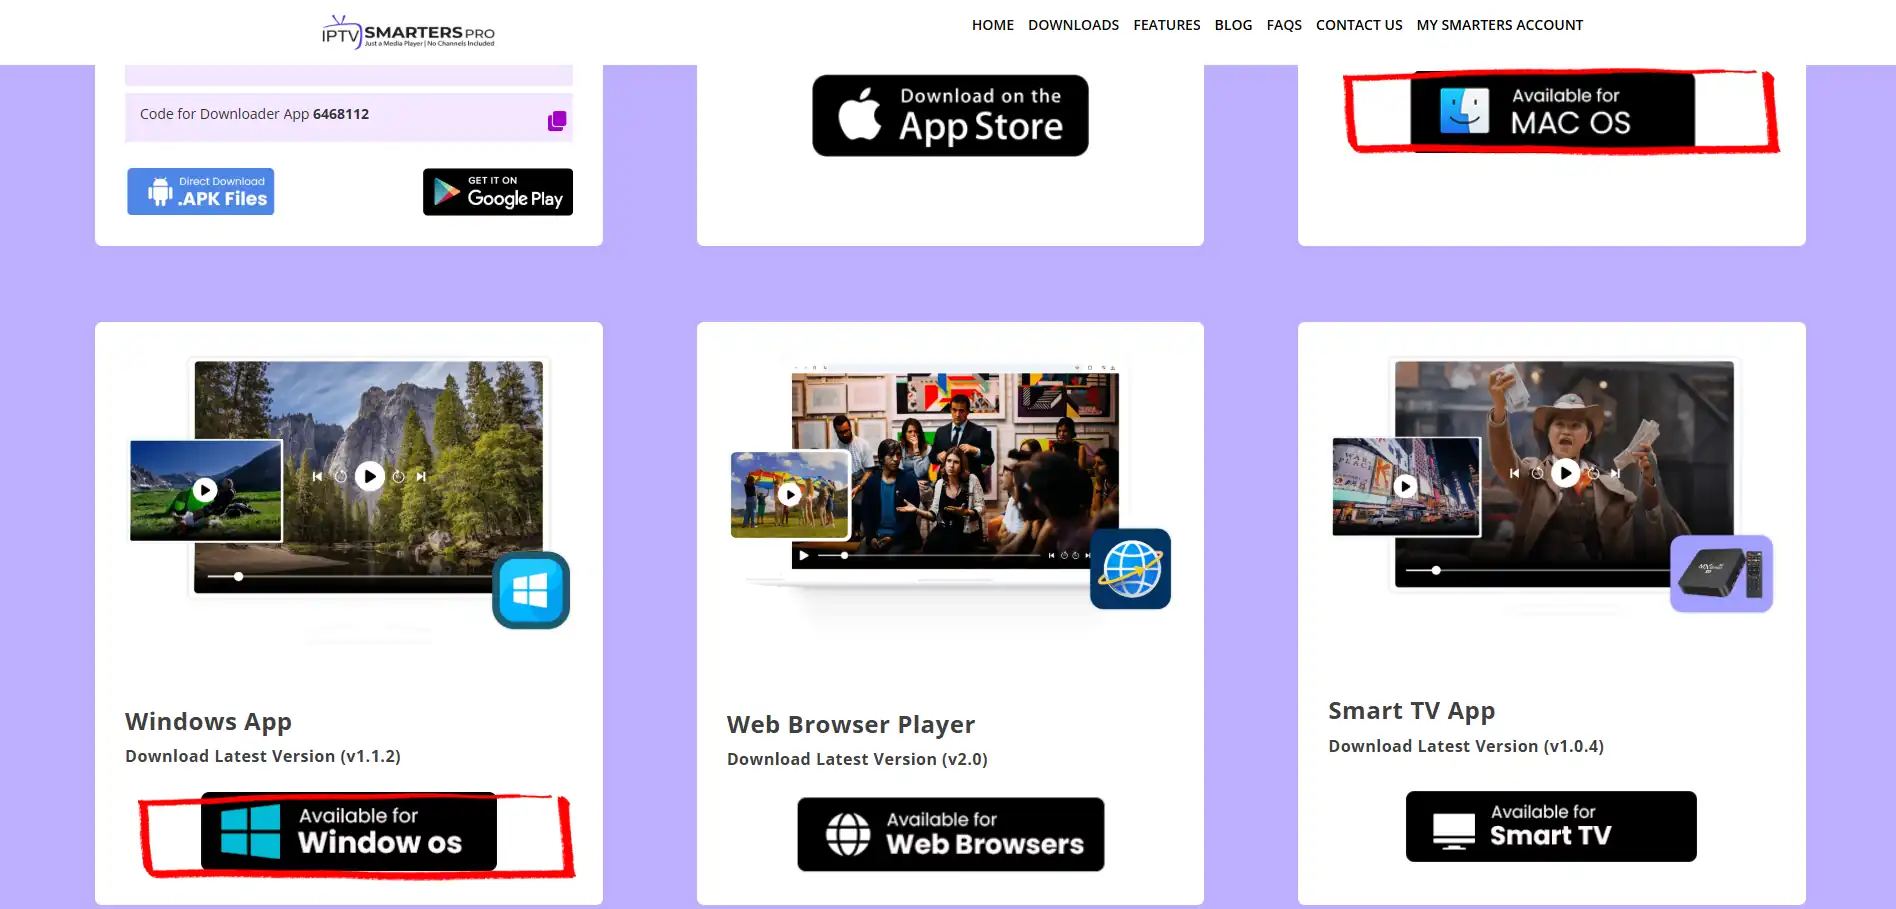
Go to iptvsmarters.com and click Downloads. Select Available for Windows OS or Available for MAC OS depending on your device.
The download starts automatically. Once the installer is downloaded, run it.
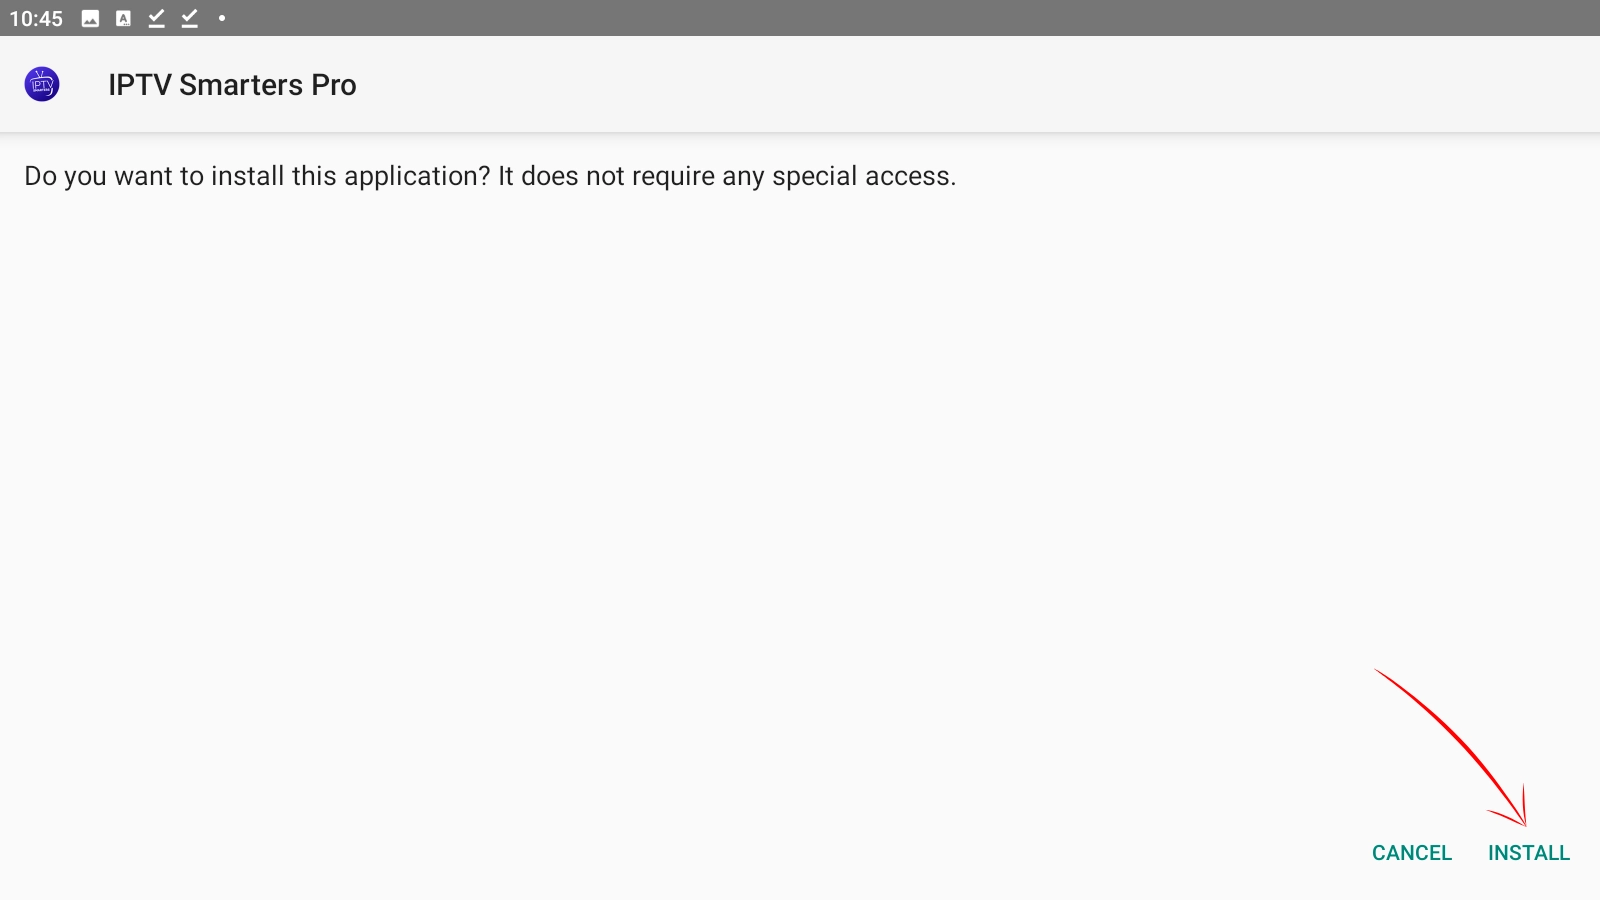
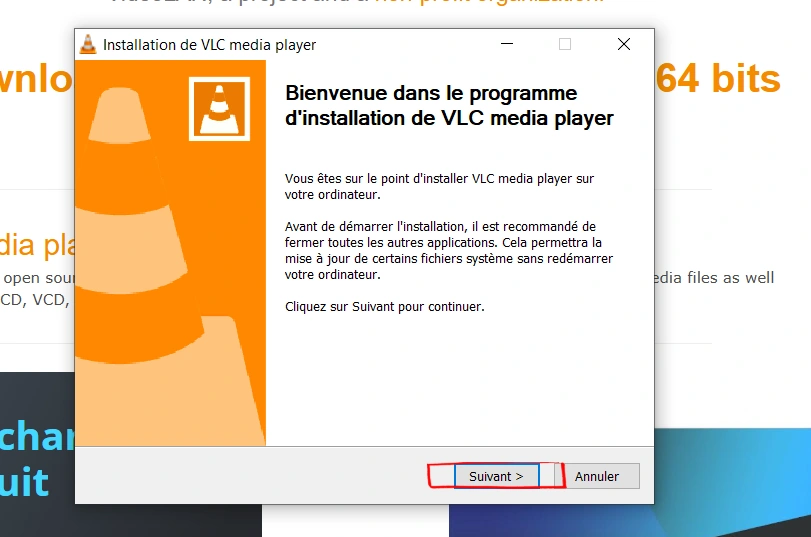
Open the downloaded installer. Click Yes if Windows asks for permission. The setup wizard will run and install IPTV Smarters Pro in about 30 seconds.
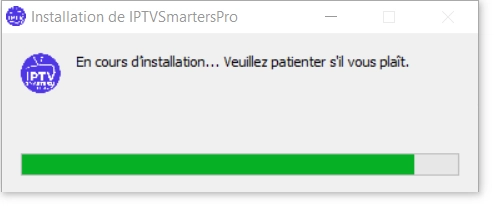
IPTV Smarters Pro is installed on your computer. Keep it open — continue with Part 2 to accept the terms and choose your login method.
Part 2: Accept Terms and Choose Login Method
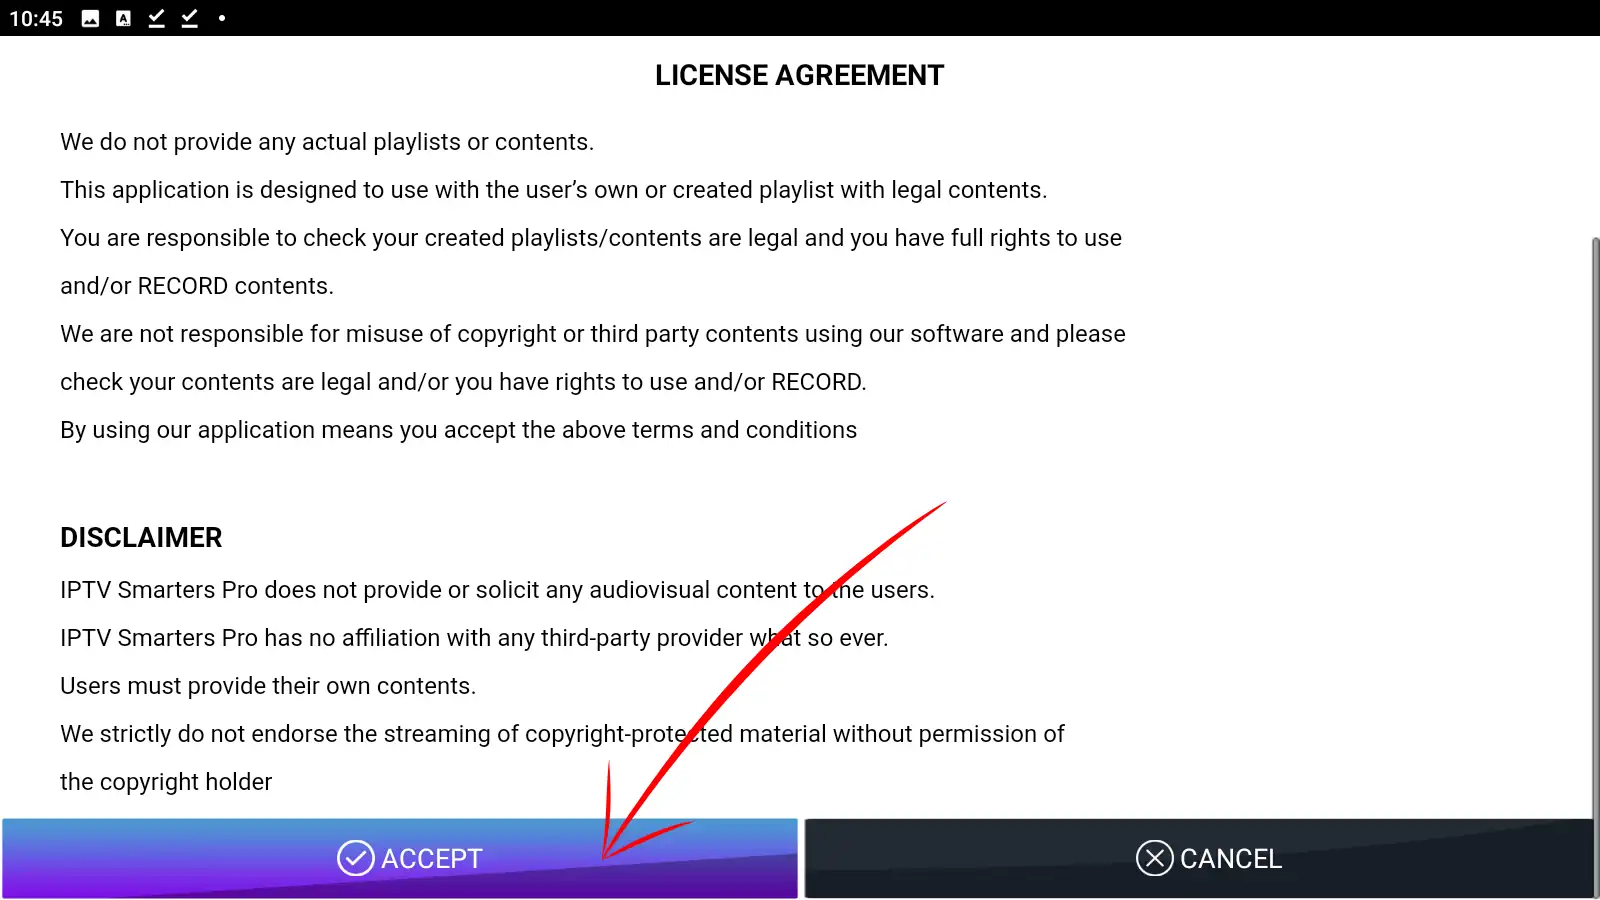
On first launch, IPTV Smarters Pro will ask you to agree to its terms before you can add a playlist. This only happens once.
When IPTV Smarters Pro opens for the first time, a terms and disclaimer screen appears. Read through it and click Accept to continue.
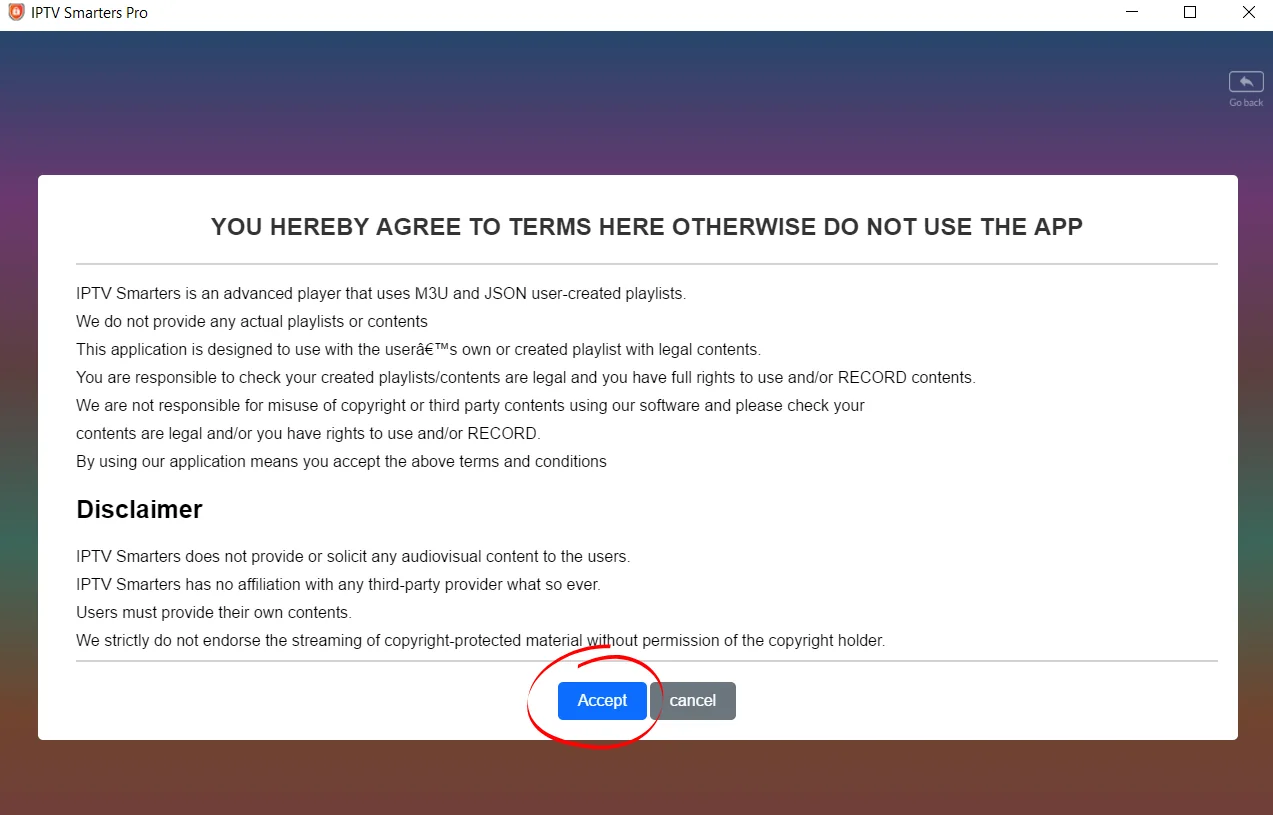
This screen confirms that IPTV Smarters Pro is a player only — it does not provide any channels. You supply your own IPTV subscription.
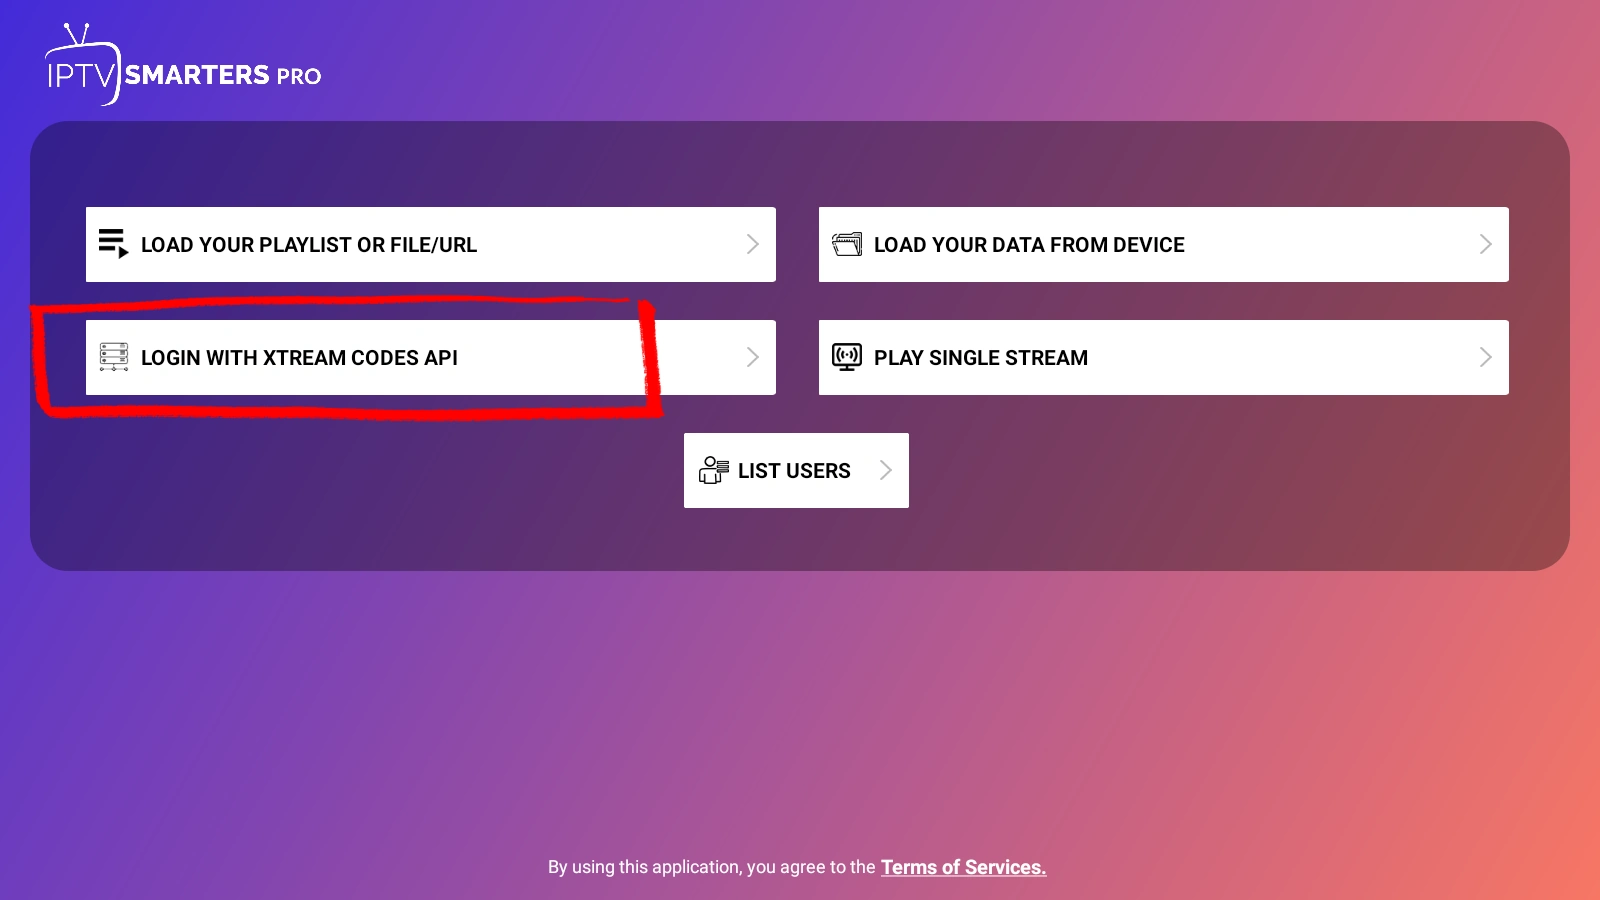
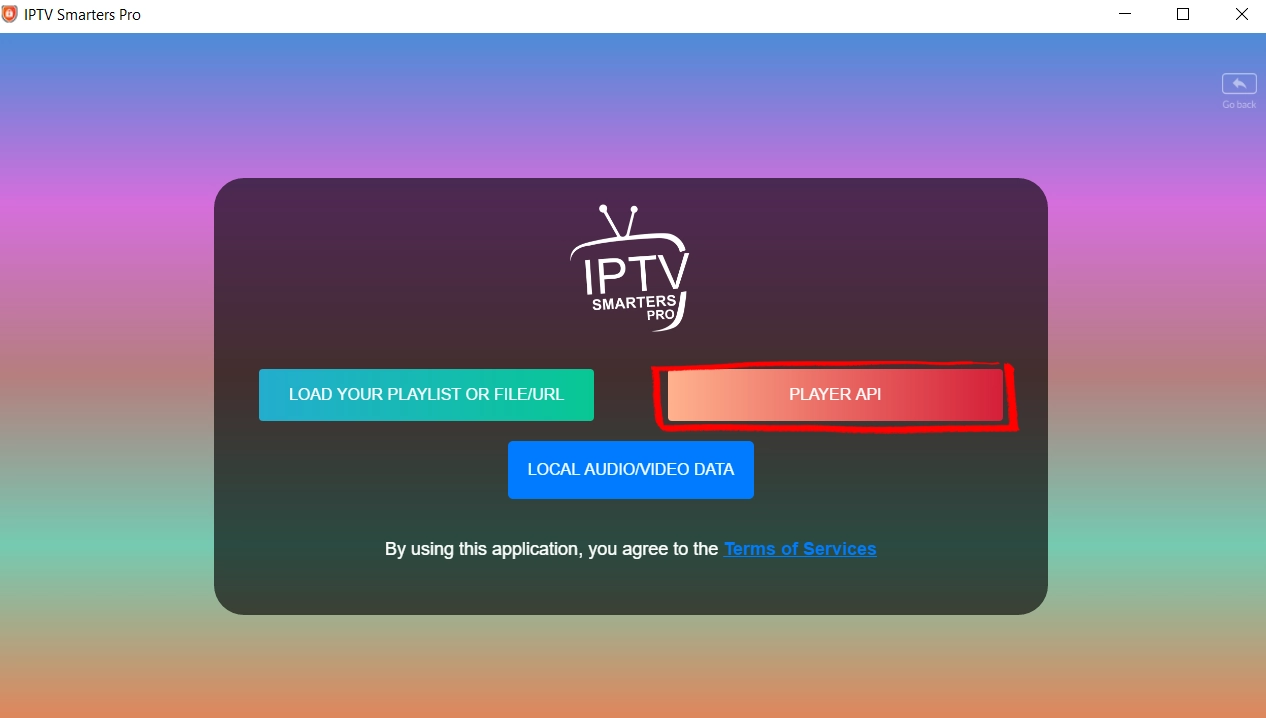
After accepting, you will see three options. Select Player API — this is the Xtream Codes login method and the most reliable way to connect your IPTV service.
You are on the credentials screen. Continue with Part 3 to enter your IPTV details and load your channels.
Part 3: Add Your IPTV Playlist
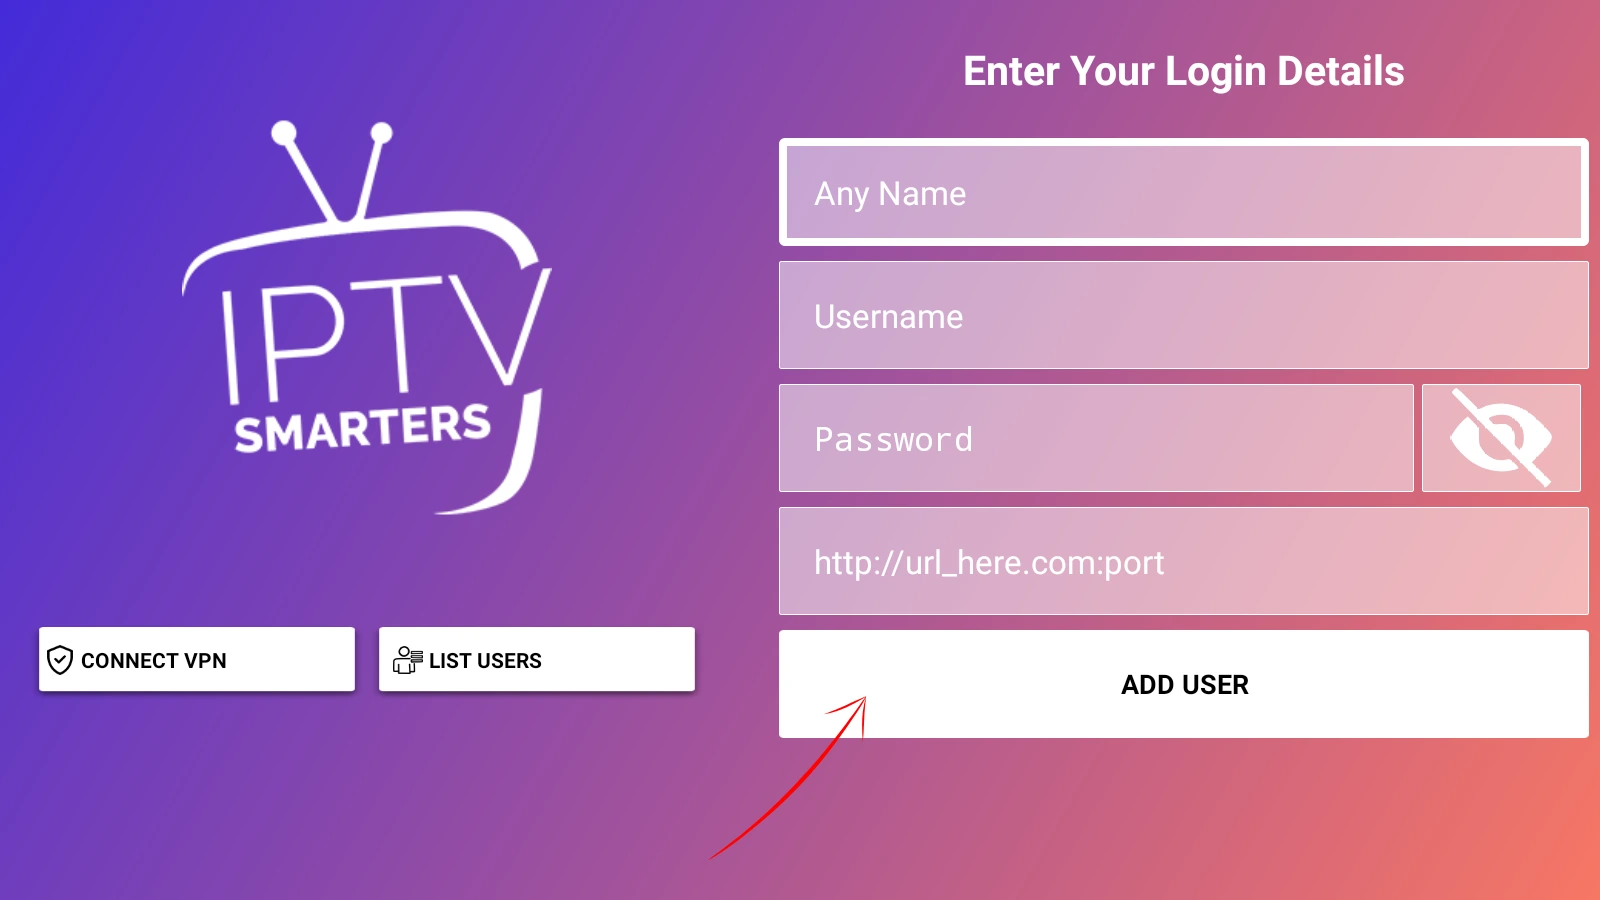
Fill in the login form with your IPTV subscription details:
- Any Name — a label for this profile (e.g. "My IPTV")
- Username — provided by your IPTV service
- Password — provided by your IPTV service
- URL — the full server URL including port (e.g. http://server.com:8080)
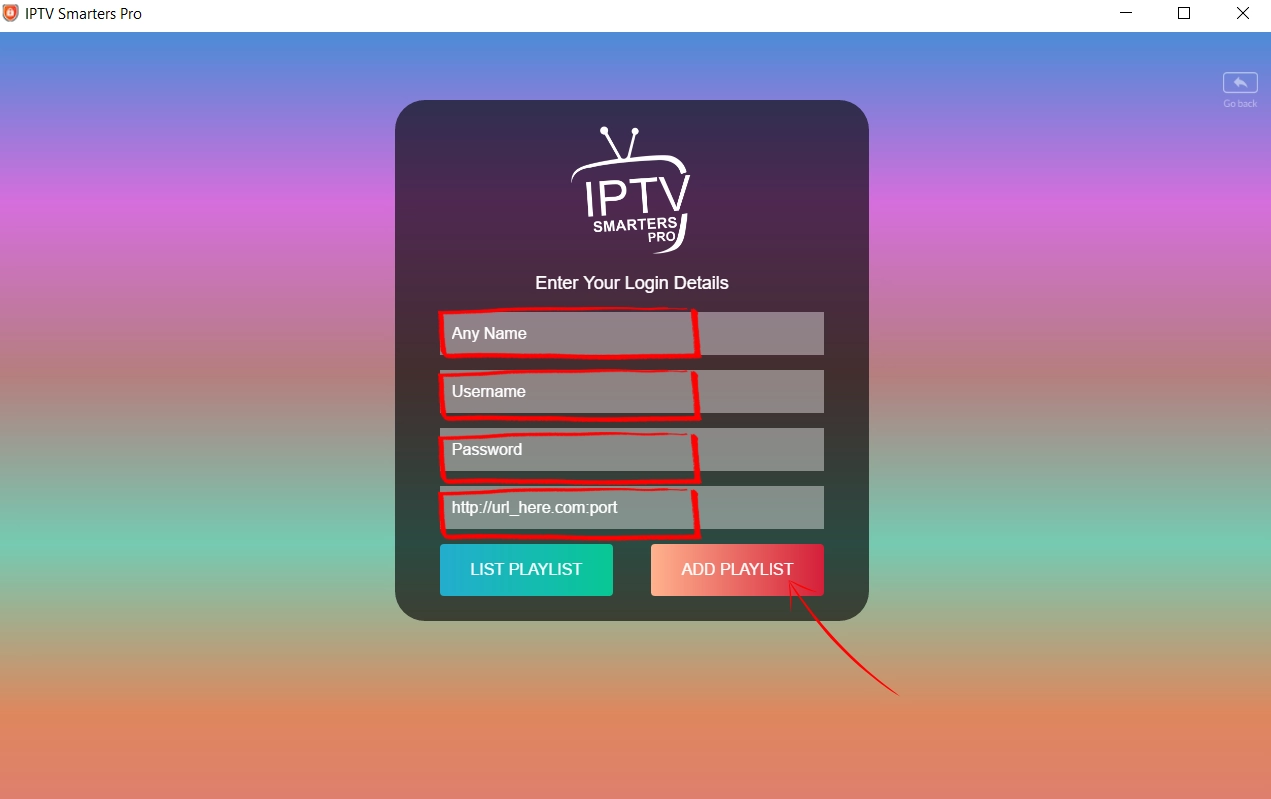
Click ADD PLAYLIST. Wait 30–90 seconds for your channels to load — the time depends on your playlist size.
Once channels have loaded, you will land on the IPTV Smarters Pro main dashboard. From here you can access Live TV, Movies, Series, Catch Up and Multiscreen.
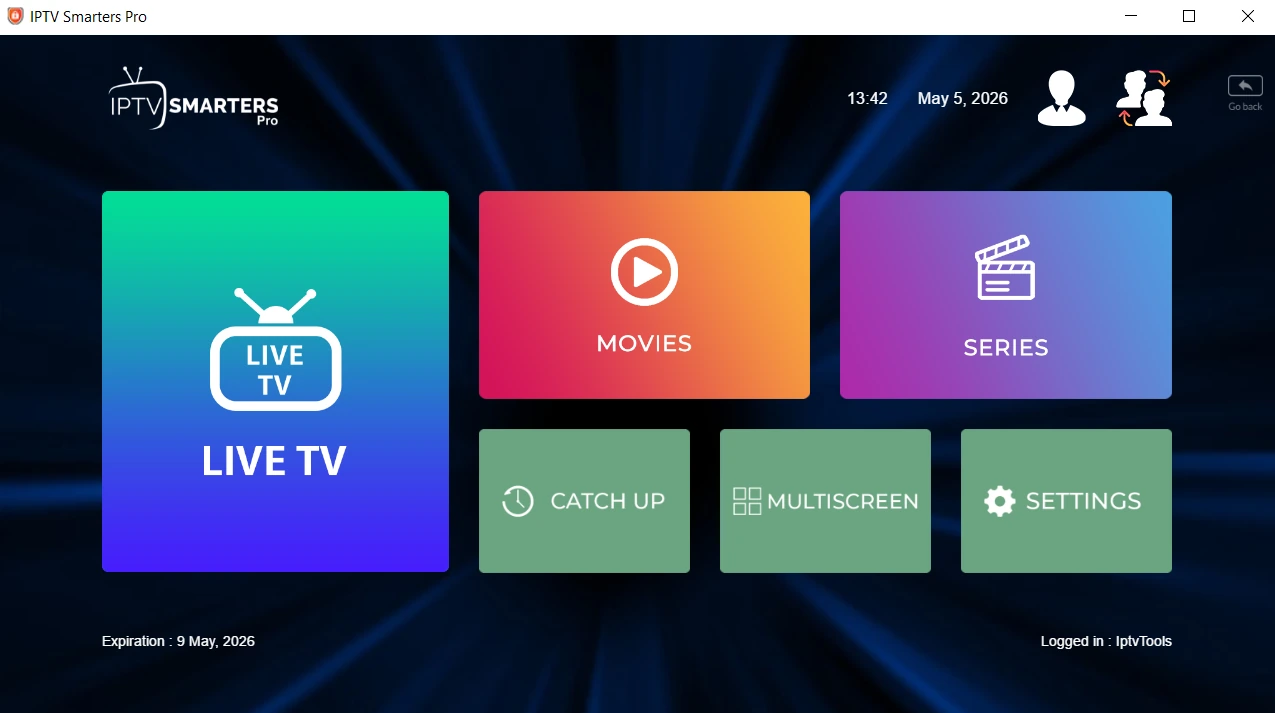
Click Live TV to browse your channels and start streaming.
IPTV Smarters Pro is fully configured on your Windows PC or Mac. Enjoy your IPTV channels on a large screen.
Windows & Mac IPTV — Common Problems & Quick Fixes
Go to System Preferences → Security & Privacy → General. You will see a message about the blocked app — click Open Anyway to allow it. This only needs to be done once.
Credentials are case-sensitive. Copy-paste them directly from your provider's email. Make sure the Server URL includes http:// and the correct port (e.g. http://server.com:8080). Test them with our IPTV Checker.
Wait 1–2 minutes — large playlists with thousands of channels take time. If still empty after 3 minutes, double-check your credentials with our IPTV Checker.
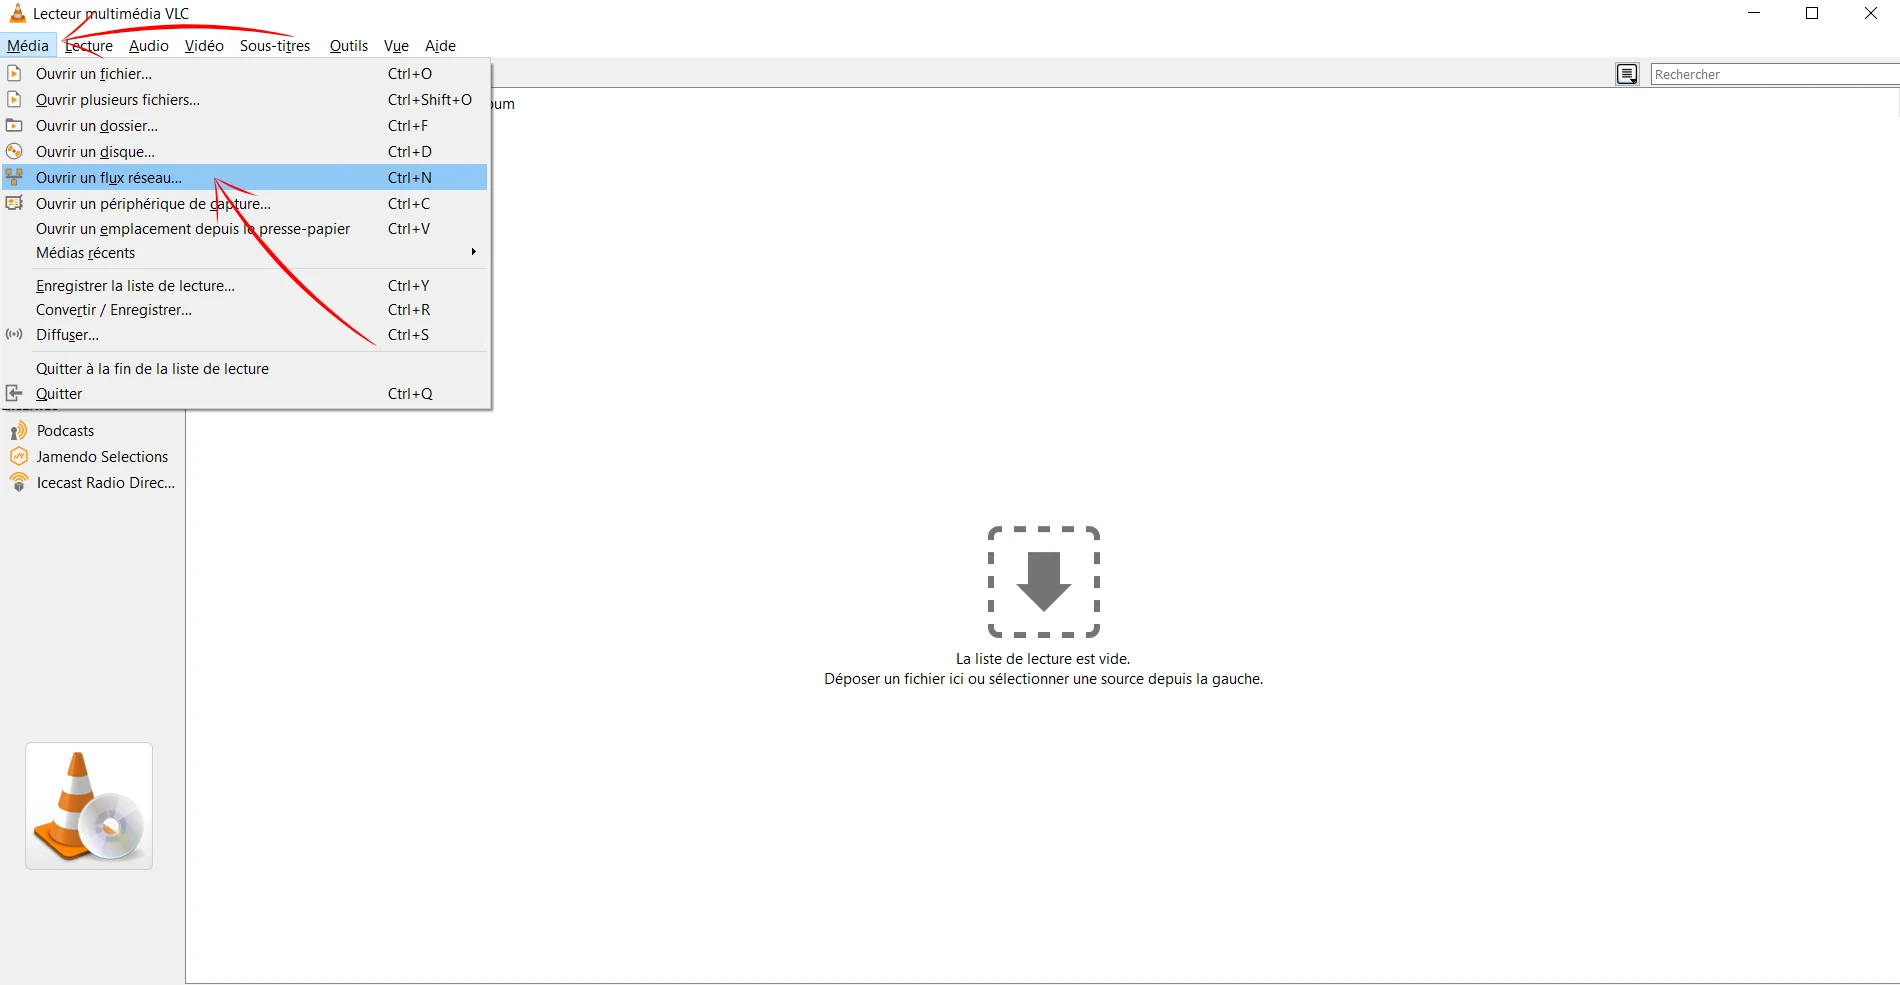
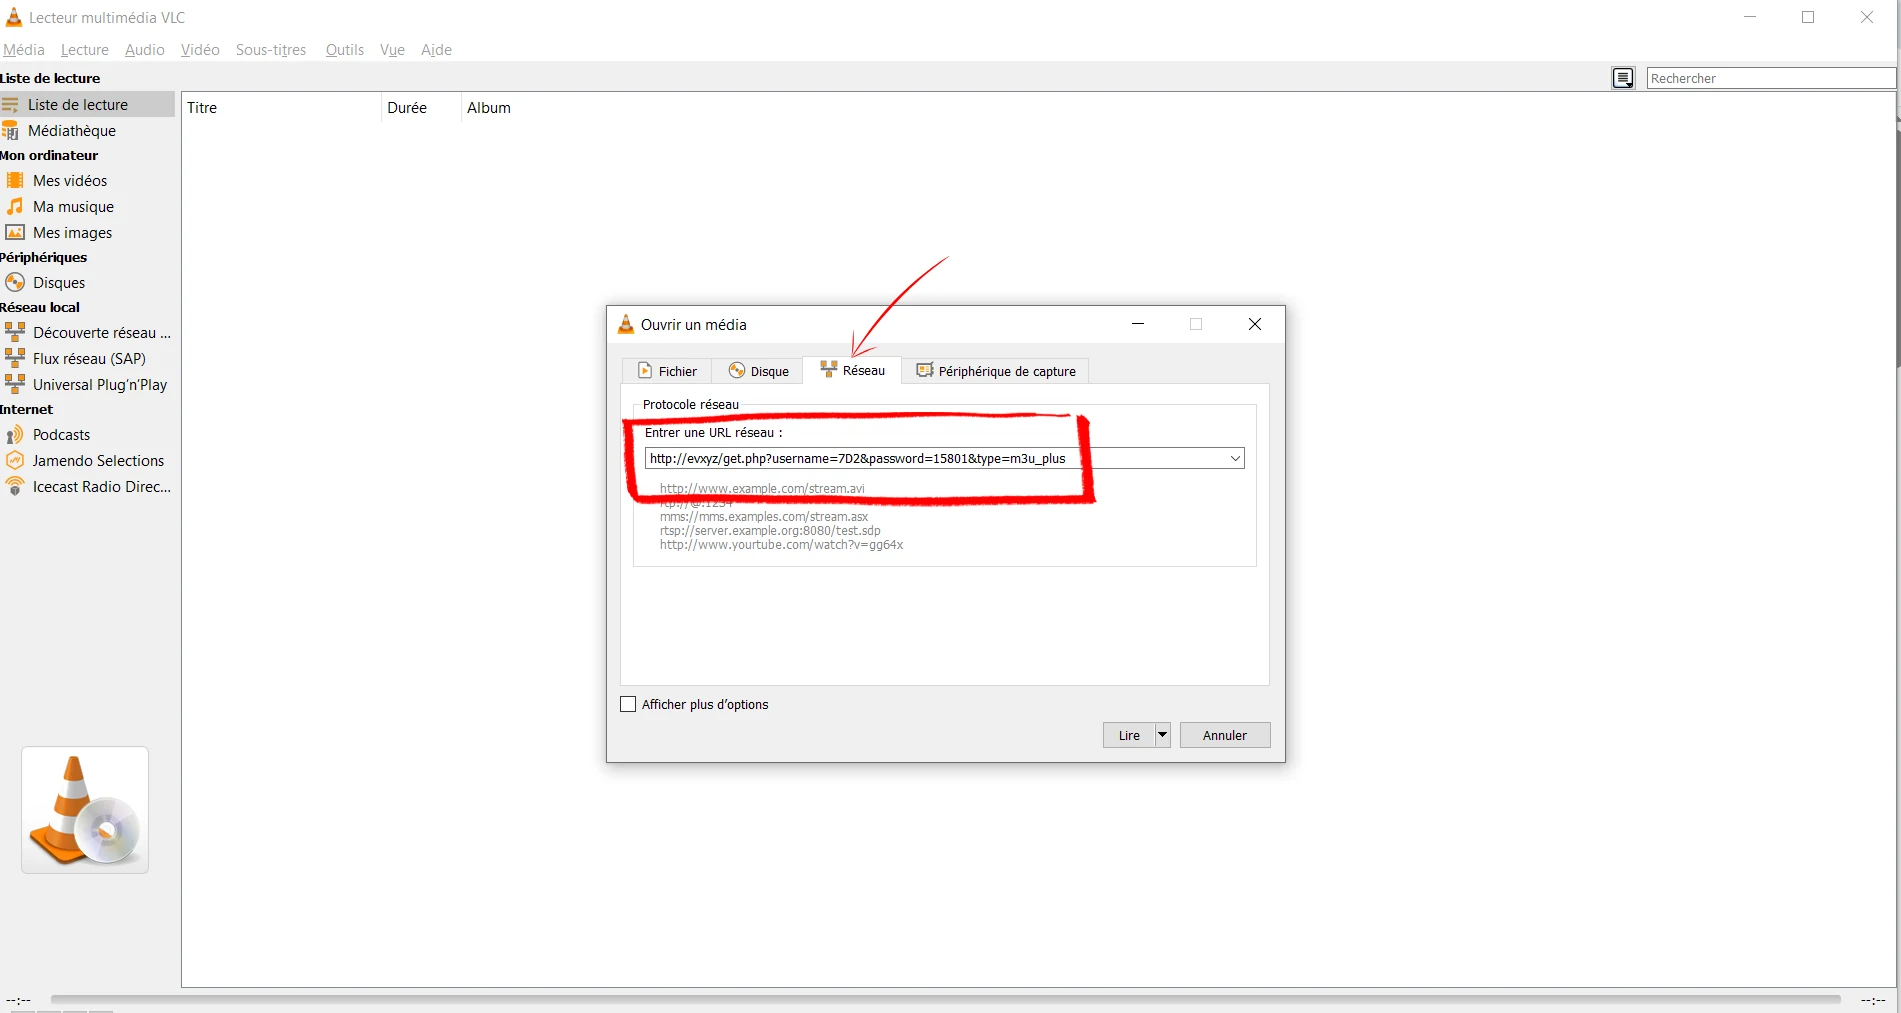
In IPTV Smarters Pro go to Settings → Player Settings and increase the buffer. For VLC go to Tools → Preferences → Input/Codecs and increase the network caching value. Also check our IPTV Buffering Fix guide.
How to Setup IPTV on Smart TV — Samsung, LG and Sony
▼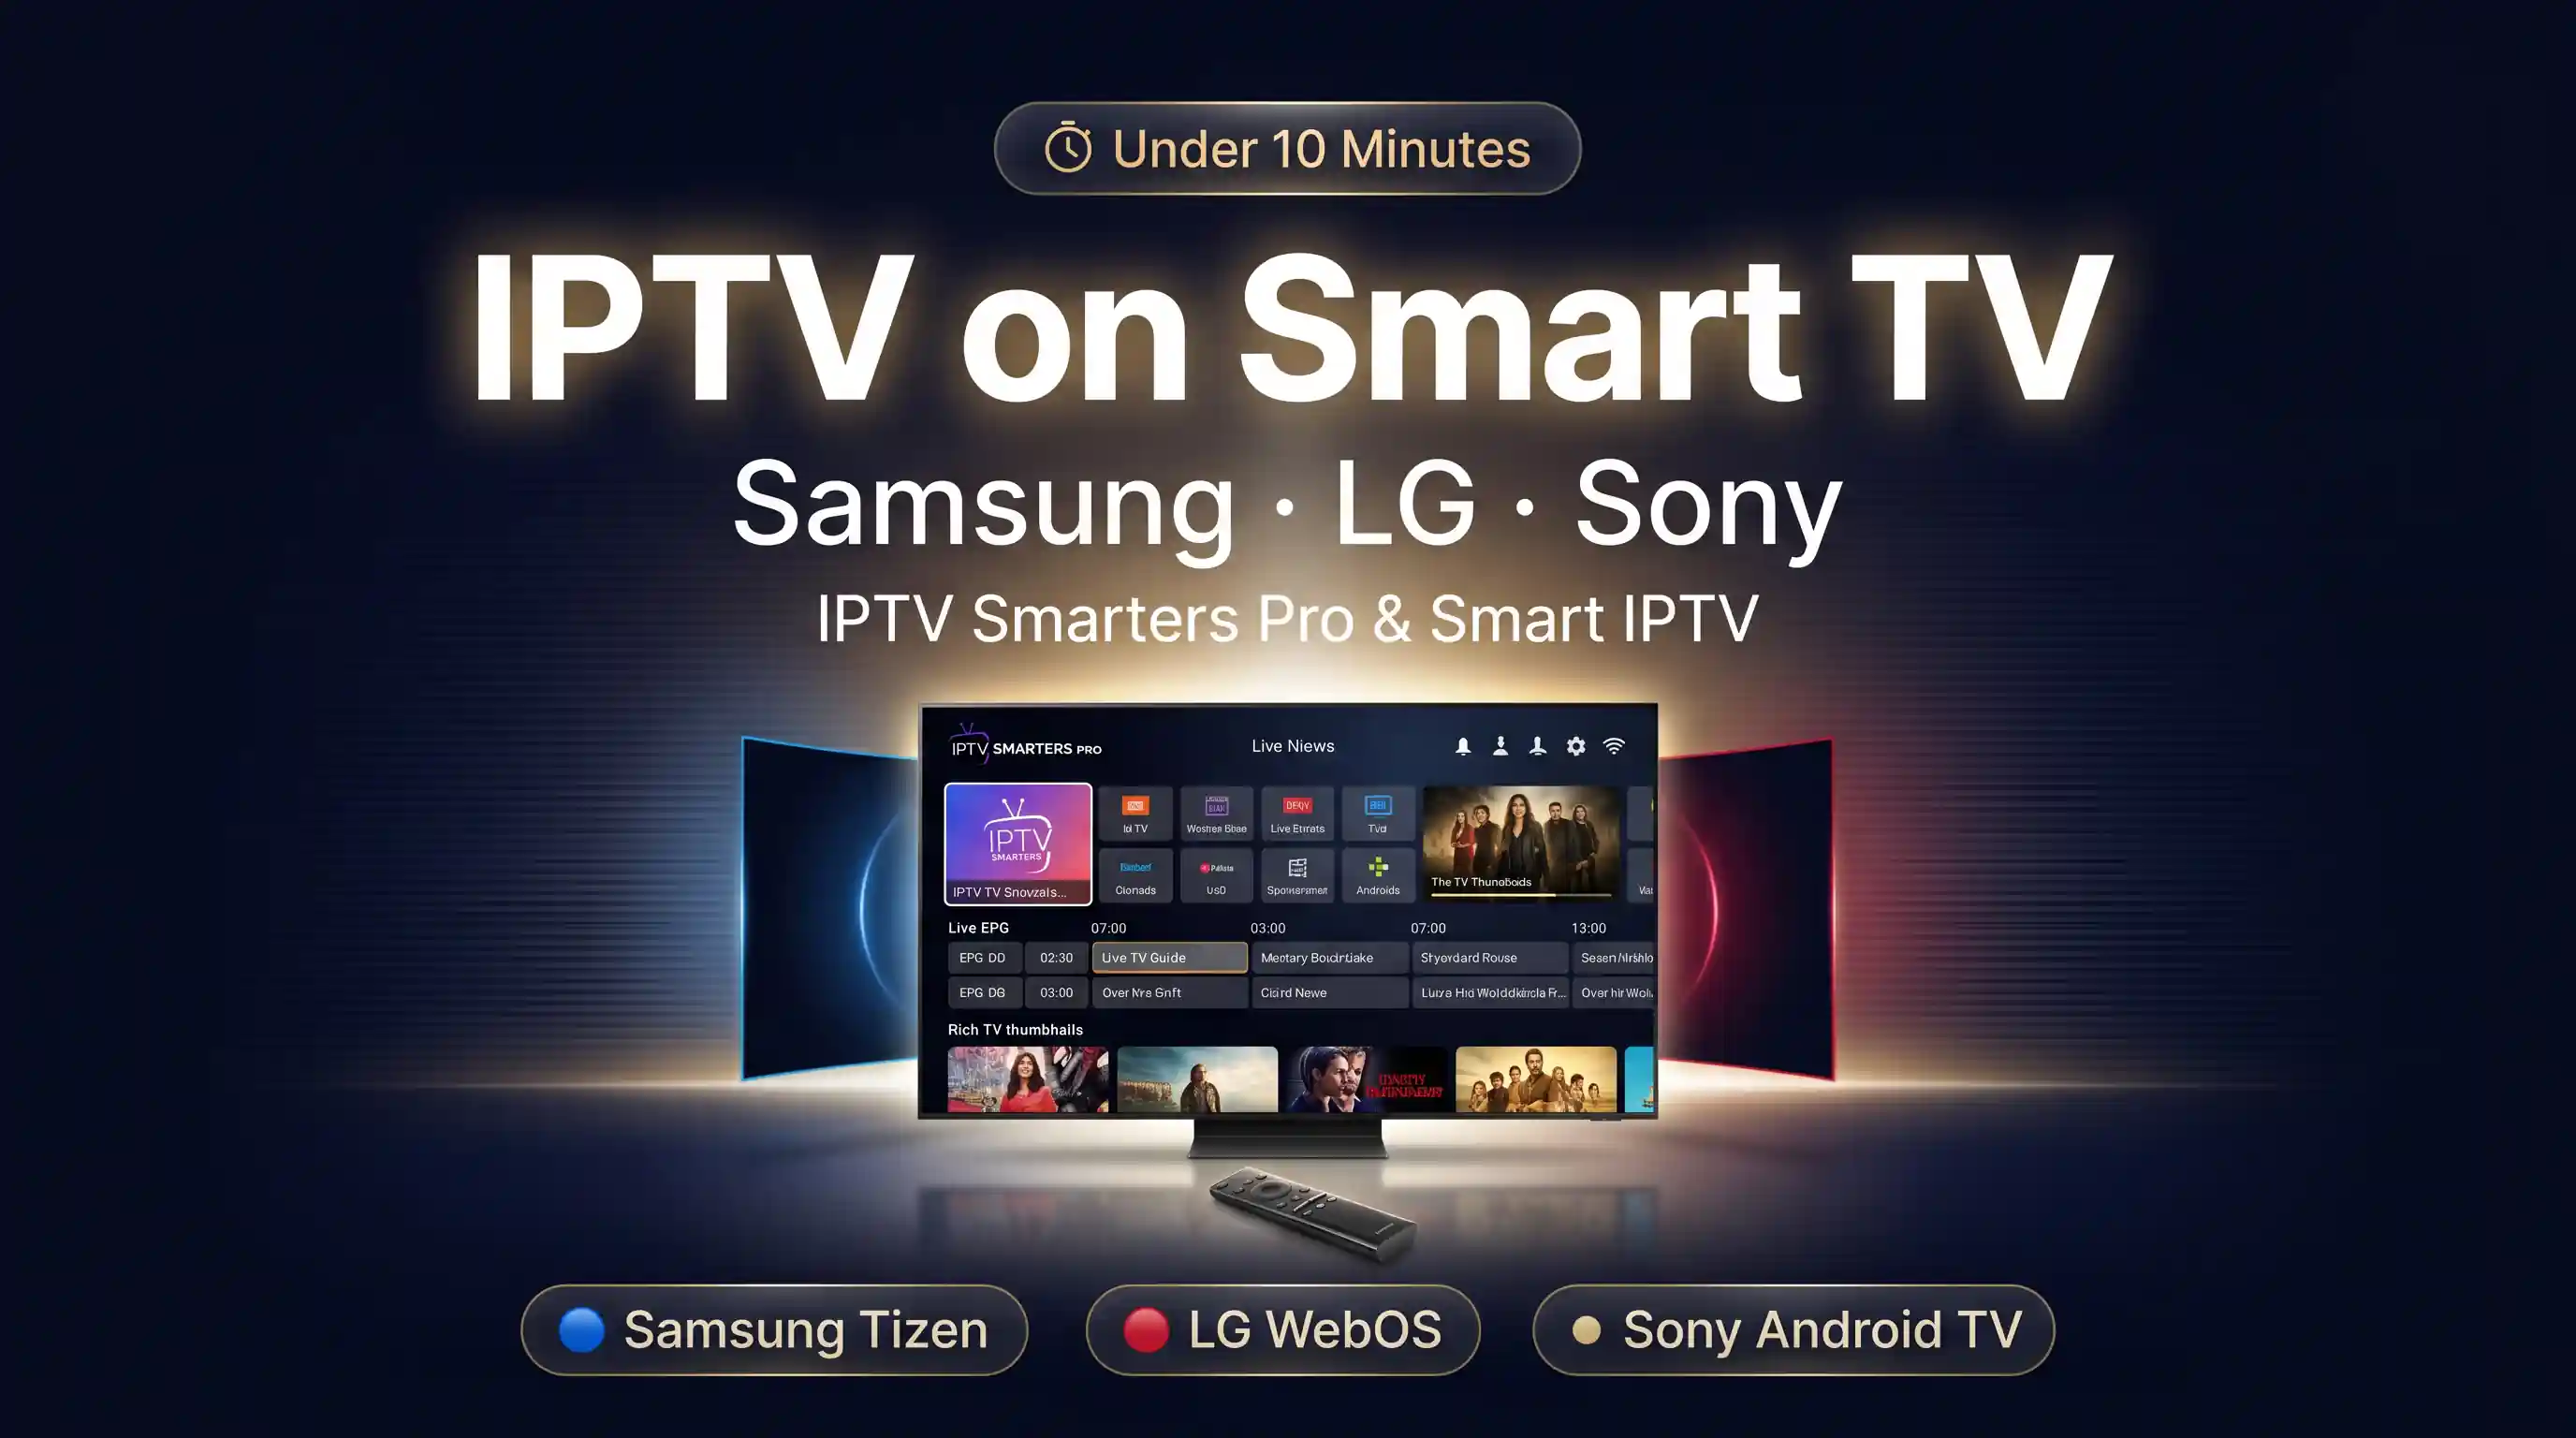
IPTV setup on Smart TV depends on your TV brand. Samsung Tizen and LG WebOS both support dedicated IPTV apps from their official stores — no sideloading or technical setup required. Sony Android TV users follow the Android TV Box method.
There are two methods covered in this guide — choose based on your TV:
| Method | Best For | Time |
|---|---|---|
| IPTV Smarters Pro | Samsung Tizen · LG WebOS · Sony Android TV | 5–8 min |
| Smart IPTV (siptv.app) | Samsung Tizen · LG WebOS | 8–12 min |
Available directly from Samsung App Store and LG Content Store. Recommended for most users — fastest setup, no configuration required.
Official Smart IPTV app. Requires uploading your M3U playlist to siptv.app via MAC address. One-time activation fee of ~€5.49 after 7-day trial.
👇 Select your preferred method
Method 1: IPTV Smarters Pro on Samsung and LG Smart TV
IPTV Smarters Pro is the easiest way to get IPTV running on a Smart TV. It installs directly from the Samsung App Store or LG Content Store in seconds, supports both Xtream Codes and M3U, and requires no technical configuration.
Part 1: Install IPTV Smarters Pro
On Samsung: press the Home button on your remote and navigate to the Apps section. On LG: press the Home button and open the LG Content Store. Both are accessible directly from the home screen without any extra setup.
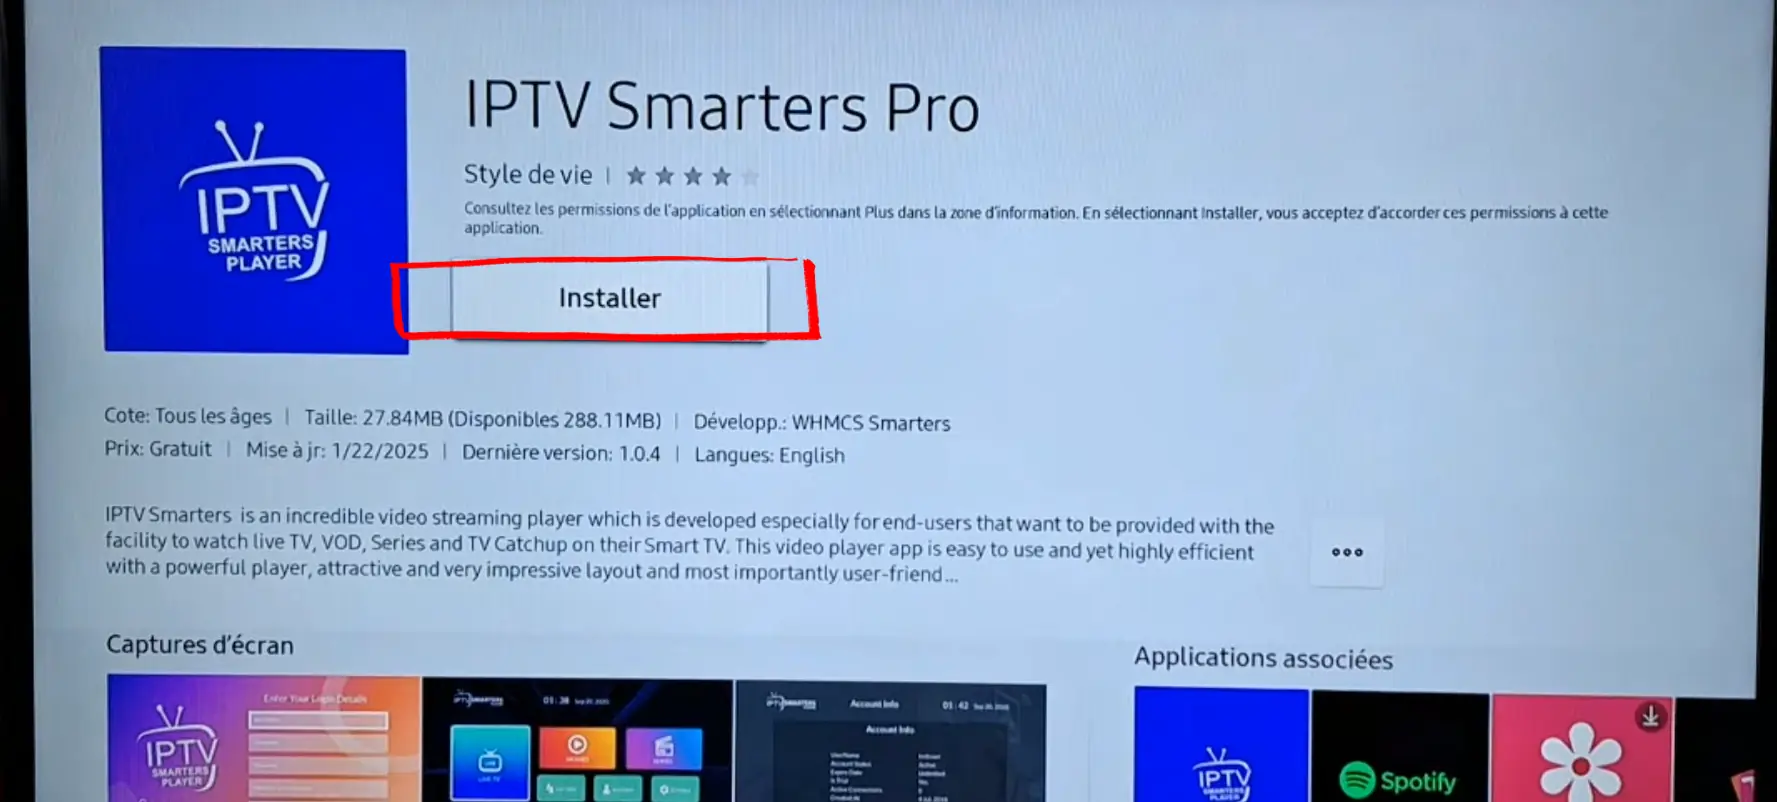
In the search bar, type "IPTV Smarters Pro" and select the app by WHMCS Smarters. Press Install (or Installer on French-language TVs). The app is free and weighs approximately 27MB.
IPTV Smarters Pro is installed on your Smart TV. Open it to continue with Part 2.
Part 2: Add Your IPTV Playlist
Launch IPTV Smarters Pro from your TV's app list. On the home screen you will see several options for loading your IPTV content. Using your remote, select Login with Xtream Codes API.
This is the recommended method — it connects directly to your IPTV provider's server using your credentials and loads your full channel list, VOD and series automatically.
Using the on-screen keyboard and your remote, fill in the login form:
- Any Name — a label for this profile (e.g. "My IPTV")
- Username — provided by your IPTV service
- Password — provided by your IPTV service
- Server URL — the full address including port (e.g. http://server.com:8080)
/iptv-smarters-pro-enter-playlist-details-xtream-credentials.webp)
Confirm and press ADD USER. Your channel list will begin loading immediately — this typically takes 1–2 minutes for large playlists.
Once loaded, IPTV Smarters Pro organises your content into categories automatically — Live TV, Movies, Series and Catch-up. Use the directional buttons on your remote to navigate between groups and channels.
Use the OK button to select a channel, and the Back button to return to the channel list.
IPTV Smarters Pro is running on your Smart TV. Your channels, movies and series are ready to watch.
Smart TV IPTV — Common Problems & Quick Fixes
On older Samsung TVs (pre-2019), search under the Video category. If still unavailable, check if your TV's firmware is up to date in Settings → Support → Software Update.
Make sure you submitted the correct MAC address on siptv.app/mylist. The MAC is case-sensitive. After submitting, fully close and reopen the app on your TV — it does not refresh automatically.
Smart TVs are more sensitive to network speed than phones. Connect via Ethernet cable if possible. Use our IPTV Buffering Test to diagnose your connection speed.
In IPTV Smarters Pro, go to Settings → EPG and enter your provider's EPG URL. In Smart IPTV, the EPG is loaded from the tvg-id attribute in your M3U playlist — contact your provider if EPG is missing.
Credentials are case-sensitive. Use our free IPTV Checker to verify your server URL, username and password before re-entering them in the app.
LG WebOS does not support UDP, RTP or RTMP stream types natively. Ask your provider for HTTP or HLS stream URLs instead. If you need multicast streams, contact your provider for a UDPXY proxy URL.
Best Free IPTV Tools to Use with Your Setup
IPTV Checker
Before you start — verify your M3U URL or Xtream Codes credentials are working. Shows server status, latency, channel count and expiry date in seconds.
M3U to Xtream Converter
Only have an M3U URL? Convert it to Xtream Codes credentials (server URL + username + password) to use with TiviMate, IPTV Smarters Pro and all major apps.
Channel Viewer
Browse your full IPTV channel list by category, search by name, and download a clean M3U playlist directly from your Xtream Codes server.
IPTV Speed Test
Check if your internet connection meets the minimum speed for HD and 4K IPTV streaming. Diagnose buffering issues before they happen.
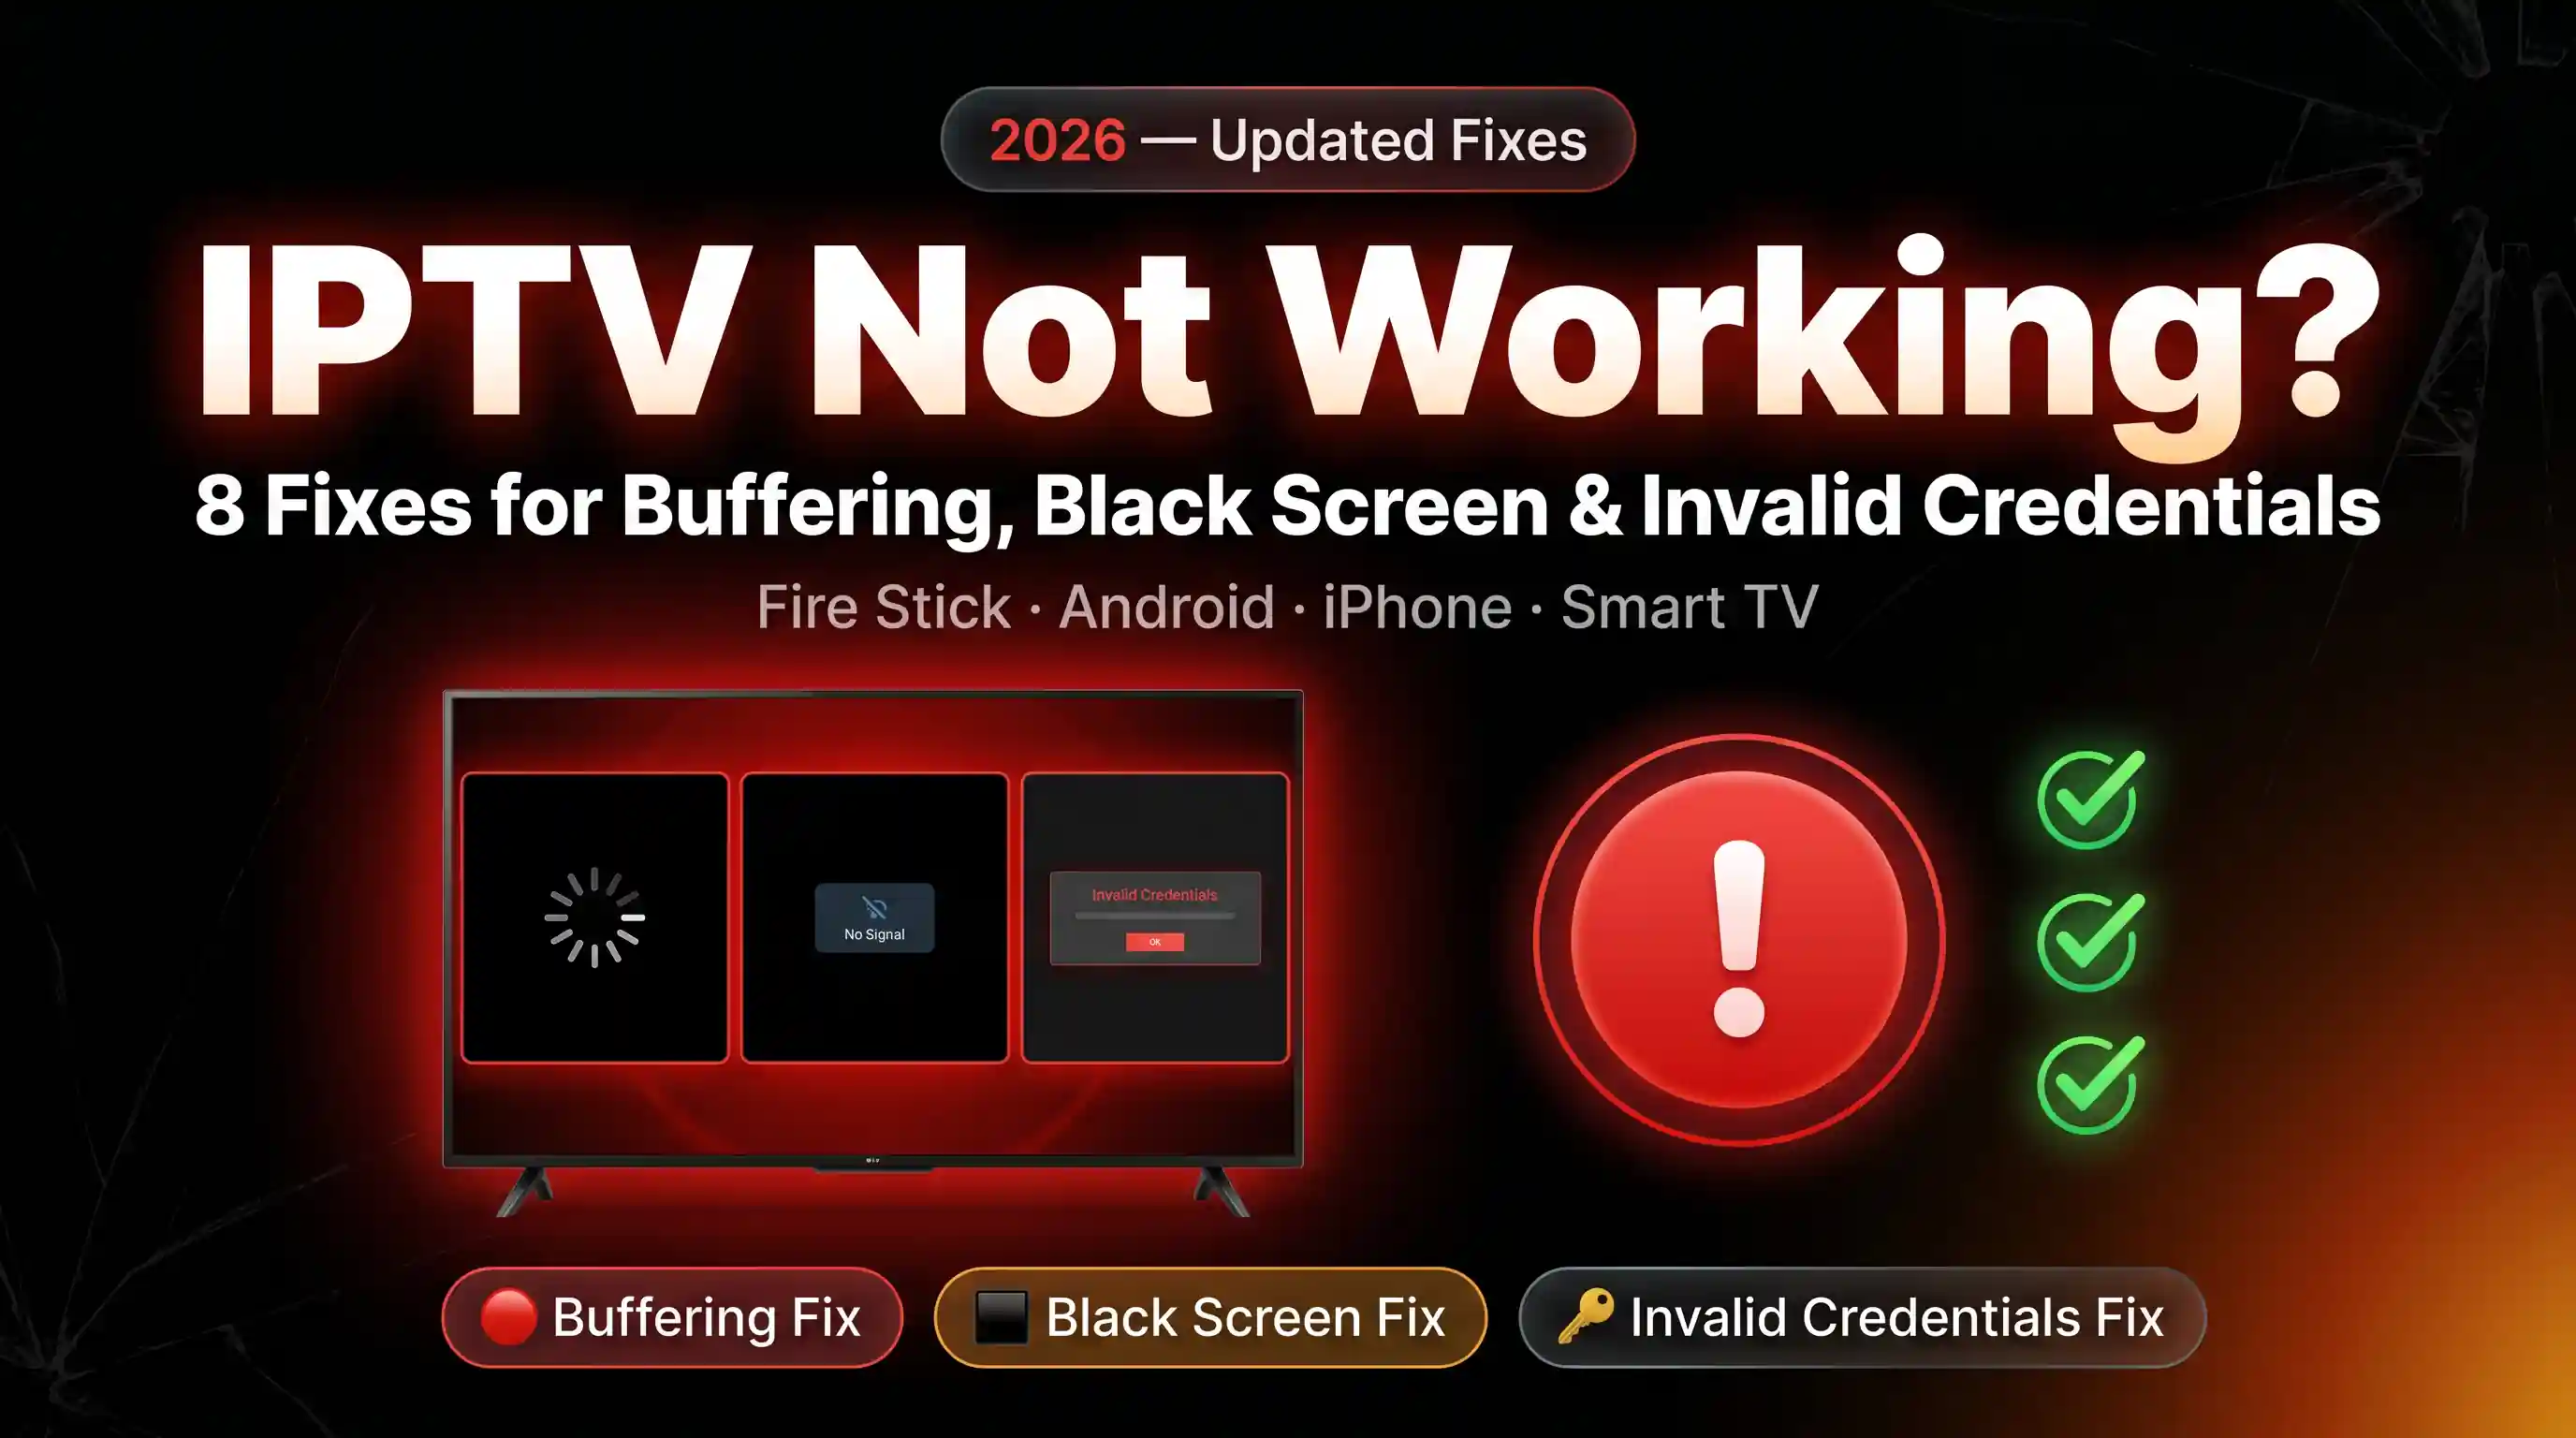
IPTV Not Working After Setup? Quick Fixes
Server URL, username and password are all case-sensitive. Copy-paste them directly from your provider's welcome email. Use our IPTV Checker to confirm they work before re-entering them in TiviMate or Smarters.
You need at least 15 Mbps for stable 1080p. Switch to wired Ethernet, increase the buffer to 30 seconds in TiviMate (Settings → Playback) or Smarters (Settings → Player), and close other apps using bandwidth.
Large playlists (10,000+ channels) take 2–3 minutes to load on first launch. If still empty after 5 minutes, your M3U URL may have expired or your credentials are wrong — verify with our IPTV Checker.
Some IPTV providers block known VPN IP ranges. Try switching to a different VPN server location, or temporarily disable the VPN to confirm it's the cause. Split tunneling can help — exclude your IPTV app from the VPN tunnel.
In TiviMate go to Settings → EPG and enable auto-update. In IPTV Smarters go to Settings → EPG and enter your provider's EPG URL. EPG can take 5–10 minutes to populate on first load.
Clear the app cache and update to the latest version. On Fire Stick: Settings → Applications → Manage Installed Applications → TiviMate → Clear Cache. Restart your device and router after clearing.
Minimum Internet Speed for IPTV Streaming
| Quality | Resolution | Min Speed | Recommended | Best For |
|---|---|---|---|---|
| SD | 480p | 3 Mbps | 5 Mbps | Mobile data, older Android phones |
| HD | 720p | 5 Mbps | 10 Mbps | iPhone, iPad, Android tablet |
| Full HD | 1080p | 10 Mbps | 20 Mbps | Fire Stick, Android Box, Smart TV |
| 4K | 2160p | 25 Mbps | 50 Mbps | 4K Smart TV, Nvidia Shield, Apple TV 4K |
Frequently Asked Questions About IPTV Setup
No, you do not need a VPN to use IPTV. People still run one for two reasons. First, some ISPs throttle streaming traffic, and a VPN gets around that — if your connection is fast but IPTV keeps buffering, this is often the cause. Second, a VPN hides your streaming activity from your ISP, which some people prefer. One thing to watch: some IPTV providers block known VPN IP ranges, so streams stop loading. If that happens, switch the VPN server or turn on split tunneling and exclude the IPTV app. Whatever VPN you pick, make sure it has fast servers and no bandwidth cap, otherwise it will just become the new bottleneck.
Depends on the device. On Fire Stick or Android TV, TiviMate wins. The interface is built for a TV screen, the EPG scrolls smoothly, and Premium ($5.99/yr) adds recording and multi-view if you need them. On a phone or a Smart TV, IPTV Smarters Pro is the easier choice: it is free, handles multiple playlists, and installs straight from the Play Store or Samsung/LG App Store (no sideloading). On iPhone or iPad, TiviMate is not an option at all, so you go with Smarters Player Lite. Honest answer: most people who own a Fire Stick end up on TiviMate. Most people who don't, end up on Smarters.
TiviMate. It is built for TV screens, the EPG actually works, and it handles both Xtream Codes and M3U without complaining. The free version covers one playlist, which is fine for most people. Premium (around $5.99/year) gets you multi-playlist, recording, and multi-view if you need them. If you would rather not pay anything, IPTV Smarters Pro is a solid second pick.
An M3U URL is a static playlist file containing all your channel stream links in one URL. Xtream Codes is an API-based system using a server URL, username and password — it dynamically loads your channels and provides extra data like expiry date, VOD and series. Xtream Codes is more reliable: it updates automatically when your provider changes servers, and apps like TiviMate handle it better than M3U.
No jailbreak needed. Install Smarters Player Lite from the App Store — it's free, developed by WHMCS Smarters (same developer as IPTV Smarters Pro on Android), and works on iPhone, iPad and Apple TV running iOS 13 or later. Open the app, tap Add Playlist, select Xtream Code, enter your server URL, username and password, then tap Add User.
Yes, but it depends on your IPTV provider's simultaneous connection limit. Most plans allow 1 to 3 streams at the same time. Exceeding the limit usually results in a "max connections reached" error in TiviMate or Smarters. TiviMate Premium covers 5 devices under one license — but each device still counts as one connection against your provider's limit.
A fast speed test does not mean smooth IPTV. The usual culprit is ISP throttling — some providers slow streaming traffic specifically, even when other traffic flies. Other possibilities: WiFi flaking out, or the IPTV server itself being overloaded. Fixes worth trying, in order: plug in over Ethernet, bump the buffer up to 30 seconds in your app settings, then try a VPN to see if ISP throttling was it. If your provider gives you multiple server URLs, switch to a different one — that often clears it up too.
TiviMate is free to download and use with one playlist. The free version covers basic live TV playback. TiviMate Premium costs ~$5.99/year or ~$33.99 lifetime and unlocks: multiple playlists, PVR recording, advanced EPG, multi-view (up to 9 channels), and full UI customization. One Premium license covers 5 devices simultaneously.
Use our free IPTV Checker — enter your Xtream Codes server URL, username and password, and it will instantly show your subscription expiry date, active connections, server latency and total channel count. No app installation required, works directly in your browser.
The TiviMate short code for the Downloader app on Fire Stick is 272483. Enter this in the Downloader URL field and press GO — it redirects to the latest TiviMate APK download automatically. If the code doesn't work, enter the full URL: https://tivimate.com/ instead.
IPTV technology itself is completely legal. Apps like TiviMate and IPTV Smarters Pro are legal media players — they don't provide any channels themselves. What matters is the source of your content. A legitimate IPTV subscription from a licensed provider (like a cable replacement service) is legal. Subscriptions that provide access to premium channels without proper licensing are not. See our full breakdown: Is IPTV Legal? US, UK & EU Laws Explained.
For most people, the Amazon Fire Stick 4K. It is around $50, runs TiviMate without a fight, and handles 4K HDR. If you have a huge playlist (10,000+ channels) or want the snappiest interface, the Nvidia Shield Pro is faster but costs five times more. The Google TV Stick sits in the middle on price and is fine if you mostly stream. And if you already own a Samsung or LG Smart TV, you don't strictly need a streaming stick at all — IPTV Smarters Pro is in the Samsung Tizen and LG WebOS app stores.
IPTV (Internet Protocol Television) delivers TV channels, movies and series over your internet connection instead of a cable or satellite signal. Your IPTV provider hosts the streams on their servers. When you open an app like TiviMate or IPTV Smarters Pro and enter your credentials, the app connects to the server and streams the content directly to your device. You need a stable internet connection (10+ Mbps for HD) and an active IPTV subscription with either Xtream Codes credentials or an M3U playlist URL.
IPTV usually wins on price and content. A typical IPTV plan runs $10 to $20 a month versus $80 to $150 for cable, and you get more channels plus VOD and catch up TV on top. It also works on whatever device you already own — phone, Smart TV, Fire Stick, laptop. The trade-off is reliability. Cable just works; IPTV quality depends on your internet and how solid the provider's servers are. If your connection is slow or you need rock-solid uptime (sports bar, kids' TV during the workday), cable is the safer bet. Everyone else, IPTV.
Five things to check before paying anyone. One: does the provider offer a free trial? Any legitimate one gives you 24 to 48 hours to test the streams. Two: do they support Xtream Codes? TiviMate and most modern apps need it. Three: how many channels, and does the EPG actually load? You want 10,000+ channels with a working guide, not just a big number. Four: server uptime. Anything below 99% means weekly outages. Five: support. When the server goes down at kickoff, you want someone who answers. And before you commit, paste your trial credentials into our IPTV Checker — it takes 10 seconds and tells you whether the server is real, how many connections you are allowed, and when the trial expires.